Diy backcountry tipi help

Bowtech1

Lil-Rokslider
Joined
Apr 25, 2015
Messages
164
Location
NW Montana
I am in the process of putting together my own 8 sided back country tipi. Have done a bunch of research and feel like I have it figured out for the most part. I have seen mention of “deflection” and “catenary curve” and I think I have it figured out but not 100% confident in it. If someone could explain the process and purpose to me it would be appreciated! From what I’ve gathered it is to keep the panels tight? Thank you
 

Beendare

WKR
Joined
May 6, 2014
Messages
8,304
Location
Corripe cervisiam
I know the arguments for the catenary cut. I don’t like it and I don’t think you need it. Plus it eats up perimeter floor space.

I built one with straight seams and my Tipi took 60 mile an hour winds in Alaska last year no problem.
 
OP
Bowtech1

Bowtech1

Lil-Rokslider
Joined
Apr 25, 2015
Messages
164
Location
NW Montana
Thank you for the response, as long as it is not required to have a functional tipi I will probably go ahead without the cat cuts. I guess I just don’t know enough about what they are or what their purpose is.
 

Beendare

WKR
Joined
May 6, 2014
Messages
8,304
Location
Corripe cervisiam
Well to expand on the cat cut; I had a SL5 which is the cat cut- meh. I can get my straight cut seams very tight. With the SL5 it felt springy when you cranked on it. I don't even use the guy loops on my tipi....but had to on the SL5.

I think the key to this is just keeping the seams straight. If I were doing another I would worry less about following the pattern...and just fold and go keeping the seam straight- do that and the panels should take care of themselves even if they aren't dimensionally perfect. Its all about straight and smooth fabric between the panels.

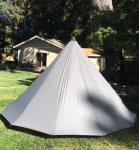
So this is a pic of mine-first pitch. There are a couple spots where the fabric doesn't lay perfectly flat. I was overly concerned about following the pattern....where if I would have just concentrated on smooth panels and straight seams....It would have been faster and probably a little better. Thats my take....but factor in I'm not a professional seamstress....in fact I better not even think about quitting my day job- grin
first pitch.jpg
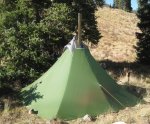
most of those little ripples you see come out when I stake it right. Where the cat cut tipis need the stakes out away from the perimeter a little....the straight cut benefit from the stakes in a straight line with the seam. In this pic of mine the stakes are a little too far out....bring them in and it tightens right up all except for one panel.

The SL5 cat cut tipi
tipi reduced.jpg
 
Last edited:
OP
Bowtech1

Bowtech1

Lil-Rokslider
Joined
Apr 25, 2015
Messages
164
Location
NW Montana
I greatly appreciate it! I wanted to make sure cat cuts weren’t required and I got my answer. I will move forward with the straight seams.
 

JoshT

FNG
Joined
Feb 18, 2018
Messages
14
Location
Alberta, Canada
Well to expand on the cat cut; I had a SL5 which is the cat cut- meh. I can get my straight cut seams very tight. With the SL5 it felt springy when you cranked on it. I don't even use the guy loops on my tipi....but had to on the SL5.

I think the key to this is just keeping the seams straight. If I were doing another I would worry less about following the pattern...and just fold and go keeping the seam straight- do that and the panels should take care of themselves even if they aren't dimensionally perfect. Its all about straight and smooth fabric between the panels.

So this is a pic of mine-first pitch. There are a couple spots where the fabric doesn't lay perfectly flat. I was overly concerned about following the pattern....where if I would have just concentrated on smooth panels and straight seams....It would have been faster and probably a little better. Thats my take....but factor in I'm not a professional seamstress....in fact I better not even think about quitting my day job- grin
View attachment 66589
most of those little ripples you see come out when I stake it right. Where the cat cut tipis need the stakes out away from the perimeter a little....the straight cut benefit from the stakes in a straight line with the seam. In this pic of mine the stakes are a little too far out....bring them in and it tightens right up all except for one panel.

The SL5 cat cut tipi
View attachment 66590

What was your total cost to make that? What kind of fabric did you use? Looks awesome!
 

Beendare

WKR
Joined
May 6, 2014
Messages
8,304
Location
Corripe cervisiam
What was your total cost to make that? What kind of fabric did you use? Looks awesome!

I used the RSBTR 1.6oz silpoly here;
1.6 oz Silpoly Ripstop Waterproof Fabric - Ripstop by the Roll

I wanted the 30D over the lighter silpoly at 1.1oz rated at 15D......both work. My 13' dia Tipi is about 3/4 to 1 pound more with that fabric over the lighter stuff.

RSBTR fabrics on sale now......

All in cost for mine was about $200-$220...

depending on size of course...mine was 21 yds as I recall.....so at $6 a yd you are at about $150 for fabric.
 
Top