Day pack planning

pods8 (Rugged Stitching)

WKR
Rokslide Sponsor
Joined
Mar 12, 2014
Messages
3,859
Location
Thornton, CO
MR NICE frame: Day pack planning

Picked up a metcalf pack which I like but I don't want to use that pack body for day hunting. While it condenses down there are way too many straps dangling off it for day use service in my mind, I'd like to take a crack at making a simplified/smaller day pack. Probably in the 20"x11"x6" turf but I'll mock some of that up later with my gear. It will not be covered in molle, etc. if I want more stuff with me I'll just put the metcalf bag on.

My initial main pondering right now is the type of opening to put on it before I start laying out the rest of the details (I'll update the thread with sketches of those down the line), curious pro/con opinions folks have.

I could do a traditional cinch top and lid setup but I don't need the expansion capacity in that area for this pack and then its just another set of straps on it, to get in you need to unclip the lid, open the cinch, etc. Without the lid its a rain/snow collection point. A roll top is also an option but seems slower to get into as well, esp if you're asking a buddy to grab something out of the top of it while you have the pack on. So with that in mind I'm leaning towards zipper access to keep the pack pretty streamlined.

One option for pack body strength is a top perimeter zipper like on a kifaru side pocket, probably simpler to do. Requires digging down into the pack but there would only be half dozen things in there anyways.

SidePocketfront350.jpg


Other option is zipper on the face perimeter so it flaps open (more like a school backpack), could either be full length or perhaps half way down only (I lean towards only coming down half way). Offers more access into the bag, potentially more stress on the zipper but I'd put the side compression straps on the face so it shouldn't pull too much on the zipper.

s-l1000.jpg


One other query is an aesthetic one. My frame is coyote and I could either do this work in coyote or I was also somewhat intrigued by ATACS AU pattern. Seems like it'd go well with the frame and not necessarily be out of place in the CO mountains. I'd just stick with coyote straps on it, not going to chase down special webbing but the fabric cost difference is minimal. Opinions?

s-l1600.jpg


s-l400.jpg
 
Last edited:

WoodBow

WKR
Joined
Jul 21, 2015
Messages
1,754
I vote full perimeter zip. By full i mean down to the bottom on both sides. With two pulls on the zipper you can access any area of the bag without opening the whole zipper. I see no advantage to a half zip besides strength, and like you said, a couple of buckles will handle that.

As far as color, im cheap and solid colors are almost always cheaper. Thats a very personal call on color though. Either will look fine so go witb your preference.
 
OP
pods8 (Rugged Stitching)

pods8 (Rugged Stitching)

WKR
Rokslide Sponsor
Joined
Mar 12, 2014
Messages
3,859
Location
Thornton, CO
Yes 2 zip pulls was a no brainer in my mind. Coming to mind on the half zip is strength but also the pack doesn't puke itself out with the panel folding out too far (esp if on my back and a buddy is grabbing something in the main body out for me but if the lower compression straps aren't released that could be mitigated). Is much really lost though in leaving the bottom 6-10" a zone you have to dig stuff out of? That's were my emergency gear, game bags, back up 1L water bottle would be nestled.

I hear you on cheap (to an extent) but unfortunately coyote isn't really cheap, tan is though. So picking up a couple yards (for some waist pouches, etc. too) of 500d in either coyote or that atacs au is less than $1.5 different. Tan saves a few more dollars.
 

WoodBow

WKR
Joined
Jul 21, 2015
Messages
1,754
And now you know why i made my bag tan instead of coyote which would have matched my frame!

Murphys law says that if i need something, its in the bottom of my bag.

I did not bias tape the seams but i did accomplish the same thing with grosgrain. I lay an iron down on a towel and then pull the grosgrain under it folded in half. This essentially creates bias tape. I did not feel it was necessary but it makes it look professional and does add strength and water resistance. I used 7/8" from walmart.
 
Joined
Mar 16, 2013
Messages
308
Location
Western Washington
Was sketching out a similar project this morning!
I'll be following this one, for sure.

My original plan was a roll top, but now I'm considering zippered.
 

mcr-85

WKR
Joined
May 28, 2014
Messages
1,070
Location
Southern Utah
I like the ACTAC AU as well. I'm making a bag for my bikini frame right now and I made my boy a backpack frame and bag using the extra material I had for my bag.

I postponed getting mine finished and have been working on his since I started it.

Sent from my SM-N910V using Tapatalk
 
OP
pods8 (Rugged Stitching)

pods8 (Rugged Stitching)

WKR
Rokslide Sponsor
Joined
Mar 12, 2014
Messages
3,859
Location
Thornton, CO
Here is kinda what is ratting around in my head at the moment. Normally for day pack mode I don't suspect there is much need to use the compression points from the frame bottom and frame top to the pack face. The pack isn't that thick and its buckled at the bottom rear and the frame is in the sleeve at the top rear so the back of it is tied to the frame sheet well and the side straps should suck up the limited slop in something like a 6" deep pack. This would keep the regular day pack to two sets of side straps.

In meat shelf mode (with the load fitter extension up) I'm wondering if the bottom frame straps are long enough to pass through those webbing slots on the front face and tie into the load lifter buckles, I might need to use accessory straps to make that setup longer and have one long loop compress everything vertically on each side (and pull the load upwards). Either that or perhaps I could put slots on the bottom and top to slip those straps through the pack (against the rear panel) so they'd compresses the rear panel against the load in the meat shelf (as if the rear panel was just a load sling) and again just use the two side straps to suck up the limited slop in the day pack back to the frame.

pack_zpsvzcriw9z.jpg
 
Joined
Mar 16, 2013
Messages
308
Location
Western Washington
My mock up has similar attachment locations. Something to consider may be going to PALS strips down the side of the bag (pretty much exactly where you have the "buckle straps" drawn. You could use G clips on the straps, instead of sewing them to the bag. That way you could adjust how much, or little, of the bag is compressed...
Just a thought. That's the direction I'm leaning towards.
 
OP
pods8 (Rugged Stitching)

pods8 (Rugged Stitching)

WKR
Rokslide Sponsor
Joined
Mar 12, 2014
Messages
3,859
Location
Thornton, CO
My mock up has similar attachment locations. Something to consider may be going to PALS strips down the side of the bag (pretty much exactly where you have the "buckle straps" drawn. You could use G clips on the straps, instead of sewing them to the bag. That way you could adjust how much, or little, of the bag is compressed...
Just a thought. That's the direction I'm leaning towards.

Maybe I'm not picturing things right or we're just talking different ways due to different frames (mine is to use with the NICE frame). The frame has buckles sewn to it on the side that the "buckle" straps would clip into those. If I didn't sew them onto the bag then I'd have to still have a loose strap with a buckle on one end and a G hook on the other to make the connection so I don't see anything gained (still need to sew an attachment PALS on) versus just attaching the strap in the first place that would always be in use. Either just compressing the day pack or when using the meat shelf these straps are what would hold the pack (and load in the shelf) to the pack frame.

Or did I not picture what you're talking about right?

4B896245-EED3-4847-A1A2-AD755B861373_zpstqas8suq.jpg
 

WoodBow

WKR
Joined
Jul 21, 2015
Messages
1,754
I think he is talking about sewing pals strips to the bag and then using g clips or k clips to attach the comp straps to the pals strip. This would allow you to add or remove comp straps. Sewn on offers no flexibility...but none may be needed or desired.

For what its worth. I didnt plan put my comp straps until the very end. As a result i had no way to attach them and make it look professional. So i did what i believe he is suggesting. But i actually just cut a slot in 3 bar sliders to make them function as a k clip or whatever they are called. Using this system i can add, remove, or relocate straps very easily. Of course this is facilitated by the plethora of molle on my bag. I was concerned about the strength of the modded slider but i have rucked with 80#s where the strap was holding the weight up in the top of the bag. No issues.
 
OP
pods8 (Rugged Stitching)

pods8 (Rugged Stitching)

WKR
Rokslide Sponsor
Joined
Mar 12, 2014
Messages
3,859
Location
Thornton, CO
I think he is talking about sewing pals strips to the bag and then using g clips or k clips to attach the comp straps to the pals strip. This would allow you to add or remove comp straps. Sewn on offers no flexibility...but none may be needed or desired.

Generally I think I'd want them on just so I could suck in the pack a bit normally (so stuff isn't sloppy if partially loaded). The only thing that comes to mind in that plan is it would allow the pull point to be moved to the rear of the bag if the meat shelf was loaded up so the bag internals aren't being compressed into the load, however if the load is narrow and the bag gets bent around it then all the stuff in the pack would start pushing out against the zipper. Stuff to stew over... I kind of like the simple plan of having them sewn on since less overall sewing and they aren't going to fall off getting tossed in the truck, etc. (not sure if a loose strap g-hook comes loose easily).

At one point I was tossing some ideas through my mind about sleeving the pack rear and just slipping it onto a cargo panel for more flexibility but decided that would just add weight for generally unneeded flexibility (and I'd still need some straps to keep it from wagging around if partially loaded). I can just make a stand alone cargo panel for training stuff (or pure load hauling if desired) and could make this change back at the truck if it was merited on a pack out to ditch the pack body.
 
OP
pods8 (Rugged Stitching)

pods8 (Rugged Stitching)

WKR
Rokslide Sponsor
Joined
Mar 12, 2014
Messages
3,859
Location
Thornton, CO
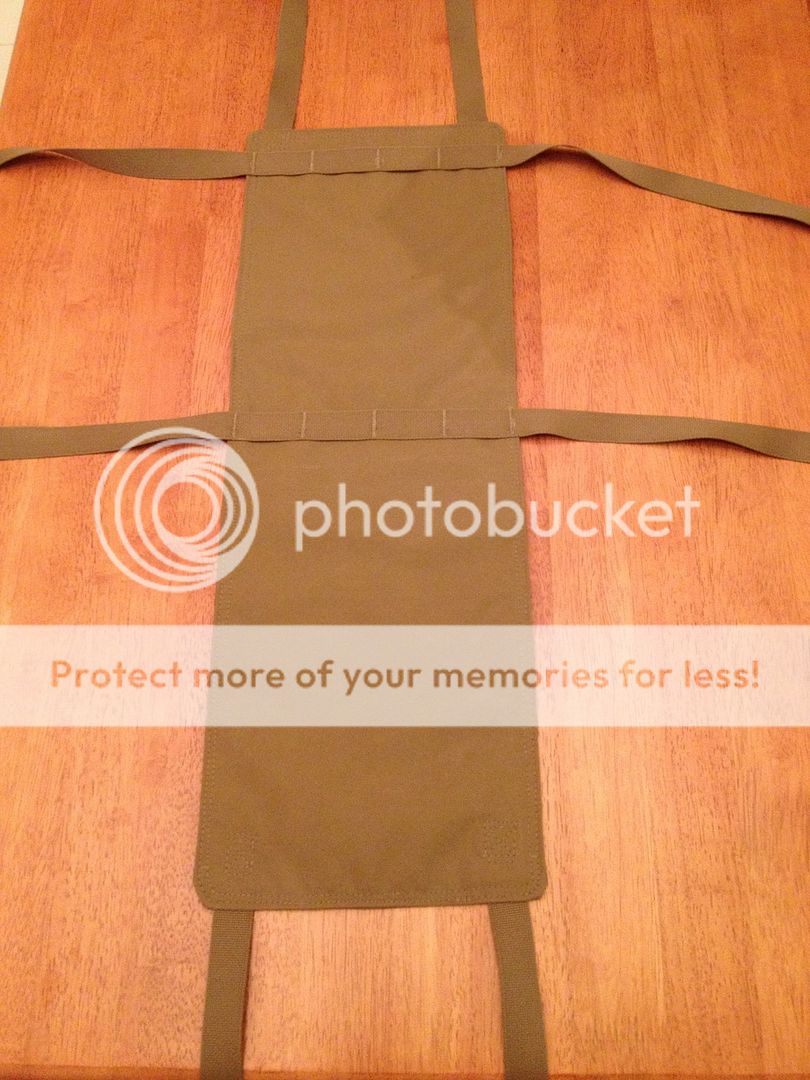
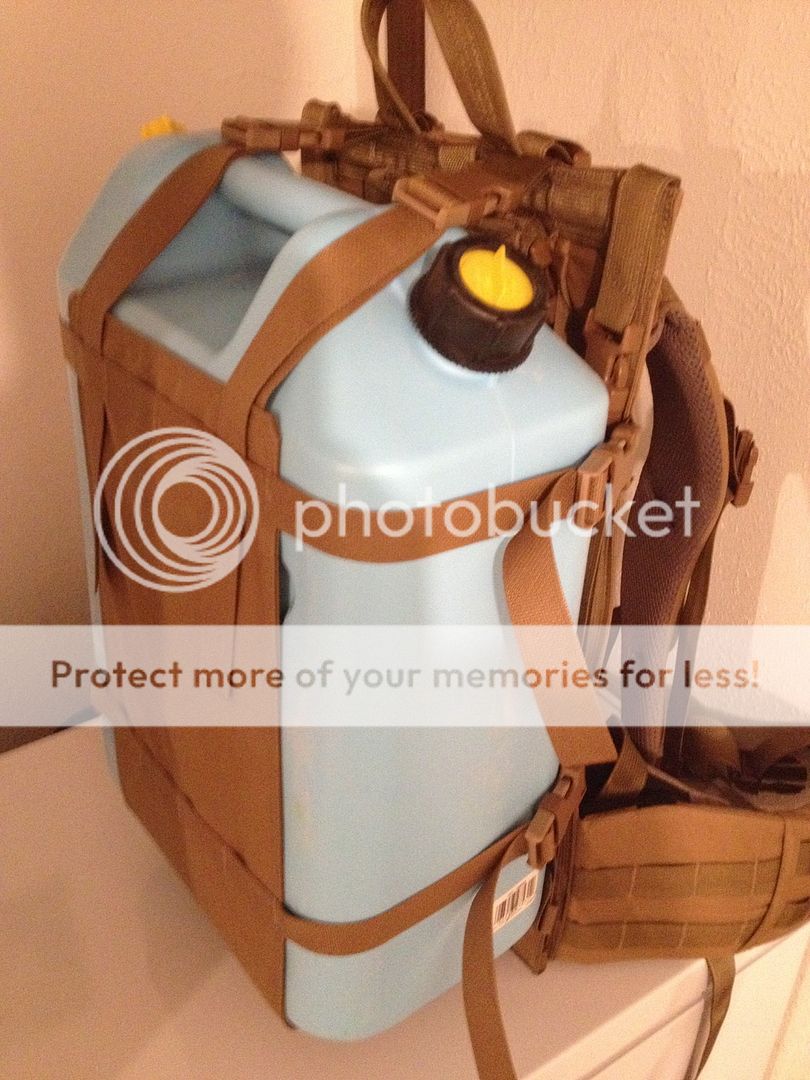
For practice and to have something to just use to haul stuff training, etc. I tossed together this load sling / cargo panel. It's not an overly large sized one on purpose (I had stuff under 8" thick in mind, but it will accommodate a few more inches if needed). Great thing about DIY is I can make a larger one later if needed.


Using some on hand tan hardware to fit it up for now but some matching coyote is enroute (I will sew over the ends of the straps later):


5MilesBack

"DADDY"
Joined
Feb 27, 2012
Messages
15,610
Location
Colorado Springs
I tried this route a few years ago, and after a few attempts of trying to put together what I had in my mind, I found Stone Glacier. So now I'm running the Approach bag as a daypack on the Krux frame. I can run whatever other bag I want with it and drop that bag in camp and then the Approach becomes my daypack. Makes things real easy.
 

WoodBow

WKR
Joined
Jul 21, 2015
Messages
1,754
Looks good. For what its worth, i have found sewing the ends over to be completely unnecessary. I have never done it.
 
OP
pods8 (Rugged Stitching)

pods8 (Rugged Stitching)

WKR
Rokslide Sponsor
Joined
Mar 12, 2014
Messages
3,859
Location
Thornton, CO
I tried this route a few years ago, and after a few attempts of trying to put together what I had in my mind, I found Stone Glacier. So now I'm running the Approach bag as a daypack on the Krux frame. I can run whatever other bag I want with it and drop that bag in camp and then the Approach becomes my daypack. Makes things real easy.

Glad you found something that works for you.
 
OP
pods8 (Rugged Stitching)

pods8 (Rugged Stitching)

WKR
Rokslide Sponsor
Joined
Mar 12, 2014
Messages
3,859
Location
Thornton, CO
Looks good. For what its worth, i have found sewing the ends over to be completely unnecessary. I have never done it.

Thanks, one of the bar tacks stuck in the feed for a moment and balled a tad on the back but not enough that I felt it merited ripping out and redoing. Pull loops have some appeal on the strap ends but I'll play around with this as-is for now.
 
OP
pods8 (Rugged Stitching)

pods8 (Rugged Stitching)

WKR
Rokslide Sponsor
Joined
Mar 12, 2014
Messages
3,859
Location
Thornton, CO
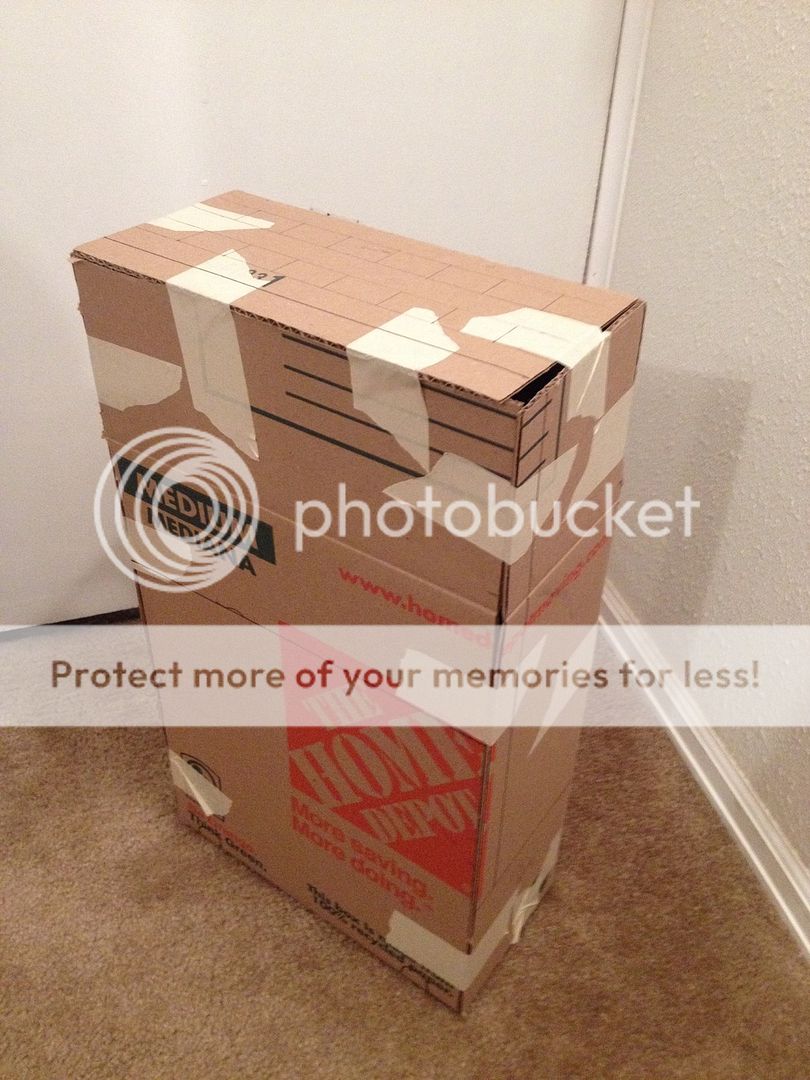
Made up a cardboard model yesterday to look over dims/placements in full scale to finalize my thoughts. Doesn't look like much but it was a useful exercise to determine some final placements and decisions. All the major seams are drawn too and notes on webbing lengths I want to embed in the seams, etc. Overall a good visual tool to do the cut list off and help visualize assembly steps.

Major outcome from it is rather than surface sew a top pocket on (since I didn't want to add a lot of seams in the pack there) I decided to switch to two pals strips on the top to attach a pocket to (if desired). Part of this was because I just wanted a single water hose pass through in the middle of the pack and didn't see a nice way of doing it with the pocket. Where as with a pals attached pocket it could still snake out.

80107F3C-67DC-4F01-852F-F8EBD6457FAC_zpscodo1hul.jpg


Looks like a slick training setup

Thanks.
 

WoodBow

WKR
Joined
Jul 21, 2015
Messages
1,754
I like the mock up idea. I know it helped me a lot with the tipi design. Still shopping for fabric on that. About ready to pull the trigger.
 
Top