eLightfoot
WKR
Been wanting a yeti cooler for a while now and could never muster up the courage to spend all that money on the one I wanted. So being the kind of guy I am (I like to make stuff) I thought I'd build one. After it was all said and done it ended up costing more than I envisioned but was still much less than the $800 yeti. Also get the satisfaction and knowledge gained from another project completed.
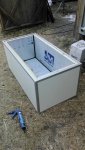
This cooler is 4'x2'x2'. Framed with 1.5" pine furing strips, they are cheap and light. exterior plastic is a product called starboard, a chemical and UV treated type of HDPE, 1/4" thick (used a lot for boat decking and such). 2" thick rigid insulation foam was used in the walls and bottom. for the inside liner I used 1/8" PVC sheet and made a box to line the inside. All seems were glued with pvc pipe glue, then I put a bead of silicone on the backside of the seems. Once the box liner was installed in place I used plastic weld to further fortify the seems. I used 1"x1" aluminum angle metal to protect and trim all exterior seems. Stainless steel screws were used throughout. Made the lid in the same fashion as the rest of the cooler and attached it with four small but heavy duty stainless steel hinges. The lid features 3 1/2" of foam insulation and has a step down on the inside to fit tight to the inside dimension of the cooler. I then installed a stop rail on the inside of the cooler with neoprene gasket to make a tight seal when the lid is shut. Made nylon rope handles and used dishwasher hose for the grips. Inside the hose I inserted a length of 1/2" pvc pipe to add strength and rigidity. Bought some replacement yeti latches to finish it off.
There is a lot Im leaving out and I got too involved at times to remember to take pictures. So my pics are missing a lot of steps but you should get the idea.