2 man tipi- ish

OP
Beendare

Beendare

WKR
Joined
May 6, 2014
Messages
8,317
Location
Corripe cervisiam
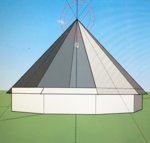
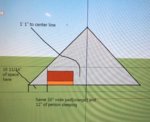
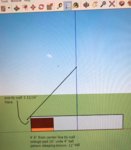
So you got me thinking Wood... let me run an analysis in this new design.
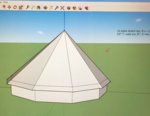
First the layout: 18” walls, 6’6” T, 9’ W x 11’ L but from point to point vs on the flat of my first one.

( design copyrighted, use by permission only)
 

Attachments

  • 58456CA7-E537-419D-8ADA-A90C5A52F3E7.jpeg
    58456CA7-E537-419D-8ADA-A90C5A52F3E7.jpeg
    178.9 KB · Views: 25
  • 47222B64-8697-4FC8-AEA2-DF236EB23DBC.jpeg
    47222B64-8697-4FC8-AEA2-DF236EB23DBC.jpeg
    202.8 KB · Views: 25
Last edited:
OP
Beendare

Beendare

WKR
Joined
May 6, 2014
Messages
8,317
Location
Corripe cervisiam
Gotta make it to scale with the same angles, here i did a quick cutaway to check from plumb

42.1 degrees
Ran the tape down side walls 7’4 3/4” from peak to hem at tieout
Edit: already a worthy analysis, the 7’4” roofline is overkill... too much eve, a shorter roof seam is fine right at 7' long, - see diagram with the androgenous Sketchup model visible

( design copyrighted, use by permission only)
 

Attachments

  • F35B6AE9-76F7-4CA3-8E8F-F68008ACB9A4.jpeg
    F35B6AE9-76F7-4CA3-8E8F-F68008ACB9A4.jpeg
    256.8 KB · Views: 22
  • 36D0171C-B671-4D8D-A6D3-7A57169FE6A2.jpeg
    36D0171C-B671-4D8D-A6D3-7A57169FE6A2.jpeg
    283.8 KB · Views: 22
Last edited:
OP
Beendare

Beendare

WKR
Joined
May 6, 2014
Messages
8,317
Location
Corripe cervisiam
First the straight tipi no walls. For comparison both models have the same roof angle, same base length to hem.

The straight Tipi version will have a slightly bigger base by 3 11/16 inches on the ground. to get the exact same wall angle and base, the Straight tipi version is shorter.

Shown with an orange 4” thick pad and brown is 12”tx 26” wide person
 

Attachments

  • DA1D8773-387C-4954-A63B-ECB3C3321A84.jpeg
    DA1D8773-387C-4954-A63B-ECB3C3321A84.jpeg
    341.1 KB · Views: 19
OP
Beendare

Beendare

WKR
Joined
May 6, 2014
Messages
8,317
Location
Corripe cervisiam
So here is the wall version exact same scale. You do lose 3 11/16” due to eve, about 7” total on base (floor) around the perimeter BUT its that trangular space that on some tipis with a cat cut swoop low- not very useable IMO.

You cant be against the tipi roof due to condensation on most designs. Apples to apples i should have allowed a few inches between pad and wall for angles, etc- so FYI this is slightly skewed for wall version.

So key here is the triangular area at perimeter in the straight tipi version and its 13” to center pole, 26” between people.

No triangular wasted space in the wall version plus it’s 2‘4“ to the center pole so 4‘8“ - ( actual about 4’between humans) I should have drawn in both sleeping pads as the increase in floor space is dramatic.

In real world , these walls work.
 

Attachments

  • 9C15554E-94BA-4FFD-B7E7-6FFE1C49FE05.jpeg
    9C15554E-94BA-4FFD-B7E7-6FFE1C49FE05.jpeg
    290.8 KB · Views: 21
Last edited:
OP
Beendare

Beendare

WKR
Joined
May 6, 2014
Messages
8,317
Location
Corripe cervisiam
This is my 12’6” tipi with the wall at 12” ( wall is lighter green fabric) wall vent is closed behind Tim but you can see velcro outline. (Snowing at 10,00’ in Montana. Tim is right up against the wall. We did have a little bit of frozen condensation overnight on about 25% of upper tipi with it being 10deg overnight. Run the stove for a bit and gone.

If air is venting in and up the inside of the walls It reduces the temperature variation between the outside and inside and condensation doesnt form.


You get a little bit of a convection current in these even without the stove if you have even just a small vent in the eve.
Nothing like my condensation monster SL5
 

Attachments

  • 5BB9B577-C924-410B-B8AF-53F92B3D707C.jpeg
    5BB9B577-C924-410B-B8AF-53F92B3D707C.jpeg
    388.1 KB · Views: 55

AndyB

WKR
Joined
Mar 8, 2013
Messages
342
Location
North Wales UK
I have a canvas bell tent and can tell you the walls will make a big difference in usable space, I've often thought id like to add 8-12 inch walls to my sl3 if i could find anyone to do it,..
 

VernAK

WKR
Joined
Dec 24, 2012
Messages
2,025
Location
Delta Jct, Alaska
I wish Beendare and his sewing machine were in my neighborhood as I can think of several little projects....even big projects.
 
OP
Beendare

Beendare

WKR
Joined
May 6, 2014
Messages
8,317
Location
Corripe cervisiam
For the record, my sewing skills are basic at best. I can fold and sew a fairly straight line...and i need jigs and guides to do that.

In other words, You wont be seeing a new clothing line from me on the red carpet anytime soon!

I should have finished my illustrations,
Both of these tipis are the exact same angle and roof seam length for apples to apples comparison. They may appear different as in sketch up you can scale these things up or down and I’m taking these pictures off my computer and editing them so they may look a little different but they are exactly the same roof profile.

First the straight tipi93CC51E0-C591-4FA5-AB45-F8137556BBDD.jpeg
 
Last edited:
OP
Beendare

Beendare

WKR
Joined
May 6, 2014
Messages
8,317
Location
Corripe cervisiam
I doubt this is any kind of revelation to a guy that owns a tipi- especially one with the catenary cut.

I played with making it The same height which does help a little bit with that outer perimeter wasted space because of the bigger angle giving a straight tipi guy a little more floor space.

This is of course what most of the manufacturers are doing- making it tall, that works too.

Just my take, trying to solve a couple issues i had with my other tipi.

In my SL 5, j burned a hole in my puffy and my bag against my stove trying to stay away from the wet walls.
 
OP
Beendare

Beendare

WKR
Joined
May 6, 2014
Messages
8,317
Location
Corripe cervisiam
Heres an overlay of a tipi the same height as with walls,( i added back the 18” to height) though of course now the roof seams are longer.

Shorter roof seams will be stronger of course, but this design might be a little less fabric. EDIT; running some numbers, fabric wise its about the same. When managing the fabric, these triangular sections are a pain, best to lay them out to max out fabric BEFORE cutting anything if you don't have this program.

This adds about 4”” per side to floor space, 8” total, much better than a shorter design, but still not as much space as with walls IMO.
233E8B5A-A956-4E52-9EEC-912B2C9A24D6.jpeg
 
Last edited:
OP
Beendare

Beendare

WKR
Joined
May 6, 2014
Messages
8,317
Location
Corripe cervisiam
So now, do i want to mess with making this enlongated tipi that will require 10 pieces, 2 sets of 5 differnt pieces- mirrored sides.

Or do i just make it all equal, only requires one piece pattern x10 (with the adjacent door zip pieces having a slightly bigger hem)

That is super easy as you make one template, fold and sew like a madman. The dirty little secret to sewing these teepees, if you work in one direction and keep these seams pretty straight everything comes out just fine. It doesn’t have to be exact. As long as it’s pretty Straight, if not it puckers.

I wish I would’ve known that little tidbit on my first one, when I was playing around with all kinds of glue and crap trying to match these pieces. Waste of time.

Pinning works, but once you get going you can just fold and sew. Its a little longer process with different size pieces.

Sketchup makes it easy to do the patterns for pieces. Decisions, decisions.

EDIT; My comparison is a little skewed as drawn with the perfect rectangular sleeping person. In reality with rounded edges a guy can use more of that perimeter space. This little exercise makes it plain to see why many of the Tipi outfits are designing them tall as it lessens that small triangular perimeter....worth noting for anyone building one on these.

After rereading this thread, I regret even doing it. Holy smokes, Its tedious following my stream of consciousness!

Plan is to manage the pieces in Sketchup instead of making a pattern like I did for my Equal sided tipi. I probably won't get at this now for a couple weeks. Once I have all of this I will convert to PDF and if anyone wants these patterns just shoot me a PM. I will update this boring azz thread when I have it.
 
Last edited:

Legend

WKR
Joined
Jun 13, 2017
Messages
788
Anyone who has used a tipi has dealt with the wet walls and wished they could use that space along the edge. After trying multiple tipis and day dreaming about redesigning to something close to this i found a great tent! Take a look at the mountain hardwear hoopster 6. I will take it any day over a standar tipi. In my opinion it is not about adding a wall below the tipi but just making the walls steeper in pitch. Anyway you can make that happen will be a winner design. Good luck
 
Top