E Bike kit install

Beendare

WKR
Joined
May 6, 2014
Messages
8,306
Location
Corripe cervisiam
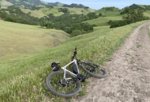
I put one of those E bike motors on my Hardtail 29er. No particular reason except to climb the mountains around here a little bit easier.

here is the bike0BE71EF5-8FA9-44F1-A93B-774C84B727BA.jpeg
It took me about eight hours but I switched out my disc brakes and I modified the kit a little bit, more on that later. I think a guy could probably install one of these things in about 4 to 6 hours if he was mechanically inclined. Probably about eight hours for a guy that’s not mechanically inclined. It’s a pretty easy process.

here’s the best place to start I will post a link to the electric bikes form site and go to their knowledge base and it walks you through measuring your bike for the correct size kit through installation.
EBike site

It’s pretty important you measure correctly before hand to make sure you get the right kit and the battery will fit.

they give you a lot of cables and my mean battery cable was really long so I cut and re-soldered it to clean it up a little bit around my bottom bracket.

Mine is the BBSHD Bafang motor with a 52v (big) battery. I got the standard display but I would recommend getting the upgraded display If you get more than a 48V battery as the upgraded display works better with the 52V battery.

I have the standard display that comes with the kit and the battery indicator isn’t accurate.The kit was $1353 With tax and shipping. I ordered direct from

Bafangusdirct.com
Luna bikes sells the same kits.

You definitely want to install the shifter sensor as that makes the motor shut off while you’re shifting an important feature so you don’t break chains.

I also have the brake sensors but do not have them installed yet. I was told that that’s an important feature but I’m not sure that I agree after riding the bike a couple times. When you stop peddling the motor stops turning. i’m not sure I’m gonna install mine because it’s not a real elegant install.
 
OP
Beendare

Beendare

WKR
Joined
May 6, 2014
Messages
8,306
Location
Corripe cervisiam
6808A68A-2C7C-4AA6-AF43-444026C3D8D3.jpeg
A couple impressions: i’m a big dude right now pushing 250 and I’m a fairly strong rider for an old guy. My last ride was a 20 miler, I did about 1500 feet of climbing total and it only use 25% of the battery. I was working a little harder than I would want to work on a hunt.

I never got this bike higher than the number five setting on these hills. There were a few fairly stiff hills that would’ve had me in my lowest gear huffing and puffing that I climbed no problem with the kit steel 48T front chain ring and my 3rd lowesr back sprocket at level 4 (it goes to 10)

I was worried that I might need a 32T front chain ring but now I think the smallest I would go is 42T

The one thing about these kits is you get a real bad chain line if you try to get your chain in your lowest gear. I’m going to rework my cassette eliminating some sprockets and skip a few gears. Right now I can’t get it into the lowest gear without it wanting to pull the chain off the front chain ring.

i’m still getting a pretty decent work out as it’s a very heavy bike which actually takes a little getting used to.

Edit; [I'm editing these number as I finally found the manual on how to set my display and reset it for 29" wheels]
I can hit 28 mph on the flats unclipped with about a 75 cadence in level 8. It cruises at 22mph on level 4 with the same pedal cadence- and some effort. 2-3 is the perfect setting for me on a flat Road.

My display is the C-961, and as I say somewhere else the upgraded DPC-18 is what you want.
Edit again; the C391 display is worthless with a 52v battery...fine with the 48V from what folks are saying. My C391 reads 100% battery life when the indicator lights read 50% or less. The upgrade DPC -18 may work with the 52V- best to confirm with Bafang. The 860 from Luna cycles works for sure- I confirmed so I ordered- $100.

I'm at 30 miles, 20 yesterday, 10 today- the last 10 flat road but at between 6 and 8 to see what those high levels feel like. The high levels really eat up the battery. My display is reading 100%, the 4 light indicators on the side are reading one green and one red....which should be somewhere around 50%. Guessing on this isn't going to work for me. I ride into a pretty rough spot to fish some lakes and pedaling my bike out is do-able but humping this heavy bike out with no assist would be horrible.

I banged my motor bottoming in a creek yesterday pretty hard- loosened the motor.....so I didn't want to run it on rough trails today as I'm siliconing my spacer piece back in there after retightening the bottom bracket.

I can tell you this is a amazing kit very powerful and better than expected. Now is it better than the bikes with integrated motors probably not. Some of the integrated bikes have the new Bafang ultra motors or a Bosch or Shimano motor- all good. I’m probably not the guy to answer a bunch of these what if questions that other forum is probably the place for that. I can tell you that a bike with crappy components it’s going to give you trouble.

The best thing I did was upgrade my crappy disc brakes to the 200mm and 180mm Shimano Zee brakes. Jenson bikes online is a great source for that stuff.

The motor kicks in on at the first half of a revolution and the pedal assist is very smooth. It stops when you stop pedalling. It is a little tricky getting that heavy bike started on a steep hill,

I might have to play around with the throttle a little bit on that. You can really feel the weight when you let up pedalling, my bike doesnt freewheel like it used to. I didn’t weigh the bike before and after but I think the kit adds a solid 20 to 25 pounds to the bike.

now I have to get my hands in shape as the cows have those trails torn up pretty good.
 
Last edited:
OP
Beendare

Beendare

WKR
Joined
May 6, 2014
Messages
8,306
Location
Corripe cervisiam
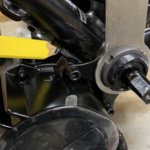
One install tip That I didn’t see mentioned anywhere is to put a spacer between the motor and your frame for cable clearance. The motor is supposed to wedge right up against your frame but I have cables going through there so I wedged a piece of Kydex between the motor and rhe bottom tube.
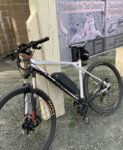
Install is super easy. I ordered their ranch with the kit, pictured (silver)

if you have never worked on these bikes before keep in mind that steel on steel you can crank down pretty tight but screwing a steel bolt into an aluminum frame you have to be careful that you don’t over tighten them and strip the threads. So something like the bolt that holds your disc brakes in place would be an example of that.

EF69C61F-58E6-4A6D-BC13-33ED03200EB5.jpeg
the yellow pencil ispointing to the 3/16” thick spacer siliconed there

I also cut the battery cables and re-soldered them to the leads as they gave me about 18 inches more cable than I needed.
I put new brakes on and it makes all the difference I would recommend a minimum of 180 upfront and 180 in the rear using a good quality brake as these bikes go fast.

I can try to answer any questions but just be forewarned I’m not an expert.
____
 
Last edited:

Steve O

WKR
Classified Approved
Joined
Feb 29, 2012
Messages
2,907
Location
Michigan
That is very very interesting. I’d love to have an while but I do NOT want to let loose $3500! I do have a decent mountain bike though.
 
Joined
May 6, 2018
Messages
8,906
Location
Shenandoah Valley
Almost did this project a year ago. I thought it would be great for getting around farm to farm and a little more exercise.

Also would be nice for when you need to leave equipment in the field, it would be easy to have a bracket so you carry it on the tractor. When you breakdown or finish for the day but need to come back you have a mode of transportation right there. Of course work boots and bikes never worked well for me.
 
Top