Edit
This thread started with one idea, and has morphed into a stream of consciousness style narrative. Hopefully the information in it can help some with their own tinkering, and as mistakes are many times more valuable for learning than success, I have tried not to hide mine (other than avoiding photographs that show the flaws in my spray paint job ). It should also be obvious that the input of others has helped me in this project quite a bit.
End edit.
So, I will start by saying that this is only one example and an n of one is a dangerous thing to draw conclusions on, however when combined with other data it can be informative. It sounds like I had worse luck than most who get a new Kimber.
I changed out my Sako model 85 in 30-06 for a Kimber Montana in 30-06 in the spring. At first I thought everything was great with the Kimber, slowly I have concluded that is not the case. That said, I see no alternative that I like more, so I will stick with it, even if it becomes nothing more than a donor action. I like CRF (Sako is pseudo-CRF) and three position safeties, no other platform I can find offers that at this weight or price point. Part of the reason for switching was also the desire to tinker and customize. So, I'm not unhappy with the Kimber, but I'm also not impressed with the QC.
The Kimber is of new manufacture.

These were on the inside of the stock in the mag box. The gun came new from Eurooptic, still in the factory plastic bag.
The Kimber action is not nearly as smooth as the Sako, though it is on par with FN manufacture Winchester model 70's I have handled, it may even be a little better, I just don't have the time behind a model 70 to say with confidence. A Tikka action feels smoother to me.
Like I said, on initial inspection I thought all was good. After putting 20 rounds through her at the range I found several issues. The mag box was binding, 45 seconds with a file fixed this. The front action screw was too long by a hair.

The shiny spot was not their before firing and shows where it was bottoming out. About a minute with a file corrected this.
The factory bedding job is practically non-existent.


In the above images you can see where paint and metal clearly have contact on the bedding posts with wear isolated to these areas. When I get time I will bed it.
While not visible, a slight smoothing of the finish can be felt in the action area and forward of the recoil lug to the barrel tapper indicating there is some contact at these points. The barrel is free floated beyond this.
Before anyone brings up torque, I use a torque wrench and set the action screws at 45 in.lb.
Accuracy is good enough for hunting, and my shooting is not good enough for me to swear it is the gun. I will say, I got better groups with the Sako. So far I have put 280 rounds through her.
The firing pin spring needs to be replaced. I had two FTF using cheap Remington ammunition at the range. Neither would fire on a second try, so I assumed it was an ammunition issue. However, on a recent hunt I had an FTF using premium Winchester ammunition. This round also did not go off on a second strike. Thankfully this did not result in the loss of an opportunity and there is just a live round somewhere in the muskeg.

Two days earlier we had a close encounter with a curious black bear, less than 20 feet away and did not run off until I closed that distance to under 15 feet. My partners gun was strapped to his pack, so the Kimber was the only weapon available for protection if the bear had been aggressive. So this failure could have had worse outcomes than just a lost animal. I should have known better than to ignore it on the range, however I wanted to assume the best about the rifle.
She took a beating on that hunt, and other than scratched paint and rust on the mag box and scope ring screws she held up very well.


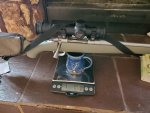
My modifications so far have been an oversized Ti bolt handle as the objective bell of the scope was close enough to slow me down with the regular bolt handle. You can also see where I removed a portion of the picatinny rail to allow better access for loading the blind magazine. I know Tallies would be lighter, but the picatinny rail allows me to move an expensive scope to other guns. I also believe it is a more robust system, though this is debatable.
I cut 4 inches off the barrel. It was 24.5 inches from the factory measured from breach face to crown, so it is now 20.5 inches. Accuracy improved slightly after the cut and crown. The cut took all of 5 minutes, the crown took about 3 hours as I lacked the proper tools and used a 1 inch steel ball bearing with lapping compound to finish it.

After bedding her, I plan to use the left over Devcon with some microballoons and a layer of fiber glass cloth to build up the comb so I can ditch the stock pack and duck tape currently serving that purpose (8.8 oz).
This thread started with one idea, and has morphed into a stream of consciousness style narrative. Hopefully the information in it can help some with their own tinkering, and as mistakes are many times more valuable for learning than success, I have tried not to hide mine (other than avoiding photographs that show the flaws in my spray paint job
). It should also be obvious that the input of others has helped me in this project quite a bit.End edit.
So, I will start by saying that this is only one example and an n of one is a dangerous thing to draw conclusions on, however when combined with other data it can be informative. It sounds like I had worse luck than most who get a new Kimber.
I changed out my Sako model 85 in 30-06 for a Kimber Montana in 30-06 in the spring. At first I thought everything was great with the Kimber, slowly I have concluded that is not the case. That said, I see no alternative that I like more, so I will stick with it, even if it becomes nothing more than a donor action. I like CRF (Sako is pseudo-CRF) and three position safeties, no other platform I can find offers that at this weight or price point. Part of the reason for switching was also the desire to tinker and customize. So, I'm not unhappy with the Kimber, but I'm also not impressed with the QC.
The Kimber is of new manufacture.
These were on the inside of the stock in the mag box. The gun came new from Eurooptic, still in the factory plastic bag.
The Kimber action is not nearly as smooth as the Sako, though it is on par with FN manufacture Winchester model 70's I have handled, it may even be a little better, I just don't have the time behind a model 70 to say with confidence. A Tikka action feels smoother to me.
Like I said, on initial inspection I thought all was good. After putting 20 rounds through her at the range I found several issues. The mag box was binding, 45 seconds with a file fixed this. The front action screw was too long by a hair.
The shiny spot was not their before firing and shows where it was bottoming out. About a minute with a file corrected this.
The factory bedding job is practically non-existent.
In the above images you can see where paint and metal clearly have contact on the bedding posts with wear isolated to these areas. When I get time I will bed it.
While not visible, a slight smoothing of the finish can be felt in the action area and forward of the recoil lug to the barrel tapper indicating there is some contact at these points. The barrel is free floated beyond this.
Before anyone brings up torque, I use a torque wrench and set the action screws at 45 in.lb.
Accuracy is good enough for hunting, and my shooting is not good enough for me to swear it is the gun. I will say, I got better groups with the Sako. So far I have put 280 rounds through her.
The firing pin spring needs to be replaced. I had two FTF using cheap Remington ammunition at the range. Neither would fire on a second try, so I assumed it was an ammunition issue. However, on a recent hunt I had an FTF using premium Winchester ammunition. This round also did not go off on a second strike. Thankfully this did not result in the loss of an opportunity and there is just a live round somewhere in the muskeg.
Two days earlier we had a close encounter with a curious black bear, less than 20 feet away and did not run off until I closed that distance to under 15 feet. My partners gun was strapped to his pack, so the Kimber was the only weapon available for protection if the bear had been aggressive. So this failure could have had worse outcomes than just a lost animal. I should have known better than to ignore it on the range, however I wanted to assume the best about the rifle.
She took a beating on that hunt, and other than scratched paint and rust on the mag box and scope ring screws she held up very well.
My modifications so far have been an oversized Ti bolt handle as the objective bell of the scope was close enough to slow me down with the regular bolt handle. You can also see where I removed a portion of the picatinny rail to allow better access for loading the blind magazine. I know Tallies would be lighter, but the picatinny rail allows me to move an expensive scope to other guns. I also believe it is a more robust system, though this is debatable.
I cut 4 inches off the barrel. It was 24.5 inches from the factory measured from breach face to crown, so it is now 20.5 inches. Accuracy improved slightly after the cut and crown. The cut took all of 5 minutes, the crown took about 3 hours as I lacked the proper tools and used a 1 inch steel ball bearing with lapping compound to finish it.
After bedding her, I plan to use the left over Devcon with some microballoons and a layer of fiber glass cloth to build up the comb so I can ditch the stock pack and duck tape currently serving that purpose (8.8 oz).
Attachments
Last edited:


