- Thread Starter
- #21
You are using an out of date browser. It may not display this or other websites correctly.
You should upgrade or use an alternative browser.
You should upgrade or use an alternative browser.
My Kimber Montana Tinkering
- Thread starter Marbles
- Start date
- Thread Starter
- #22
Here are examples of how she has been shooting for me up till now. All groups are 100 yards prone off of a pack. I don't shoot well enough to swear it is the rifle and not the shooter, I'm hopping the bedding helps. From Barnes TTSXs to Winchester ammo with AccuBonds, to cheap Remington Cor-lokt, Federal, and PPU has all shot about the same. Within 300 yards hunting worthy, but not great. 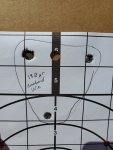
The above image is a four shot group with two rounds through the top left hole.
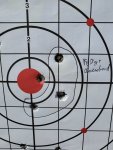

This last one is interesting to me because it is two different groups fired at the same point of aim. The two holes with a 2 written next to them where from a 4 shot group. I circled the other two shots from this group. The second three shot group stacked two rounds on top of the holes from the first group. Same ammunition for both.
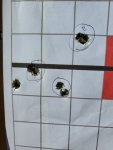

The above image is a four shot group with two rounds through the top left hole.


This last one is interesting to me because it is two different groups fired at the same point of aim. The two holes with a 2 written next to them where from a 4 shot group. I circled the other two shots from this group. The second three shot group stacked two rounds on top of the holes from the first group. Same ammunition for both.

- Thread Starter
- #23
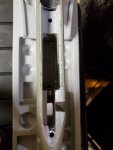
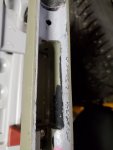
Silicone PB blaster is not a good choice of release agent. It did come out, but not clean and I had to give the action screw posts a good tap with a hammer to break it free, then scrape epoxy off the action. As a bedding job I think it will work, but it does not look very good and I will probably bed it again at some point.


- Thread Starter
- #24
I find it interesting that the majority of the epoxy in the recoil lug recess is on the butt side. I had noticed that if I dropped the action in the stock and forced it all the way to the rear I could not thread the action screws before bedding. This is no longer the case. I'm willing to bet this was allowing the action to move under recoil.
Too bad I did such a poor job on the bedding cosmetically. I kept trying to tell myself not to worry about it, but I'm unable to get passed how it looks and am going to sand it out and re-bed. The question is, should I pick up some Marin Tex, or just use the Devcon Ti that I already have. My only complaint with the Devcon is the 20 minute pot life. The extra ten minutes of Marin Tex Grey would certainly be nice.
Another mistake I made was that I only had 320 grit sand paper, even though I roughed it with the dremel, I think this effected how well the epoxy bonded to the stock. Should have hit it with some 80 grit before bedding. I think this and a better release agent would have given a nicer result.
Devcon Ti is fine. You now know it has a short pot life and can deal with that. I would say, the prep step you might have missed was wiping it down with acetone or alcohol just before applying the bedding. I didn't see that in your description. Sanding with 320 is enough, but you have to degrease\dewax if you want perfect adhesion. I only sand enough to remove paint, and then dremel below the stock line. After it gets wiped down, or sprayed with brake cleaner to degrease the stock.
Johnsons paste wax is the best release agent I've ever used. Another thing to do is to cut the bedding with a sharpened plastic knife at the stock line before it sets up completely. I use a plastic utensil ground to a single bevel, then cut the bedding that has oozed above the stock line. This gives it a break point, and you don't see the pullout when the action is removed. You can also use it as a scraper to remove the ooze.
Jeremy
- Thread Starter
- #26
Round two. Much the same as the first round with a couple changes.
First, I used 80 grit sandpaper rather than 320. While sanding the previous bedding job out I noticed the Devcon would come cleanly off where the stock was not roughed up by the dremel. I also did not use the dremel this time.
Second, I left a small amount of the previous Devcon at the tang to set its depth (rather than the electrical tape shim I used last time.
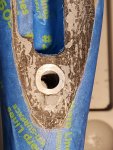
Third, per the suggestion of @Wapiti1, I used Johnson's past wax as the release agent.
Fourth, I also took his suggestion on the plastic tool.
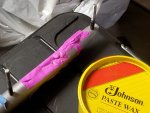
Fifth, I mixed less Devcon and spread it out thin on the mixing board, which extended the working time by about 5 minutes.
Finally, I threaded the other end of my guide post for the rear tang. Then used a 1 inch piece of metal as a washer and a wingnut to hold the rear tang in place (rather than electrical tap). This let me clean up the Devcon that oozed out as well as having more control.
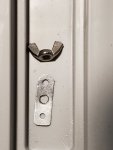
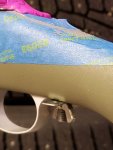
I should have checked it first and pulled the trigger guard from the stock. Thankfully it still worked and all I have is a scratch on the trigger guard as evidence of my mistake. It was a bit too close for comfort though. If it had not worked I would have quickly taken a file to the wings to get enough clearance.
First, I used 80 grit sandpaper rather than 320. While sanding the previous bedding job out I noticed the Devcon would come cleanly off where the stock was not roughed up by the dremel. I also did not use the dremel this time.
Second, I left a small amount of the previous Devcon at the tang to set its depth (rather than the electrical tape shim I used last time.

Third, per the suggestion of @Wapiti1, I used Johnson's past wax as the release agent.
Fourth, I also took his suggestion on the plastic tool.
I use a plastic utensil ground to a single bevel, then cut the bedding that has oozed above the stock line. This gives it a break point, and you don't see the pullout when the action is removed. You can also use it as a scraper to remove the ooze.

Fifth, I mixed less Devcon and spread it out thin on the mixing board, which extended the working time by about 5 minutes.
Finally, I threaded the other end of my guide post for the rear tang. Then used a 1 inch piece of metal as a washer and a wingnut to hold the rear tang in place (rather than electrical tap). This let me clean up the Devcon that oozed out as well as having more control.


I should have checked it first and pulled the trigger guard from the stock. Thankfully it still worked and all I have is a scratch on the trigger guard as evidence of my mistake. It was a bit too close for comfort though. If it had not worked I would have quickly taken a file to the wings to get enough clearance.
- Thread Starter
- #27
Came out much cleaner this time. Only flaw is a small spot at the muzzle end action screw where some Devcon formed a mechanical lock with the thread of the post. I popped it out after 4.5 hours as I wanted the Devcon to still be soft enough to cut with a knife to make clean up easier. From a clean up perspective, this worked well. Only question is, did I weaken the bedding? Which only time will answer that.
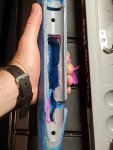
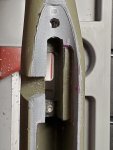
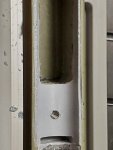
The final cleanup will wait until it is fully set as I will sand the edges.


The final cleanup will wait until it is fully set as I will sand the edges.
Last edited:
That looks good.
One thing to try when you go out and shoot it. If it still won't shoot. Fold up a piece of paper thick enough to fill the barrel channel to barrel gap. Slide it into the gap at the forend until you see just a slight movement of the barrel upward. Shoot another group like that.
I know everyone wants free floated and that's the only way to get a barrel to shoot, blah, blah, blah.... Some barrels don't like being free. More common on thin ones. The reason is usually a crooked bore and one side is thinner than another. No bore is straight. The drilling process gets it close, but it is never straight. Even hammer forged usually have a little bow to the bore. My experience is that pressure bedding will help it shoot a wider variety of ammo. Otherwise, they tend to be really finicky as a free floated barrel. If they shoot at all.
That's a long winded way of saying, try a small pressure bedding pad if you aren't getting what you want.
Or change up the ammo. Not sure if you mentioned that or not.
Jeremy
- Thread Starter
- #30
Any updates?
None that are particularly interesting.
Turns out I lifted the barrel too far out of its channel resulting in thick bedding under forward part of the action and now I only get one (at best) thread of engagement between the action screw and the action.
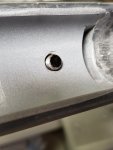
The fix for this is simple though. I ordered some Bat Machine action screws with a Salt Bath Nitride finish and will hold off on shooting it until these arrive. https://www.batmachine.com/product/action-screws/
I've also sanded the edges of the bedding to clean them up as well as sanding off all sharp corners as these are more prone to chipping and removing them alters total contact area very little.
In the mean time I have been prepping the stock for painting.
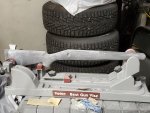
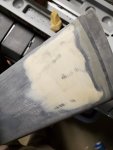
I've sanded down to the substrate. Kimber's primmer coat was pretty thick. Under it I found several areas with a very soft filler. Most where shallow and I just sanded the filler off as well.
Interesting... I've got a Mt Ascent as well that I picked up used. The barrel wasn't quite floated as advertised and previous owner had shimmed the action with duct tape. Yep duct tape. I decided to bed the recoil lug and sand the barrel area of the stock for full floating. I used JB Weld and just applied it to the recoil lug area. I also adjusted the trigger for a 2 lb pull. I reassemble and torque the action screws to 65 in/lbs as per Kimber's recommendations, although I have seen 45 in/lbs here on the forum.
I'm now in the process of working up hand loads for it. So far it seems like 56-57gr of H4831 is going to be the ticket.
I've thought about refinishing the stock as the Kimber open fade is rubbing off. I've been inspired by the paint jobs seen on this forum. But I think I should hunt with it first.
Oh yeah, I installed a Mini Beast muzzle brake from Muzzle Brakes and More and couldn't be happier with the reduction in recoil! It's amazing.
Good luck with the build.
- Thread Starter
- #32
Interesting... I've got a Mt Ascent as well that I picked up used. The barrel wasn't quite floated as advertised and previous owner had shimmed the action with duct tape. Yep duct tape. I decided to bed the recoil lug and sand the barrel area of the stock for full floating. I used JB Weld and just applied it to the recoil lug area. I also adjusted the trigger for a 2 lb pull. I reassemble and torque the action screws to 65 in/lbs as per Kimber's recommendations, although I have seen 45 in/lbs here on the forum.
I'm now in the process of working up hand loads for it. So far it seems like 56-57gr of H4831 is going to be the ticket.
I've thought about refinishing the stock as the Kimber open fade is rubbing off. I've been inspired by the paint jobs seen on this forum. But I think I should hunt with it first.
Oh yeah, I installed a Mini Beast muzzle brake from Muzzle Brakes and More and couldn't be happier with the reduction in recoil! It's amazing.
Good luck with the build.
Thanks. I got a lot of ideas from threads on Rokslide, as well as several other forums where I just lurk.
I need to start hand loading. I'm rather limited on space at the moment though.
What kind of accuracy are you getting out of your Mt Ascent now.
Due to the front action screw I have not reassembled mine fully yet. However, I'm a little concerned that my mag box might be too short now. If it is, I think I could shim the bottom easily.
I also took some material off the magazine, as it was binding when fully assembled. Interestingly one of the action screws it came with was short as well. I ordered new ones from Kimber and they are the appropriate length.
On paper, at best, I'm getting groups of 5 with 4 out of the 5 shots touching. At worst I'm getting 5" 5 shot groups. Although some groups are spread out, I'm getting great chrono numbers: ~3000ft/sec, ES 12, SD 2. It seems these rifle are a little finicky and picky on loads. My dad was a hand loading guru, having done it for 50 years. We started the process of working up loads for this rifle last fall, but he passed away this spring. I'm trying to follow through with what we started, but there are days where I'm sure I'm doing the one step forward two steps back jig... It's a learning process for sure.
I haven't shot a tone of factory ammo through it, but my best results were Federal Premiums 130gr Barnes TSX.
Man... that sounds like a headache of a rifle. You seem to be enjoying yourself though, and I appreciate you chronicling your process! Keep after it!
- Thread Starter
- #35
@ProAlpine Sorry to hear about your dad.
I have heard a lot of people say Kimber's are only good for 3 shot groups unlessn you provide ample time for cooling between shots. While mine has not been very accurate so far, it has been shooting the same regards of round count and heat. Most likely any changes from heat have just been masked by larger inconsistencies up to this point. One reason for floating the barrel shank was to minimize changes from heat. Though many people say Kimber's are more accurate with the shank bedded. So I may end up bedding it.
Yeah, some of the headache is my own creation though, such as needing a longer front action screw and bedding the entire action. My hope as others can avoid my mistakes if the are interested in doing the same.
The new screws arrived today. It looks like the front action screw is only about 1.5 threads longer, this gets me a little more thread engagement, but not as much as I would like. I've not had time to see if this will actually work, but I may end up cutting a longer back action screw to length for the front. First I will see if the mag box still works with the extra spave, and if it does not I might just sand out the bedding and go for attempt number three.
I probably should shoot it before touching the bedding and see if the shake needs to be bedded.
I have heard a lot of people say Kimber's are only good for 3 shot groups unlessn you provide ample time for cooling between shots. While mine has not been very accurate so far, it has been shooting the same regards of round count and heat. Most likely any changes from heat have just been masked by larger inconsistencies up to this point. One reason for floating the barrel shank was to minimize changes from heat. Though many people say Kimber's are more accurate with the shank bedded. So I may end up bedding it.
Man... that sounds like a headache of a rifle. You seem to be enjoying yourself though, and I appreciate you chronicling your process! Keep after it!
Yeah, some of the headache is my own creation though, such as needing a longer front action screw and bedding the entire action. My hope as others can avoid my mistakes if the are interested in doing the same.
The new screws arrived today. It looks like the front action screw is only about 1.5 threads longer, this gets me a little more thread engagement, but not as much as I would like. I've not had time to see if this will actually work, but I may end up cutting a longer back action screw to length for the front. First I will see if the mag box still works with the extra spave, and if it does not I might just sand out the bedding and go for attempt number three.
I probably should shoot it before touching the bedding and see if the shake needs to be bedded.
- Thread Starter
- #36
Replaced the firing pin spring today. Pretty simple job. The Wolff spring is the shorter, fatter one.
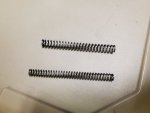
For anyone interested in how to do it.
Loosen the allen screw that prevents the firing pin from migrating.
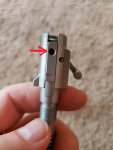
Then unscrew the firing pin from the bolt shroud. I found it easier to clamp the pin in a vice and turn the shroud than to use a screw driver. This is probably obvious to most people, but the slotted piece is the firing pin which is threaded and screws into the cocking piece. They are standard right hand threads. You can see a little damage to the slot where I was trying to turn the wrong direction before I realized this.
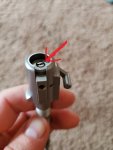
If you pay attention to where the firing pin sits before pulling it, then getting the correct firing pin protrusion is easy as you just screw it in until it is sitting the same.

For anyone interested in how to do it.
Loosen the allen screw that prevents the firing pin from migrating.

Then unscrew the firing pin from the bolt shroud. I found it easier to clamp the pin in a vice and turn the shroud than to use a screw driver. This is probably obvious to most people, but the slotted piece is the firing pin which is threaded and screws into the cocking piece. They are standard right hand threads. You can see a little damage to the slot where I was trying to turn the wrong direction before I realized this.

If you pay attention to where the firing pin sits before pulling it, then getting the correct firing pin protrusion is easy as you just screw it in until it is sitting the same.
Last edited:
Beendare
WKR
Excellent thread....very informative both plusses and minuses....and some great contributions by others. Thanks for posting your process Marbles.
Threads like this are the reason I like Rokslide....
________
Threads like this are the reason I like Rokslide....
________
Arizona Hunter
FNG
- Joined
- Apr 30, 2016
- Messages
- 33
Where did you get your TI bolt handle ?
- Thread Starter
- #39
Where did you get your TI bolt handle ?
Chris84 on 24 Hour Campfire. He has a thread you post to and then he will PM you. I believe he will flute the tactical ones as well.
About 30 seconds with a torch and the factory bolt handle unthreads easily. Then some red loctite on the new one. It helps with rapid fire, especially with the scope bell so close to the handle, and saves a few grams.
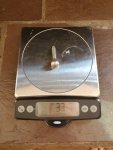
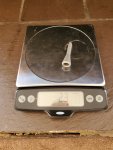
I used two scraps of softwood as padding and clamped the handle in a vice using the bolt body to apply torque, both for taking off the factory handle and installing the new one.
Arizona Hunter
FNG
- Joined
- Apr 30, 2016
- Messages
- 33
Chris84 on 24 Hour Campfire. He has a thread you post to and then he will PM you. I believe he will flute the tactical ones as well.
About 30 seconds with a torch and the factory bolt handle unthreads easily. Then some red loctite on the new one. It helps with rapid fire, especially with the scope bell so close to the handle, and saves a few grams.
View attachment 218183
View attachment 218184
I used two scraps of softwood as padding and clamped the handle in a vice using the bolt body to apply torque, both for taking off the factory handle and installing the new one.
Similar threads
Featured Video
Stats
Latest Articles
-
Idaho Mule Deer Management with Eric Freeman
-
TT#28 Idaho Bear Hunting with Roger Holscher and Chris Young
-
Rockstar Research with Kevin Monteith
-
Hunting Big Mule Deer: Obey the Wind & Still-Hunting
-
TT#27 DIY New Zealand Hunting with Australian Duo Miller and Pitts
-
Fewer Bucks, More Fawns?
-
Mathews Lift Review
-
Wyoming Range Winter Wrap-Up with Jeff Short
-
The Pursuit with Cliff Gray
-
Mile High Mule Deer Seminar
