Rehabing Elk shed

Junibravo

FNG
Joined
Jul 5, 2021
Messages
35
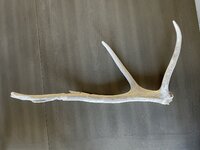
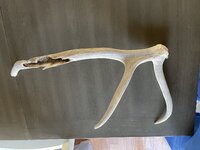
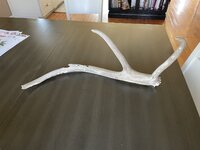
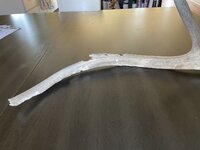
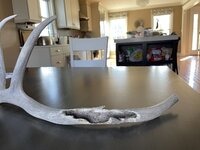
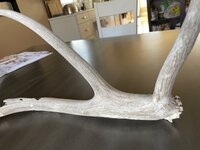
Now that deer season is over, i am thinking about other endeavors. I have a elk shed from my week of drinking tag soup in NM. Its a little chewed up but i plan to rehab it to restore its former glory. My plan is to use apoxy to reform the lost parts and stain with potassium permanganate.
I had a could of questions for those who have done this before.
1. Do i need to use something to form a scaffold to mould the apoxy on? I saw a youtube video and the guy cut a wire hanger and used that. I am a first time DIYer so want to keep things simple.
2. There are some cracks on the surface of the shed. Is there a way to smooth them out so it matches the apoxy work once complete
3. Lastly, any thoughts on how many point this shed had originally. My guide when i picked it up, thought it had 3 points, but the way the bone is warped in the middle, i think i can probably put another point there and make it look natural
 

Attachments

  • 3052C3E2-0C2A-464B-B82F-9143EAAD9BC4.jpeg
    3052C3E2-0C2A-464B-B82F-9143EAAD9BC4.jpeg
    280.1 KB · Views: 55
  • AA4C6443-BE4F-4F2B-A974-9252414D06C1.jpeg
    AA4C6443-BE4F-4F2B-A974-9252414D06C1.jpeg
    285.6 KB · Views: 56
  • 7243FEBA-2D8E-463A-A364-269359C2E4E4.jpeg
    7243FEBA-2D8E-463A-A364-269359C2E4E4.jpeg
    220.8 KB · Views: 48
  • C1C56AD8-33B7-4719-B323-08BF671E4479.jpeg
    C1C56AD8-33B7-4719-B323-08BF671E4479.jpeg
    210.4 KB · Views: 46
  • C474352D-753D-4B69-A788-8F8A8A36A6D9.jpeg
    C474352D-753D-4B69-A788-8F8A8A36A6D9.jpeg
    214.8 KB · Views: 42
  • A1B79EC5-1631-4ABD-BB16-1BD027C7CA52.jpeg
    A1B79EC5-1631-4ABD-BB16-1BD027C7CA52.jpeg
    197 KB · Views: 45

Wapiti151

WKR
Joined
Nov 14, 2020
Messages
918
I would guess you have another point where the hole is. If you just fill the hole and reform, it’d probably be easier, but I would guess you could build a pretty natural looking point. Depending on the size of the point, would determine the need for a wire if some sort. I haven’t built a point though, just brought back some dead heads. Once you apoxy, take some dry wall putty and rub a light layer into the whole antler to fill the cracks, but make sure it is LIGHT! You don’t want to fill in any of the grooves or striations.

I would suggest using white paint and wood stain, instead of PP based on personal experience. Once you put putty over it, take latex paint and dilute with water until it is pretty liquid, but not quite water thin. Paint a very light coat to start with a consistent white surface. Then start using stain. I like using the Minwax Early American. Paint a coat onto the shed, let it dry for a full day. Come back, paint another coat, wait another day…then put the final third coat on and let it dry for 2-3 days. The latex paint will not take the stain very well at all at first, but it really comes to life in the third coat. Very lightly rub with 00 steel wool, just using the weight of the wool to take the sheen off. Rub more around the knurls at the base, and some more on the tips to make lighter and natural looking. My .02.
I’ll post some pics from my last dead head…not perfect but I’m really happy with how it turned out. The picture on the truck bed is finished product, the one on the ground is at the same point and looks super dark but that is just from the lighting.

4BE2EA97-0589-4123-9089-3B653407095A.jpeg68EA43D8-D14B-4D65-B286-517CEC47AB43.jpeg163DB6D8-9527-46E7-94BB-F0FA7ECB199D.jpegF56D92F4-9D55-43E2-A20A-4626EFEA4CFD.jpeg130D09CB-530B-4BD7-A83D-1B91C41F60C8.jpeg3CD3AE74-9DEB-4F05-99EE-7DBB0B45B111.jpeg281F5AB4-AE8F-4F22-8763-324C3657BABA.jpeg
 
OP
J

Junibravo

FNG
Joined
Jul 5, 2021
Messages
35
080ccb6bdbf1b9e339c145fb468f662a.jpg

d93c854d5039e24c96eb80b038317b55.jpg

Shed rehab is on way. Filled the cavitues with apoxie sculpt (natural) and once it set i Used 14G copper wire to form a scaffold for the points.
As u can see in pictures, the natural apoxie is grey. Any thoughts on how to cover it. I was thinking spray paint ivory satin before staining.
Also any ideas if there is a better apoxie color to use for future restoration projects.


Sent from my iPhone using Tapatalk
 
Joined
Apr 8, 2020
Messages
308
I’ve used PP on some sheds and it’s worked well, but I’m not sure how it would work on the part you’re rebuilding with apoxie.

I did a moose shed several years ago and repeated wiped it down with linseed oil/turpentine mix after the PP and it helped some of the hairline cracks go away and returned some of the “moisture” to the horn instead of it being so dried out looking.

You’re probably on the right path with stain for this one but thought I’d pass along my experience for other future projects.
 
OP
J

Junibravo

FNG
Joined
Jul 5, 2021
Messages
35
I’ve used PP on some sheds and it’s worked well, but I’m not sure how it would work on the part you’re rebuilding with apoxie.

I did a moose shed several years ago and repeated wiped it down with linseed oil/turpentine mix after the PP and it helped some of the hairline cracks go away and returned some of the “moisture” to the horn instead of it being so dried out looking.

You’re probably on the right path with stain for this one but thought I’d pass along my experience for other future projects.

I haven’t decided in what stain to use. I have PP sitting around waiting to be used to stain sheds. Might give it a try before buying some wood stain


Sent from my iPhone using Tapatalk
 
OP
J

Junibravo

FNG
Joined
Jul 5, 2021
Messages
35
I would guess you have another point where the hole is. If you just fill the hole and reform, it’d probably be easier, but I would guess you could build a pretty natural looking point. Depending on the size of the point, would determine the need for a wire if some sort. I haven’t built a point though, just brought back some dead heads. Once you apoxy, take some dry wall putty and rub a light layer into the whole antler to fill the cracks, but make sure it is LIGHT! You don’t want to fill in any of the grooves or striations.

I would suggest using white paint and wood stain, instead of PP based on personal experience. Once you put putty over it, take latex paint and dilute with water until it is pretty liquid, but not quite water thin. Paint a very light coat to start with a consistent white surface. Then start using stain. I like using the Minwax Early American. Paint a coat onto the shed, let it dry for a full day. Come back, paint another coat, wait another day…then put the final third coat on and let it dry for 2-3 days. The latex paint will not take the stain very well at all at first, but it really comes to life in the third coat. Very lightly rub with 00 steel wool, just using the weight of the wool to take the sheen off. Rub more around the knurls at the base, and some more on the tips to make lighter and natural looking. My .02.
I’ll post some pics from my last dead head…not perfect but I’m really happy with how it turned out. The picture on the truck bed is finished product, the one on the ground is at the same point and looks super dark but that is just from the lighting.

View attachment 370855View attachment 370856View attachment 370857View attachment 370858View attachment 370859View attachment 370860View attachment 370861

So on a trial basis, i painted a whitetail shed with acrylic spray paint to get a base color. Then i tried PP. turns out PP takes forever to stain acrylic paint.
So i decided to dump that and go with the minwax stain. I have applied a few coats of minwax and it is starting to look better.
But i am confused about how long to leave the stain on since the instructions on the can say wipe after 15-20min and also how often to apply further coats. And once its done, looks like there will be streaks of darker stain where the stain settled. How do i get those off?


Sent from my iPhone using Tapatalk
 

Jimss

WKR
Joined
Mar 6, 2015
Messages
2,077
You likely don't have any older beat up sheds around? The reason I ask is because it's a lot easier finding a point that matches the old one, drilling a hole, epoxie or bondo the point onto thin all thread and patch the joint with epoxie-sculpt. You can fill in the chewed area with the same epoxie-sculpt. It is a lot like clay and doesn't crack when dry. For large or thicker areas I would likely do a shallow layer at a time.

You can use epoxie-skulp or wood putty to fill the cracks. I often sand or polish cracked sheds or antlers to get rid of all the flakiness. Different steel wool also work well. If you want to make your antlers look real the best way is to go super light on coats. Most antlers I've seen are way darker than they naturally are....and it's super easy to go way too dark. My preference is many super light coats and polish/blend with steel wool between coats.

I use everything from minwax stains, to colored pencils (wettened), and water based fish taxidermy paints. It's important to have good reference antlers or closeup photos.

Obviously you can put as much time into them as you want. A lot of guys use a coat or 2 of stain and are done.
 

Cconrad94

FNG
Joined
Mar 30, 2022
Messages
16
080ccb6bdbf1b9e339c145fb468f662a.jpg

d93c854d5039e24c96eb80b038317b55.jpg

Shed rehab is on way. Filled the cavitues with apoxie sculpt (natural) and once it set i Used 14G copper wire to form a scaffold for the points.
As u can see in pictures, the natural apoxie is grey. Any thoughts on how to cover it. I was thinking spray paint ivory satin before staining.
Also any ideas if there is a better apoxie color to use for future restoration projects.


Sent from my iPhone using Tapatalk
Good work! Nice shed
 
Top