Aron is going to hate me but this is the first tent I've ever made, with no skills, and don't plan on selling my stuff.
Started making my replica in May of this year after it was decided that my dad would be joining me on his first Elk hunt and I wanted something roomy enough for us without breaking the bank.
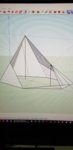
I began by doing some simple design in Sketchup, taking approximate measurements from the real Sawtooth, and making adjustments to fit my skill level and plan for the tent. Once I had the rough idea in my head, I really just had to make sure that no panel in my design would exceed 58", as that is the max width of most fabric you will find at consumer outlets online. No problem.
Then I hopped online to research fabric and decided on 40D PU coated HyperD SilNylon by RSBTR. It was a little heavier than I would have liked but the PU coating certainly made the fabric easy to work with when it came to basting fabric together to form complex seams like the flat-felled. Throughout the project, I was a little worried about the life span of the PU coating. I ended of finding some info on this specific fabric and found out that it is actually a Polyether coating, which is more resistant to hydrolysis. This could be wrong, just one of many interesting rabbit holes I found myself down.
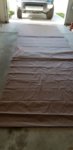
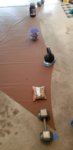
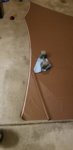
The fabric finally arrived, folded neatly in a shipping bag...I guess. The next process was to lay the fabric out and begin cutting panels, or so I thought. On my cold and hard garage floor, I used a soapstone pencil and painters tape to measure everything out per the specs in my Sketchup design. Luckily the fabric is delivered wrong side to wrong side (PU to PU) so that makes it easy to double up the layers and cut mirrored panels in one process. Throughout this process, you learn small but impactful characteristics of the material, such as the silnylon side is non stick to everything on the face of this planet. So you kind of have to find what works for you by using small clamps and tape to keep things uniform and taut. Weights and buckets of reloading brass are key here!
So I get the 2 main panels cut and decide to sew them together. I don't think I cut the remaining panels yet but I'm not sure.
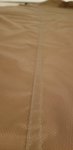
I'm going for the flat felled seam on the ridgeline using a newish cheap Singer, but I did get a walking foot which turned out to be instrumental in the quality and consistency of the stitch. I ended up making a pretty big mistake early on by not paying attention to the bottom side of the fabric while sewing the "second stage" of the flat felled seam and put a few feet of holes veering into the middle of the panel that I didn't realize was being overlapped. I skipped over the cat cut, but don't worry I'll have to do that again anyway.
I'm furious, questioning if I even want to do this project. I scrap the panels to use for something else later and order replacement fabric, this time in foliage versus the original brown. Weeks pass and the new fabric is in. I start over again. Line up the fabric, measure, measure again...wait a sec. I run up and down the stairs back and forth to my PC and realize that I didn't even take angles into account on the first cut of the panels. I get all of the angles done in Sketchup and put them in my Onenote. More trips up and down the stairs. I also realize that one half of my drawing was skewed for some reason while the other half (thing mirrored through the middle) was correct. That was close!
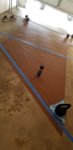
I redo all my soapstone layouts on the new fabric and make the cuts. I cut out all the remaining panels as well now that I restored my sanity a bit. Due to my expensive test run, I realize that I must use a lot of basting tape to make sure the seam is taut prior to sewing. It's also key to keep pressure on both sides of the seem while sewing as a backup and is more closely resembles the stress the seem will be under when pitched to make it look cleaner. Could use another hand. Oh yeah, for the catenary curves, I only did them on ridgeline edges because they are a pain in the ass. I used an excel sheet and mapped out XY coordinates to trace the perfect curve. Kneepads!
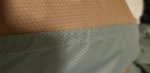
I get all of the panels together relatively flawless. The only thing I should have done in hindsight was build my flat-felled seam face to face versus PU to PU so that the "joint" of all the panels meeting at the top weren't showing on the outside. I think this is also a factor of not using an official flat-felled method I guess, but it worked for me.
The final hurdle was the zipper. Another technique I've never done that I have to do right the first time. Am I going to do a test run with scrap? Hell no. It went okay actually, it just looks messy. I made the grey flap too narrow so some of the thread went into the panel itself. It's fine though. I went with a Uretek #5 zipper for max water resistance. I then finished the tent up with the tie-outs and 1000D Cordura for the pole reinforcements. I've tried a couple of aluminum poles from Easton and REI but might shell out for a carbon fiber one later.
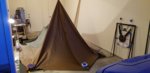
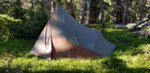
And that's pretty much it. Might put in a stove jack at some point but it's nice to have my evenings back. Enjoy the pics.
On projects like this, you learn more about yourself, like when you need to stop because you aren't at 100% anymore and at 90% you start the make compromises and shortcuts which will lead to mistakes. There is only right or wrong and you will have to live with the compromised performance of the product at the end of the day.
Started making my replica in May of this year after it was decided that my dad would be joining me on his first Elk hunt and I wanted something roomy enough for us without breaking the bank.
I began by doing some simple design in Sketchup, taking approximate measurements from the real Sawtooth, and making adjustments to fit my skill level and plan for the tent. Once I had the rough idea in my head, I really just had to make sure that no panel in my design would exceed 58", as that is the max width of most fabric you will find at consumer outlets online. No problem.
Then I hopped online to research fabric and decided on 40D PU coated HyperD SilNylon by RSBTR. It was a little heavier than I would have liked but the PU coating certainly made the fabric easy to work with when it came to basting fabric together to form complex seams like the flat-felled. Throughout the project, I was a little worried about the life span of the PU coating. I ended of finding some info on this specific fabric and found out that it is actually a Polyether coating, which is more resistant to hydrolysis. This could be wrong, just one of many interesting rabbit holes I found myself down.
The fabric finally arrived, folded neatly in a shipping bag...I guess. The next process was to lay the fabric out and begin cutting panels, or so I thought. On my cold and hard garage floor, I used a soapstone pencil and painters tape to measure everything out per the specs in my Sketchup design. Luckily the fabric is delivered wrong side to wrong side (PU to PU) so that makes it easy to double up the layers and cut mirrored panels in one process. Throughout this process, you learn small but impactful characteristics of the material, such as the silnylon side is non stick to everything on the face of this planet. So you kind of have to find what works for you by using small clamps and tape to keep things uniform and taut. Weights and buckets of reloading brass are key here!
So I get the 2 main panels cut and decide to sew them together. I don't think I cut the remaining panels yet but I'm not sure.
I'm going for the flat felled seam on the ridgeline using a newish cheap Singer, but I did get a walking foot which turned out to be instrumental in the quality and consistency of the stitch. I ended up making a pretty big mistake early on by not paying attention to the bottom side of the fabric while sewing the "second stage" of the flat felled seam and put a few feet of holes veering into the middle of the panel that I didn't realize was being overlapped. I skipped over the cat cut, but don't worry I'll have to do that again anyway.
I'm furious, questioning if I even want to do this project. I scrap the panels to use for something else later and order replacement fabric, this time in foliage versus the original brown. Weeks pass and the new fabric is in. I start over again. Line up the fabric, measure, measure again...wait a sec. I run up and down the stairs back and forth to my PC and realize that I didn't even take angles into account on the first cut of the panels. I get all of the angles done in Sketchup and put them in my Onenote. More trips up and down the stairs. I also realize that one half of my drawing was skewed for some reason while the other half (thing mirrored through the middle) was correct. That was close!
I redo all my soapstone layouts on the new fabric and make the cuts. I cut out all the remaining panels as well now that I restored my sanity a bit. Due to my expensive test run, I realize that I must use a lot of basting tape to make sure the seam is taut prior to sewing. It's also key to keep pressure on both sides of the seem while sewing as a backup and is more closely resembles the stress the seem will be under when pitched to make it look cleaner. Could use another hand. Oh yeah, for the catenary curves, I only did them on ridgeline edges because they are a pain in the ass. I used an excel sheet and mapped out XY coordinates to trace the perfect curve. Kneepads!
I get all of the panels together relatively flawless. The only thing I should have done in hindsight was build my flat-felled seam face to face versus PU to PU so that the "joint" of all the panels meeting at the top weren't showing on the outside. I think this is also a factor of not using an official flat-felled method I guess, but it worked for me.
The final hurdle was the zipper. Another technique I've never done that I have to do right the first time. Am I going to do a test run with scrap? Hell no. It went okay actually, it just looks messy. I made the grey flap too narrow so some of the thread went into the panel itself. It's fine though. I went with a Uretek #5 zipper for max water resistance. I then finished the tent up with the tie-outs and 1000D Cordura for the pole reinforcements. I've tried a couple of aluminum poles from Easton and REI but might shell out for a carbon fiber one later.
And that's pretty much it. Might put in a stove jack at some point but it's nice to have my evenings back. Enjoy the pics.
On projects like this, you learn more about yourself, like when you need to stop because you aren't at 100% anymore and at 90% you start the make compromises and shortcuts which will lead to mistakes. There is only right or wrong and you will have to live with the compromised performance of the product at the end of the day.
Attachments
-
 20190510_161220.jpg133.4 KB · Views: 279
 -
 20190518_105236.jpg146.3 KB · Views: 276
 -
 20190518_122755.jpg131.6 KB · Views: 264
 -
 20190518_135621.jpg123 KB · Views: 261
 -
 20190522_150526.jpg103.4 KB · Views: 265
 -
 20190613_180255.jpg81.5 KB · Views: 268
 -
 20190620_215918.jpg131.7 KB · Views: 280
 -
 20190628_212905.jpg136.3 KB · Views: 330
 -
 20190721_081348.jpg345.3 KB · Views: 338
 -
 20190721_081334.jpg352.4 KB · Views: 334
 Makes it so much cooler getting to use stuff you made.