Seek Outside U-Turn Mods

TomJoad

WKR
Joined
Jul 13, 2020
Messages
410
Location
CO
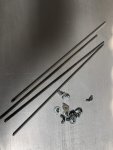
So I just came into a SO U-turn stove for my floorless... I'm less than impressed with the legs:

- cheap steel threaded rod
- hardware store fasteners: wing nuts... really?
- all heavy and janky

My biggest issue is having not having fixed stops on the threaded rod based on the stove height which doesn't change. This seems like a no-brainer. I get that this will allow for crazy deep adjustment to foot height for leveling but I have several stoves with no adjustment and I make them work fine with shimming in the field. This set-up also seems overly heavy.

Here's what I'm trying:
- Change to 3/16 OD x 8.5" ti rod, threaded 10-24 on both ends: faster install, lighter weight
- Make 5" Aluminum tube feet threaded for 10-24 to tension bottom: lighter weight, faster install
- install low profile rivet nuts (10-24) to stove top: Enables totally flat top for cooking, less parts to lose

So with this new set-up, the threaded rod would still tension the stove bottom to top but would be fastened to rivet nuts in the top (vs. wing nuts) and threaded tube feet on the bottom for ground clearance.

Questions:
- Aluminum has a much lower melt temp than steel or Ti but it also has excellent conduction. I think it should be able to shed heat fine for the feet but we will see! Ti- tube is way too expensive in this application for me.

Here's the part list:
Ti Rods: https://www.mcmaster.com/89145K12/
Alum feet: https://www.mcmaster.com/1658T32/
Rivet nuts: https://www.mcmaster.com/98560A551/

I'll post up pics once I do this but meanwhile any ideas you all have for doing this differently I'm all ears!

C0DCB841-EEED-4EE3-A41D-8918023D21B3.jpeg
Here’s where it stands today: 16 loose parts and 5.7 oz (161 grams).
 

Attachments

  • 0AE80F6D-4C53-43AD-9BC2-A3F56B6DC7CD.jpeg
    0AE80F6D-4C53-43AD-9BC2-A3F56B6DC7CD.jpeg
    260.5 KB · Views: 46
Last edited:
OP
TomJoad

TomJoad

WKR
Joined
Jul 13, 2020
Messages
410
Location
CO
I'll make sure to get an accurate gram count on both set-ups. Primary for me is assembly + functionality but the weight will be a bonus.
 

sneaky

"DADDY"
Joined
Feb 1, 2014
Messages
10,063
Location
ID
Sounds like a lot more parts to do the same thing and save about an ounce and a half. Have at it though!

Sent from my SM-G955U using Tapatalk
 

Erict

WKR
Joined
Jun 28, 2020
Messages
602
Location
near Albany, NY
Besides the differing expansion/contration rates, you may also want to think about galvanic corrosion depending on exactly what metals you end up using.
 
OP
TomJoad

TomJoad

WKR
Joined
Jul 13, 2020
Messages
410
Location
CO
Yeah this is more for simplicity than weight.
Current system has 4 rods, 8 wingnuts, 4 feet: 16 loose parts.

New system has 4 rods and 4 tube “feet”: 8 parts total 1/2 the current system and none as small like wingnuts. Rivet nuts are permanently attached to the top so nothing to loose there.

For the science nerds I’m not aware of chemical reactions with alum and Ti, I thought that was a carbon steel/alum reaction. Regardless that’s for long term connection, the alum feet will only be in contact with the Ti Rods for burning, not long term storage.
 

sneaky

"DADDY"
Joined
Feb 1, 2014
Messages
10,063
Location
ID
When you heat all those small threads up you're gonna have a helluva time unscrewing them. Think there is a reason that stoves don't come with a lot of threaded pieces put together?

Sent from my SM-G955U using Tapatalk
 
OP
TomJoad

TomJoad

WKR
Joined
Jul 13, 2020
Messages
410
Location
CO
When you heat all those small threads up you're gonna have a helluva time unscrewing them. Think there is a reason that stoves don't come with a lot of threaded pieces put together?

Confused, medicated or both? Current SO stoves have 16 THREADED COMPONENTS!
This configuration cuts that in half. If your going to troll at least read the thread and know something about the product.
 
Last edited:
Joined
Apr 18, 2019
Messages
349
I wouldn't worry about galvanic corrosion, it'll be on/off so often it'll never be a problem, and it'll stay dry when assembled anyways. I would worry a little about softening in the aluminum threads - but you could helicoil them ahead if time and that would alleviate that concern (also help with corrosion). Neat idea, I've always thought the threaded rod wing nut solution was a bit weak. Maybe throw some high temp anti seize like boron nitride on there to help assembly.
 
OP
TomJoad

TomJoad

WKR
Joined
Jul 13, 2020
Messages
410
Location
CO
So small update... ordered the parts tonight and chickened out on the Ti rod. I’ve machines plenty of steel and aluminum but never Ti. Ducking into a few machining forums tonight were filled discussions of nightmarish work hardening, gummy, grabby quality and overall toughness I decided to bail on threading the ends of my rods. I only have HSS dies and while some folks concede is technically possible to do with HSS, solid carbide is the way to go. No thanks. I’ve got ample drawers of taps and dies, I don’t need to collect more for one project.

So I did substitute aluminum threaded rod for the Titanium I originally planned for... mostly because I can buy it threaded for $3.74 and if I want to by the Ti fully threaded it’ll be like $90 😳 I‘m marginally concerned about the heat for the two legs in the stove but not excessively. The ones on the outside corners will be fine. So I’m going to go for 8” al threaded rod short sections threaded into rivet nuts in the lid and aluminum tube feet under the base. I’m planning on only tapping 1/2” in the tube feet and permanently installing the rods into the feet so I’ll be going from 16 loose parts to 4 loose parts... basically a long foot/screw combination that holds both the stove together under tension and keeps it 5” off the ground.

After I get this together I’m going pressure test everything: fire it up as hot as conceivable for several hours and see if I can get those rods to burn up. If I have a failure there I’ll move back to steel rods (1/2 length) and coat them prior to assembly to prevent corrosion. Worst case scenario I lost $3.74 on aluminum.
 
Joined
Apr 18, 2019
Messages
349
After I get this together I’m going pressure test everything: fire it up as hot as conceivable for several hours and see if I can get those rods to burn up. If I have a failure there I’ll move back to steel rods (1/2 length) and coat them prior to assembly to prevent corrosion. Worst case scenario I lost $3.74 on aluminum.

Well that's not actually the worst case, the worst case is you get molten aluminum all over the stove - which is pretty likely. Even worse than that is actually igniting the aluminum and damaging the stove - which is pretty unlikely.

Red hot (https://en.m.wikipedia.org/wiki/Red_heat#Stirling) is above the melting temperature of aluminum (660C) and it's pretty easy to get those titanium stoves red hot. As a leg you're wicking heat away so it's unlikely to get that hot, but inside the stove absolutely.
 
OP
TomJoad

TomJoad

WKR
Joined
Jul 13, 2020
Messages
410
Location
CO
Well that's not actually the worst case, the worst case is you get molten aluminum all over the stove - which is pretty likely. Even worse than that is actually igniting the aluminum and damaging the stove - which is pretty unlikely.

Red hot (https://en.m.wikipedia.org/wiki/Red_heat#Stirling) is above the melting temperature of aluminum (660C) and it's pretty easy to get those titanium stoves red hot. As a leg you're wicking heat away so it's unlikely to get that hot, but inside the stove absolutely.

I VERY MUCH appreciate your concern, but I'd have to disagree with you... Aluminum's flash point is 2535C. Titanium is molten at 1670C. It's not just unlikely, it's physically impossible, I'm not inserting the whole unit into a glass furnace! 😂

As for damaging the stove, I see no risk. I see no chance molten aluminum is going to bond with my stove bottom, sides or top while they are covered with soot, debris, oxidation and ash. That is one dirty bird. If by remote chance there is any adhesion it can be polished off with a wire wheel, AL is MUCH softer than Ti. This is not a brazing operation, I didn't clean and flux the unit.

I do think (as mentioned) that it's possible for those inside rods (front two) will melt. I honestly think its a coin toss not a guarantee, but I see no chance for the back rods to melt as they are surrounded by air and AL is a great conductor. So I wound not be surprised if I end up with steel front rods and aluminum back rods. We shall see! I'll try to have a vid going of the first test so you guys can see me make a mess of my pea gravel if/when it falls apart.
 
Joined
Apr 18, 2019
Messages
349
I VERY MUCH appreciate your concern, but I'd have to disagree with you... Aluminum's flash point is 2535C. Titanium is molten at 1670C. It's not just unlikely, it's physically impossible, I'm not inserting the whole unit into a glass furnace! 😂

As for damaging the stove, I see no risk. I see no chance molten aluminum is going to bond with my stove bottom, sides or top while they are covered with soot, debris, oxidation and ash. That is one dirty bird. If by remote chance there is any adhesion it can be polished off with a wire wheel, AL is MUCH softer than Ti. This is not a brazing operation, I didn't clean and flux the unit.

I do think (as mentioned) that it's possible for those inside rods (front two) will melt. I honestly think its a coin toss not a guarantee, but I see no chance for the back rods to melt as they are surrounded by air and AL is a great conductor. So I wound not be surprised if I end up with steel front rods and aluminum back rods. We shall see! I'll try to have a vid going of the first test so you guys can see me make a mess of my pea gravel if/when it falls apart.

I did say catching them on fire is unlikely - but you can pretty easily melt aluminum in an open campfire, so the inner rods will likely melt. You'll have a hot stove with failing internal structural members - the risk is low that something will be damaged but it then again it's not my stove so feel free. I've failed enough parts that I'm more careful when the words "I can't think of how this could possible cause damage." Just because I'm not creative enough to imagine how this could cause damage - doesn't mean it won't...
 

sneaky

"DADDY"
Joined
Feb 1, 2014
Messages
10,063
Location
ID
Confused, medicated or both? Current SO stoves have 16 THREADED COMPONENTS!
This configuration cuts that in half. If your going to troll at least read the thread and know something about the product.
I'm not trolling, and I'm also not the person who plans on putting aluminum pieces on a hot ass stove. Go right ahead, learn the hard way, it's your stove. My stove came with threaded riv nuts installed and each leg has stops that are held in place with set screws. I have the four leg pieces with pre set stops and the stove body. You'd be money ahead to set yours up similarly. But, since you know it all, I'll let you figure out out on your own.

Sent from my SM-G955U using Tapatalk
 

Marbles

WKR
Classified Approved
Joined
May 16, 2020
Messages
3,711
Location
AK
On galvanic issues with Al and Ti go down to the table under galvanic corrosion risk. Even though there is a risk between those two, I don't think it will be a significant problem, and even if it was the Al would undergo oxidation, no the expensive Ti, so perhaps just a slightly shorter service life for the parts. Another reason to think it will not be an issue in reality is there is also galvanic corrosion risk between steel and Ti.

I do think Al rods will fail. However, as you will be testing it I hope you prove that assumption wrong.

Another option would be to weld a stop to supports the bottom of the stove and eliminate 4 wing nuts. Remove the threads from sections that don't need them to shave weight. Still use the low profile rivet nuts. Still use Al rod to make feet.
 
OP
TomJoad

TomJoad

WKR
Joined
Jul 13, 2020
Messages
410
Location
CO
On galvanic issues with Al and Ti go down to the table under galvanic corrosion risk. Even though there is a risk between those two, I don't think it will be a significant problem, and even if it was the Al would undergo oxidation, no the expensive Ti, so perhaps just a slightly shorter service life for the parts. Another reason to think it will not be an issue in reality is there is also galvanic corrosion risk between steel and Ti.

I do think Al rods will fail. However, as you will be testing it I hope you prove that assumption wrong.

Another option would be to weld a stop to supports the bottom of the stove and eliminate 4 wing nuts. Remove the threads from sections that don't need them to shave weight. Still use the low profile rivet nuts. Still use Al rod to make feet.

Thanks for the ideas in this post. Can you explain what the welded stops would get me in this case? I was planning on the top of the legs being the stops.

For those following I did change my riv nut spec. I hadn’t looked at the tolerances for acceptable sheet thickness before posting but I did before ordering... good thing as the bottom pan is way thinner than the low end of that tolerance. I considered using a standard rivet nut which I have in my fasteners cabinet but it’s right on the line as well so I ended up with this spec:

Heavy Duty Twist-Resistant Rivet Nut, Steel, 10-24 Internal Thread, .010"-.085" Material Thickness

It gives this connection .005 under tolerance which is better than nothing.
 
OP
TomJoad

TomJoad

WKR
Joined
Jul 13, 2020
Messages
410
Location
CO
I'm not trolling, and I'm also not the person who plans on putting aluminum pieces on a hot ass stove. Go right ahead, learn the hard way, it's your stove. My stove came with threaded riv nuts installed and each leg has stops that are held in place with set screws. I have the four leg pieces with pre set stops and the stove body. You'd be money ahead to set yours up similarly. But, since you know it all, I'll let you figure out out on your own.

Sent from my SM-G955U using Tapatalk

thank you for your continued contributions. What would be awesomely un-troll like would to give some more details on your stove, as that would be pertinent and helpful to this mod.

Is this an SO unit or someone else’s? I’d be interested to learn if they changed their spec and any indications of why, because as you likely read my stove does not currently have a rivet nut + 4 leg setup (it’s got 16 loose parts).
Also really would love to know if they inserted the rivet nuts over or under the top of the stove. Mechanically they should be put through from bottom to top which lands the nuts on top (keeps the rivet clinch in tension). Since the stove assembly is under very low tension I’m planning on rolling the opposite way to keep the stove top nice and flat as well as land the thickness of the nuts inside the depth of the Top sheet flange to reduce my overall packed thickness... but that’s not keeping the nuts under tension and eventually I could see it leading to a failed (spinning) rivet nut.

so any photos of this part of your stove would be appreciated!
 
Last edited:

Marbles

WKR
Classified Approved
Joined
May 16, 2020
Messages
3,711
Location
AK
Thanks for the ideas in this post. Can you explain what the welded stops would get me in this case? I was planning on the top of the legs being the stops.

I may be miss understanding what you plan to do, so you may already have a better solution.

The welded stop would simply be to eliminate a loose piece. If I'm understanding correctly, your top nut will be the rivet nut fixed to the top of the stove. The lower stop nut is what I'm suggesting welding in place. You could weld a hex nut (which should be lighter than a wing nut), or a washer to save a few more grams. With the lower stop nut fixed tension would be applied by screwing the rod into the rivet nut at the top. Bending 1-2 inches at the bottom of the rod to create an L shaped foot would make it easy to screw the rod into the rivet nut and get a small amount of tension on it and could bring you down from 16 to 4 pieces. Not sure how well L feet would work as feet though.
20200917_052852.jpg

Ok, after rereading your original post I see what you're planing to do and why the above does not apply. I had pictured something very different. I'll leave the above though, just in case the aluminum gets to soft from the heat touching the stove box. Only way to really know is to try, and at $3 for 2 feet there is not much to loose in doing so.
 
Top