Rattle Can Sage Brush Camo paint suggestions

WyoHuntr

FNG
Joined
Oct 14, 2020
Messages
77
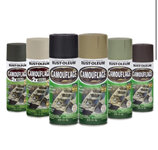
Any paint color / type / brand suggestions for a Sagebrush Camo??? **Hopefully from someone that has done it, and not just guessing like I can do myself**

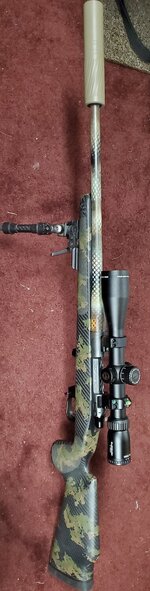
I have to revamp my .204 AR-15, for the second time. (I need to build it with a forward assist for quieter loading). Last time I did air-cured Duracoat in ACU Gray and some sort of light FDE. I wasn't super happy with how it turned out: I solid colored the parts. I'm going to do a camo job with this one.

Figured the Predator forum is pretty active, and relevant to hiding in sagebrush. (Someone posted this in DIY Modifications and got crickets).
 

holder171

FNG
Joined
Sep 27, 2021
Messages
32
I did this one a few years ago. Just did a base layer then took cut up sponge pieces for the pattern.
8ba47380626fd529da30b4f68330e4dd.jpg

2f685db7a5d9b1c612cf33bd934568b5.jpg


Sent from my iPhone using Tapatalk
 

WCB

WKR
Joined
Jun 12, 2019
Messages
3,286
Not sure what exactly you are looking for. I have "rattle canned" a bunch of guns. Prep Prep Prep is the name of the game I have found out with spray paint. I always use a light base color with the built in primer. Ten just attempt whatever pattern I want to try.

All of my most recent ones I dip using spray paint and like the results better then just spraying or sponging. With an AR it takes A LOT of time to dip.

I don't have any pics of my AR but here is one of my varmint guns I dipped. If you mixed the right colors your gun will disappear. 20200111_125826.jpg
 
Joined
Nov 30, 2020
Messages
343
Rustoleum worked fine for me. Scuffed the stock a little then cleaned very well. Following the multiple coat procedure on the can then finished it off with a matte clear coat. 62950D88-3CCB-4810-8C3B-119A53945D26.jpeg
 

DRNalaska

FNG
Joined
Nov 2, 2021
Messages
35
Location
Alaska
Rustoleum has worked well for me and they’ve got a great color selection. Make sure you clean really well before you paint. No experience hunting sage brush, but I generally pick 3-4 colors that match the habitat. Spray a solid base coat of the lightest color on the rifle, then use a mesh laundry bag as sort of a stencil to spray the other colors over in a camo pattern.
 
Joined
May 3, 2020
Messages
542
I got some textured rattle can paint for my tikka m695 years ago because the synthetic stock was slick as snot. It has the texture of sandpaper if you sprayed paint over it which makes it pretty dull and grippy which is what I was looking for. I don’t remember the brand but it was just an on the shelf hardware store can, probably a rust oleum product. I used a olive drab color because I thought it looked good and figure the animals don’t care what it looks like as long as it’s not shiny, so pick out whatever color camo pattern looks good to you.
 

TheGDog

WKR
Joined
Jun 12, 2020
Messages
3,271
Location
OC, CA
Don't know if this satisfies what you refer to as "SageBrush Camo" but this is what my Remington 783 .223 Rem bolt gun looks like now. As you can see from the photo, a good match for the Kryptek pattern.
ComparedtoKryptek.jpg

Just the various Krylon Camo-specific cans of Ultra Flat Matte colors.

As I recall Krylon "Sand" Ultra Flat Matte as the base.

After masking, I wrapped elastic stretchable Halloween netting all around the firearm before doing the larger stripes of a Matte Earth Brown. (I think that was from a bunch of Rustoleum I already had?) To break-up the base color.

Then cut yourself some sponge pieces approx 1.5 x 1.5 in. Then tear away pinches of the sponge bottom surface in order to create a very randomize shape to dab with.

In larger lighter colored area... use the sponge pieces to lightly dab-in your contrasting darker colors to breakup the lighter areas, and conversely on the darker strip areas... dab into those areas with your lighter colors so the darker region are also not rigidly defined in their edges.

NOTE: Don't dab it on right after dipping it into some paint. Take that dipped sponge and first dab it a buncha times upon your palette you have the paint sprayed onto. You want it to kinda get tacky/grabby with the paint, NOT WET LOOKING! Otherwise it'll blop on way too much with those first few dabs.

As you're dabbing, make sure to rotate the sponge randomly a little bit before each dab so the pattern it has is never repeated on the gun.

I have to paint them across saw-horses. If you can hang it to paint that'd be way better. If you have to use saw-horses to lay it across like I did, make sure to put a fresh piece of masking tape across the top edges of that plastic sawhorses to give it a "clean" surface to lay against.

After each step, ya need to give it 30+ min to dry before going to the next step.

NOTE: On other rifles I tried incorporate a Gray color, wanting to mimic the color of the dead oaks. I had to mix-in just a little bit of like the Sage or the Brown into that Gray upon the palette in order to slightly darken down the "loudness" and "brightness" of the color of that Gray shade I used.

Here is a similar one I did for my .308 Win. I was running low on the sand base coat, and because the intent was for this camo to be a little more Alpine in appearance, I opted to then use whatever sage/green color it was on the barrel, then just dither it in with the lighter colors.
Savage308WinCamoedUpWithVeracityScope.jpg

THEN: the Matte Clear Coat. At least 2 or 3 coats. It'll look shiny there for a substantial bit until it dries more so don't freak out.
 
Joined
Aug 26, 2013
Messages
2,258
Location
New Orleans, La.
I finished the painting, then added 4 coats of matte clear, and it's been drying for two days. I seem to remember in another thread about painting the stock to let it cure for a couple weeks to make sure it's hard enough. Just thought I would get your opinion.
 

GARLICSALT

Lil-Rokslider
Joined
Jul 19, 2021
Messages
147
I spray the the entire item (shotgun, rifle, duck boat, duck boat engine, whatever) with a base coat of flat tan or whatever your flavor. Then I grab a handful of grass or brush I find in the yard or at the park or in a field. hold the brush in one hand and lay over the gun hit the brush lightly (less is more) with the color or your choice, I use brown. want to fancy it up a bit have a can of flat black within easy reach and move the brush just slightly and hit the area again with the black for a neat shadow effect. You can hit with the black first and color over that for the shadow as well. Both look cool.Try samples on cardboard and then you don't need to waste your tan paint. Super simple, don't over think it. Remember LESS IS MORE!

I have done several boats and guns and a boat motor this way, When they need a touch up just hit the area again no big deal.

Have fun with it.

Edit.... here is the motor I did tan base color, found some weeds in the backyard and shot brown right over the top of them
 

Attachments

  • IMG_6148.jpeg
    IMG_6148.jpeg
    324.5 KB · Views: 15
Last edited:
Joined
Aug 10, 2015
Messages
1,119
Location
Coeur d alene, ID.
Use a flat or matte or satin if you have to. Play with a broom stick old stock or something 1st then try till you like it. Have used laundry bags, fish net, grass and sponge before.

Latest to just knock the stainless down for a dog rifle.
 

Attachments

  • 20231216_083627.jpg
    20231216_083627.jpg
    137.4 KB · Views: 28

ORhunter74

Lil-Rokslider
Joined
Mar 26, 2018
Messages
124
Location
Oregon
Krylon, Rustoleum plus USC Spraymax 2k matte clear. The clear is much flatter and more scratch and chemical resistant than the ones that the two spray paint companies make. It’s toxic as all get out so use a respirator. It’s a two part with the catalyst built into the bottom of the can. Once you break the seal so to speak, you have like 8 hours to use the can. I’ve gotten 4 coats from a can both times I’ve used that stuff. I also use vinyl stencils and really like the results I’ve been able to get. Here’s a couple Tikkas I used these methods on. IMG_9314.jpegIMG_5446.jpeg
 
OP
WyoHuntr

WyoHuntr

FNG
Joined
Oct 14, 2020
Messages
77
Wow, this thread revived from the dead! I posted it two years ago looking for colors that matched well with sagebrush. I was out of the country and didn't trust the colors based on computer images. It turned into an unsolicited tutorial, which I figured would benefit other folks, so I just let it be. (Always good to see different ways to do things). Back then, I went a different route and did Coyote Rifle version 3 with a better receiver set all in FDE.

Funny timing for a revival, because I just grabbed a few cans of Brownells Aluma-Hyde II in Magpul FDE&Coyote Grey. Not sure when I'll do a project, but if I do, I'll post the results! Until then, good luck out in the hills!
1000007657.jpg
 

wapitibob

WKR
Joined
Feb 24, 2012
Messages
5,425
Location
Bend Oregon
Go cut some sage brush sprigs, lay down a base coat of paint, then paint with the sprigs as stencils. That's how we did camo in the 70's.
 
Top