Breaking Rules, Tack, and Everything Else: My DIY Horseback Hunting Chronicle

Still alive, and no rodeos. Just haven't had the time to do a decent write-up on the trips.

The 5-day sheep trip was a bust and had to call it early, but still a ton of fun. (Logistics issues and some gear failures - Will post later.)

But, it's been a really good few weeks.

9bAg3kV.jpeg


VazbE6C.jpeg


Any updates?
 
Figured this thread was due an update. This one will be short though, as there isn't really anything super cool to report.

Sheep Trip - The Bad
My enthusiastic 5-night/6-day sheep opener trip was cut short, due to government red tape (or my stupidity), and some equipment failures. Short version is on Night 1 of my trip, I got an inreach message from my wife saying "Oh btw you got a parking ticket for your horse trailer."

Well that doesn't make sense, because I registered my truck with a park pass. Well turns out if you read the fine print, you also have to register the trailer too. So, I had to decide if I wanted 6 days of parking tickets or not....

As far as equipment failures, my titanium pack stove had a couple of issues: The glass window on the front of the stove cracked during travel, and the rolled stove pipe was also crushed at some point. It was salvageable, but not a ton of fun setting things up. But it's not like it's -20 here, so it wasn't the end of the world. (Recommendation: Swap out the glass for steel, and store your stove pipe inside a hard container like a PVC pipe or something.)

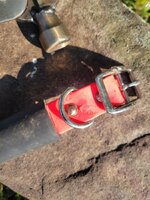
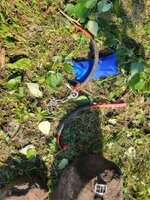
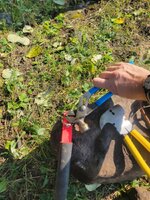
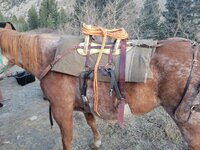
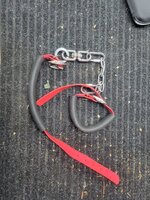
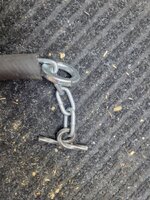
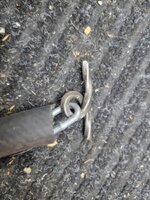
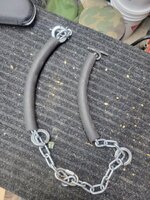
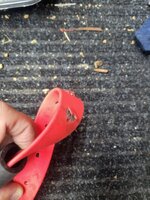
But the thing that really sealed it was my hobbles. I've been experimenting with a mix of different hobble setups, and had settled on biothane dog collars with a chain in the middle. This worked great around the barn and during light use.

Fast forward to being out in the mountains with horses new to hobbles, and then cutting them loose on rough ground, and yeah. Popped the garbage, made-in-china rivets in about 2 hours. I managed a field repair (always have a possibles pouch with you), but by next morning, the biothane material itself was tearing/failing.

So between all of that, the trip was cut short. AKA I did not follow my @missjordan sticky note from last season, and I bitched out.

Sheep Trip - The Good
Lots of small wins on this short trip though:

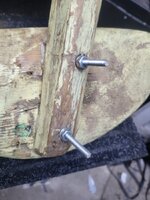
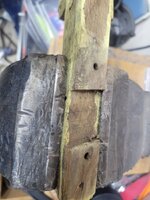
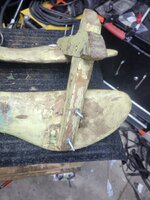
-- My janky channel-lock pliers + hammer was a huge success.

-- 10" nail spikes for the 4 corners of the tipi tent were a great idea.

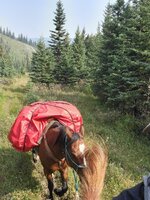
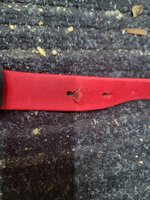
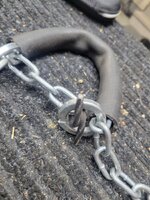
-- The lash rope + diamond hitch works darn well. I swapped out the braided nylon rope I was using during early summer for a 1/2" climbing rope I had laying around (I cut a 50ft length), and it works waaaaaay better. (Nylon rope seems to stretch too much, so I stopped using it on the pack saddle. Both lash and sling ropes are now climbing rope material.)

Sheep Trip - The Weird
So here's one I could use some pro help on:

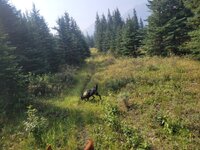
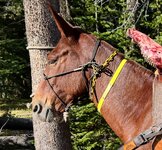
Both on the trip in, and the trip out, my mare/pack horse would just stop. Like plant all four feet and refuse to move. It seem to happen mostly on the down-hill sections, which sucked.

I worked around it by either just leaving her (shes hardcore herd-bound), and after I got ahead about 20m, she would start to boogy to catch up. But this is not my preferred solution, that's for sure.

I'm thinking this is just a saddle fit issue, but I don't know. She didn't have any hot spots, no hair rubbed off, and the saddle was sitting correctly in the pocket as best I could tell.

She's done this on a recent trip on me as well again (and with waaaay lighter panniers that trip), so I don't know.

***

So that's it for this update. I've managed to fit in a few more day-trips since the beginning of the month, and even managed to connect with another Rokslider local to me and have done some rides together. Still hoping to get in some 3/4 day trips between now and the end of October. Then the rifle elk opener hits, and that's a different game.
 

Attachments

  • 3a118349-1086-47e2-b2ed-b8cc931077a8.jpg
    3a118349-1086-47e2-b2ed-b8cc931077a8.jpg
    551.1 KB · Views: 26
  • 8fe0abca-54f7-4c7f-9d41-83a0183d80e8.jpg
    8fe0abca-54f7-4c7f-9d41-83a0183d80e8.jpg
    333.4 KB · Views: 25
  • 67d258cd-d5ec-4c57-bc12-60c52ab62a82.jpg
    67d258cd-d5ec-4c57-bc12-60c52ab62a82.jpg
    710.2 KB · Views: 24
  • b3d101b3-e2a1-4575-bc78-0759239c1cce.jpg
    b3d101b3-e2a1-4575-bc78-0759239c1cce.jpg
    613.4 KB · Views: 26
  • fae4af24-1dc2-4d50-933a-0e87e31a4f79.jpg
    fae4af24-1dc2-4d50-933a-0e87e31a4f79.jpg
    582.3 KB · Views: 27
  • fdfc516d-c628-4115-b355-7cd5b3234473.jpg
    fdfc516d-c628-4115-b355-7cd5b3234473.jpg
    398.7 KB · Views: 27
Tip On Hobbling
While I'm typing stuff, I wanted to mention a tip about hobbles and feeding. (I'm quite certain I picked this tip up from the forum, but I can't remember who told me.) I'm not saying this is the right way to do this, but just what has worked for me this summer and fall so far:

I highline my horses during the night. So, when I get up in the morning, the horses are HUNGRY. My routine is I walk them out to wherever they can graze, put their hobbles on, and then take their halter off and leave them be.

What you're watching for: The horses will have their heads to the ground, and start CHOWING. They will take tiny little steps, and keep mowing down grass.

Depending on the grass quality, at some point your horse will start slowing down. It'll start taking bigger steps with the hobbles, maybe even hopping. It'll stop chomping down everything in sight, and instead start to get a little more picky in what it wants to eat. It'll raise it's head, look around, maybe wander a bit, then go back to eating for a little bit.

This is when I catch them and put them back on the line/tie to a tree.

I'm posting this here because this routine wasn't obvious to me when I first started. I was all "Well how long do you graze for? How do you even do this hobble/feed thing?"

Short answer is your horse likely would eat non-stop if it could, so it'll always want to graze. The trick seems to be watching for when they switch from "Chowing like starving man on a ribeye" to being picky eaters, looking around at things, and starting to wandering off to random places not near where they should be.


The above assumes you're in a decent grazing spot. If you're in sparse grass, your ponies will wander trying to find feed. So you have to use some judgement here.
 
I love this thread! It's great that you're getting out there and doing it!

The Custom Pack Rigging biothane hobbles work great. Easy to put on and take off. Very durable, too. I've been using them for years.
 
I have a question. Have you been able to pinpoint a pattern to the mare planting her feet? How long will she travel before stopping? How steep?

Trying to get an idea if there’s the off chance she might be sore in the hind end and that’s why she’s stopping. Or if she’s being a crack. My guess is on the second choice since she has a history of similar tendencies but it’s worth asking just to make sure


Sent from my iPhone using Tapatalk
 
I carry the same hammer set up you have. I use it for putting shoes back on, camp chores, all kinds of stuff. It’s unbelievable handy.

For hobbles I’ve always used leather. Leather has its own life. It’s breathable and pliable, and can break under heavy strain.

Your mare may be getting pinched by the pack saddle. Shoulder pain can cause horses to lock it up and quit.


Sent from my iPhone using Tapatalk
 
So yesterday I bailed on the office, and headed out to the mountains for a last-minute day ride. Horses are still barefoot, so didn't want to push it too much. We covered about 6 miles, and got to test out a few things, so in no real order:

Turnout Kit
I've complained earlier about my lack of organization, and me turning the trailhead into a yard sale... Well over the last month I've been re-organizing my gear around the idea of a "Turnout Bag", similar to what firefighters run. Except mine are ghetto $8 army surplus duffle bags, and stuffed with hunting crap...

I bought about 10 duffles, and starting "bundling" my stuff into semi-broad categories: Hunting clothes, riding clothes, horse spike camp, food, and "Core Kits." Kits are just the small task-specific stash bags that we all have: Kill kit, cook kit, repair kit, possibles kit, etc.

Anyway, long story short, this was easily the fastest I've been loaded. Grabbed the appropriate duffles, tossed them in the truck, done. You know that when you get to the trailhead, all the gear you need is there, and you can fine-tune as needed.

I'm not saying this is The Way, and youl need to put stuff in the right spots (saddle bags, cantle bag, panniers), but this was a noticeable improvement vs how I was doing things before. Combined with a checklist of the basic to-remember's that I always seem to forget, it worked pretty well.
So I’m probably the least qualified person to comment on this thread. My only experience with horses is rental horses on my yearly elk hunt for the last 13 years. But over the years we’ve come to find that those army duffels (top load) are the way. At least for the soft panniers we use. If they’re not too stuffed, you can fit two on each each. They fit tight, balance incredibly well. You can clip them to each other to help everything centered. And they’re pretty much waterproof. They’re also tall enough that they extend above the saddle a bit, and can help keep a top load in place.
 
I have always made everything out of latigo leather (10oz). Most have lasted over 20 years. The other part is if you make it you can fix it.

When I first started out I had hobbels on an Appy I bought. He showed me all about them when he ran two miles down a trail in the 7 devils just because he could. I have a used a halter or one foot hobble picket ever since. If you graze them on a rope during the summer for yard trimming they get pretty good at manageing the rope. I had a gelding who was a defiant, arragant A-hole who turned until he tied all four feet together and fell over. When I got up in the morning and rescued him, he had an entirely differant attitude towards me right up until I had to put him down at 30.
 
Well, figure it's about time for an update. I'll call this one the "You can just do things" meme. This is from the other week.

Load your gear.
JyaG2CF.jpeg


Drive to the trail head with horses.
ESpQ4ye.jpeg


Pack up and ride to where you need to go.
8OzxdIP.jpeg


Tie up your horses and loosen some cinches.
pQi8Jd8.jpeg


Load your pack
0SnT71u.jpeg


Tarp your gear.
L8pbn6x.jpeg


Go hike somewhere.
m5HcwPs.jpeg


Get cliffed out.
e4Uf3mp.jpeg


Walk back to horses and ride back home. Best feeling in the world coming back to your spot and seeing (hearing) your critters still there.
4RHCQ4O.jpeg


***

This outing was my last attempt at getting a sheep, but was skunked. Lots of sign, but no luck. Oh well, always next year.

I'll have a few more (better) updates for everyone shortly.
 
So the last part of September and Last of October were a mish-mash of day hunts and scouting. One thing that happened was I discovered the likely issue for my mare deciding to lock up on downhills: The sawbuck I had didn't have enough clearance for her whithers, and on downhills (even with the britchin) the saddle walked forward and scraped her.

So she had a bit of time off, and then out of necessity, she got to be my riding horse. (More on that later.)

But out of this annoyance was a mad scramble to find more gear. And apparently the packing gods were kind, because they offered up a facebook marketplace ad where I tracked down this beauty.

It was in rough shape, but thankfully the skills acquired from my misspent youth came in handy. After stealing the rigging from my original sawbuck, and some strategic application of PL Premium and carriage bolts, it all came together.

I forgot to get a picture, but there's probably close to 2" difference in height/clearance of the front "X" from the new tree vs my old one.

One note worth mentioning: Try and counter-sink your bolts. I was a bit too scared on this, just because of the state of the wood. It still works, but the protruding hardware can potentially be hard on gear, depending on how you're rigged.
 

Attachments

  • 4629d8e3-8a9d-445c-97db-c68b22582845.jpg
    4629d8e3-8a9d-445c-97db-c68b22582845.jpg
    353.1 KB · Views: 15
  • 2360e765-7843-4a9a-8369-b881bbbf52ca.jpg
    2360e765-7843-4a9a-8369-b881bbbf52ca.jpg
    265.6 KB · Views: 11
  • 706cee0b-cf97-4c2d-870d-54ea10b1ffee.jpg
    706cee0b-cf97-4c2d-870d-54ea10b1ffee.jpg
    243.1 KB · Views: 11
  • 91ffacdc-4457-40a2-a396-56ce36bc49b0 (cware@waretax.com 6).jpg
    91ffacdc-4457-40a2-a396-56ce36bc49b0 ([email protected] 6).jpg
    287.4 KB · Views: 11
  • 4ca61eaa-9bdf-4c34-acac-1581b438a816.jpg
    4ca61eaa-9bdf-4c34-acac-1581b438a816.jpg
    280.8 KB · Views: 15
  • 3e4f16e6-dbdc-445e-a88f-9388267b3c76.jpg
    3e4f16e6-dbdc-445e-a88f-9388267b3c76.jpg
    469.8 KB · Views: 15
Speaking of gear, here's a picture dump of my latest hobbles, and my old setup. You can see the issue with the cheap biothane tearing.

The chain ones work awesome, and are easy to put on and off in snow/weather. Heavy though, and likely not much for give, so if your horses are new to hobbles, I wouldn't start with these.

These are easy to make yourself, in case you were DIY-inclined. (I make a lot of my own gear; otherwise I couldn't afford this insane hobby.)
 

Attachments

  • c9116ef7-520a-46a7-8a64-2dc91d0aae74.jpg
    c9116ef7-520a-46a7-8a64-2dc91d0aae74.jpg
    368.7 KB · Views: 10
  • b54c5950-7dfb-429c-b3e5-944ae716df2a.jpg
    b54c5950-7dfb-429c-b3e5-944ae716df2a.jpg
    683.3 KB · Views: 10
  • a5477e48-cba9-45aa-aed3-8997daa9e821.jpg
    a5477e48-cba9-45aa-aed3-8997daa9e821.jpg
    574 KB · Views: 10
  • 4954d3eb-990d-4d15-9f8d-fda2c7538075.jpg
    4954d3eb-990d-4d15-9f8d-fda2c7538075.jpg
    367 KB · Views: 11
  • 17c14dfa-8da2-4497-a325-f7c484dadac4.jpg
    17c14dfa-8da2-4497-a325-f7c484dadac4.jpg
    611.3 KB · Views: 11
  • 3dfc99fb-5d21-4bd9-b631-8bd645c7beed.jpg
    3dfc99fb-5d21-4bd9-b631-8bd645c7beed.jpg
    284 KB · Views: 11
  • d416a77b-5fe9-4fed-b68d-be57a68fdb7a.jpg
    d416a77b-5fe9-4fed-b68d-be57a68fdb7a.jpg
    337.6 KB · Views: 10
Good find on the pack saddle. I use the T nuts with little prongs and you don’t need much relief to counter sink. Then I fill the bar side toward the saddle with wood filler and sand smooth. Bolt head goes on top of the buck, I prefer Phillips stainless, but sometimes a flathead is the correct length. I’ll cut the screw/bolt to length a few threads short with a hack saw then a little file at a 45 and they still thread fine.

I like the hobbles, similar to some OPS ice hobbles I have. What did you use for the twisted squareish piece that feeds through the ring?
 
Back
Top