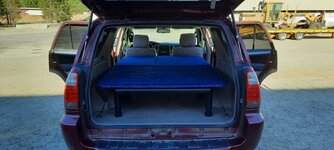
DIY Sleeping Platform w/ Bin Storage

Joined
May 6, 2021
Messages
311
Location
Colorado
Somebody tell me I’m crazy. I’ve got a 1992 Toyota 4Runner and I want to build a sleeping platform for it.

I’ve slept in the back while hunting before, but it’s pretty cramped trying to get all the gear and my sleeping setup in there. What I want to do is build a platform that I can slide gear and tote bins under - effectively giving me some storage space under the sleeping setup.

I am not handy. I have little more than a basic toolbox. I’m also not looking to spend much money on this - all prefabricated options are expensive, and it doesn’t make sense to pay a handyman to build this for me. I've seen some pretty nice DIY builds, but I don't have the skill for that level of effort, nor do I want to spend the money.

I really think this works, though. Anyone see any big challenges or problems with this design that I haven’t thought out?

DESIGN LIMITATIONS
  • The floor to ceiling height is 31”. Assuming the platform takes up 8” total, that leaves 23” of headroom for my sleeping pad and myself - seems like plenty.
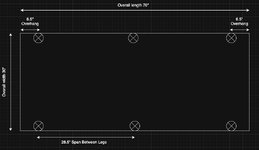
  • The maximum length for the platform is 70”. This is the distance from the front seat-backs to the inside edge of the back tailgate. This does include some overhang into the back seat footwell, though.
  • I plan for a 30” width (although the maximum width could have been 35”).
  • The maximum footprint for the legs is 57” x 30”. At the front, the legs have to be pulled back from the footwell. At the back, there’s a small “cliff” at the edge, so I’ve pulled the legs back from that, too.
  • This leaves an overhang of 6.5” from the head and foot of the plywood to the legs at those corners. The legs will be flush to the edge widthways, though.
  • Longest span between legs is 30” along the width and 28.5” along the length.
  • I considered 4x4 legs (cheapest, but heavy), 2x4 legs (most expensive because of angle brackets), and PVC legs (mid-priced, but lightweight). I decided against 2x4s with angle brackets because of the cost and against 4x4s because of the weight, so I’m planning to use PVC pipe for legs.

PARTS
  • Sandeply 18mm sanded plywood (3/4" x 4' x 8'), $66, cut to 70" x 30" to fit in the back hatch of the 4Runner. This is a smooth faced, interior plywood that is safe to sleep on once sealed.
  • 180 grit sandpaper, $6, for sanding the plywood before sealant and the PVC legs before cementing. (No, I don’t even have sandpaper.)
  • Varathane sealant, $26, sealing the plywood will reduce VOCs and protect against moisture.
  • Charlotte 2" Schedule 40 PVC, $14, cut to 7” segments. I plan a minimum of 6 legs, but might go with 7 or 8.
  • PVC table leg cap fittings, $20, to attach the PVC legs to the plywood and to act as feet at the bottom.
  • PVC primer and cement, $11, to weld the PVC pipe to the leg cap fittings.
  • Screws and washers, $10, to attach the leg cap fittings to the plywood deck.
TOTAL PARTS COST $155

Here’s a drawing. Roast me.

Screenshot 2025-06-28 at 12.00.02 PM.png

Random additional note: I might even get a 4" - 6" foam mattress custom fabricated by https://www.foambymail.com as well. My super plush Exped Megamat is like 78" long, so it wouldn't fit in the 4Runner. If anyone ever wants to have a foam mattress fit to a specific size, this looks like a good option.
 
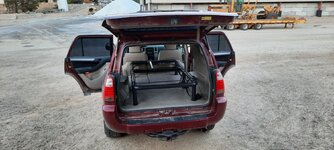
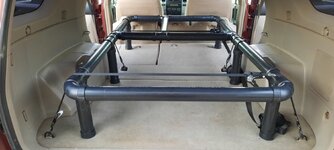
Nice @mtnwrunner! What height did you go with? And it looks like maybe you’re using 3” or 4” PVC?

I hadn’t considered building a whole frame of PVC and setting the plywood on top. I would think that will cost more in materials than mounting PVC legs right on the plywood. Probably works better, though.

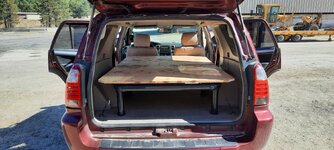
What did you use to carpet the plywood? Just wrap it around and staple underneath?
 
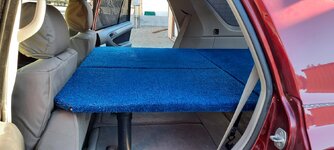
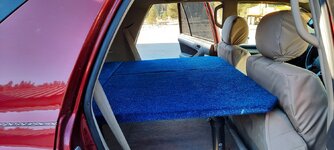
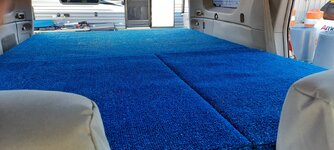
2.5 inch pvc and from floor to pvc is 10 inches. Just used a Boise State blue outdoor carpet, glued and stapled. I also made it modular in 3 pieces so I could adapt to different needs and loads. Velcro on top of pipe and corresponding Velcro on plywood.

Randy
 
Alright, fellas. I did a thing, and I figured I'd post it here for posterity when some other desk jockey gets the same crazy idea.

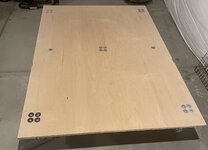
The basic parameters were to have as large of a deck as possible, little or no feet in the middle to obstruct the storage lane, minimum headroom loss with the framing under the deck, and cheap, cheap, CHEAP. I built the following for $242 + taxes.

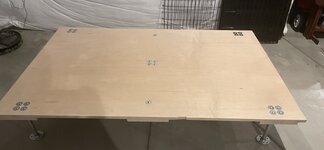
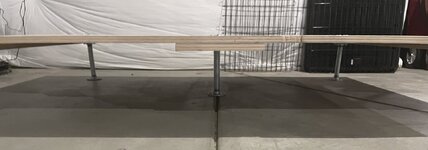
I initially tried to determine how to mount PVC legs directly to plywood, but couldn't find suitable flanges for the task. I didn't want to use 4x4s due to the weight or 2x4s due to lateral weakness. I also didn't want to build a full PVC frame due to added cost + loss of headroom from the pipes under the deck. Ultimately, I found some steel pipe with flanges for pretty cheap, so I just bought 8" pipes for legs, flanges to mount to the deck, and flanges to act as feet.

After some review with ChatGPT on the flexion of a 48" wide 3/4" plywood sheet without a center post, I decided that I couldn't do without one. For my measurements, it turned out fine because the tote bins I wanted to slide under are just shorter than the midpoint of the length, so I'll be able to slide them in just fine. The other half of the storage area would be accessible from the side doors up front.

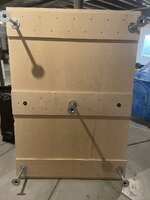
As an additional measure to reduce flexion, I also ripped the excess plywood into three support "beams" that were laminated to the underside of the deck. This adds a weight penalty and takes up 3/4" of extra headroom, but the cost is negligible. I'm not sure how necessary this was; ChatGPT seemed to think there would be a good deal of flexion without the laminated support beams. I think it probably would have been okay without them, though certainly more springy than this build turned out. This build has near zero flexion under my body weight, even concentrated when sitting on edge in the center of the length (where there are no edge support feet).

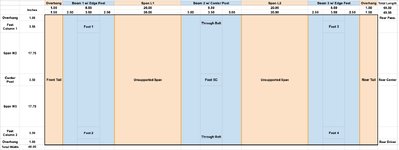
Here's a "diagram" of the deck layout that I made in Excel. The measurements are accurate, but it's not to scale. The feet are mounted on 3.5" diameter flanges. The laminated Beams 1 and 3 (front and rear) are both 8.5" wide, whereas the center Beam 2 is 9.5" wide. (The plywood was 8' x 4', so I had ~26" left to work with for making the beams.) There are also through bolts at the edges of Beam 2 in an effort to solidify the lamination.

*Deck Diagram v3.png
 
Basic instructions:
  1. Trim plywood to to 69.5" + 8.5" + 8.5" + 9.5" (your measurements may vary). Assemble legs and test height and location in bed of truck by placing legs and laying plywood on top. Leg pipes can be exchanged if the deck needs to be higher.
  2. Note leg placement limitations (wheel wells, odd surfaces) and mark them on the plywood or jot down notes.
  3. Label plywood deck (top, bottom, front, rear), and beams (number, arrow to front).
  4. Degrease steel pipes and flanges if needed.
  5. Lay plywood upside down and place legs and beams to plan layout. Keep carriage bolts and screws >1" from edges. Mark locations for all beams, leg flanges, bolts, and screws.
  6. Drill 1/4" holes for all carriage bolts. (This came out pretty tight, maybe 3/8" holes would work better, but I'm not sure if the carriage bolt bites would work then?) To match holes in the beams to the deck, I simply drilled the beam holes first, then laid the beams in place, dropped a couple of 45 lb dinner plates on top to hold them, and drilled straight through the beam holes into the deck. I'm sure a carpenter would have a more refined process, but I have neither the requisite knowledge nor the tools. It worked fine.
  7. Place all bolts and beams (do not fasten or glue yet) to check fit. Mark all screw locations on the beams (approx. every 6" in a staggered layout, >1" from beam edges and carriage bolts).
  8. BE PREPARED TO FINISH THE COMPLETE PROCESS FOR BEAM INSTALL BEFORE PROCEEDING. Gather tools and parts needed for the beam install (lock nuts, carriage bolts, washers, wood screws, construction adhesive, towels, drill, wrench to tighten lock nuts).
  9. Install beams (one at a time): Lay the deck upside down with carriage bolts and 3/8" fender washers in place (top side, through the deck, threads up). Apply adhesive liberally across beam installation span. Place beams and legs on top and clamp the beam into place (if you're a fancy pants with clamps and carpentry knowledge; f not, 45 lb dinner plates worked fine). Drop 1/4" flat washers onto bolts, apply thread locker (if desired), and tighten lock nuts to snug. Do not over tighten! Last, drive 1.25" wood screws into beams roughly every 6" in a staggered layout. Leave the clamp or weight in place for 24 hours to allow adhesive to cure.
  10. Repeat for all three beams. For the center beam, through bolt at edges without leg flanges; place fender washers on both sides of vertical stack (top and bottom) instead of only one flat washer on the bottom. On the top, use 3/8" fender washers to allow square bolt bites to pass through. On the bottom, use 1/4" fender washers.
  11. Cut underfelt carpet oversized to allow 2 - 4 inches wrap to the underside of the deck. Staple carpet in place on the underside. I haven't done this step yet, I was still taking pics of the end product for you interweb lurkers.
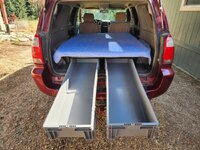
The end result is a very solid platform with a bit over 8" of clearance underneath for tote bins and other gear. I could have raised this to 10" or 12", but I didn't think it necessary and figured I'd rather have the head room for my noggin.

It's manageable to carry it from the basement to the truck with one person, but really better to have two sets of hands to get it into the truck without tearing up your upholstery.

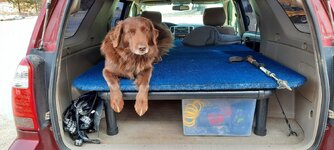
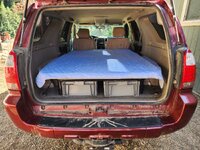
Pics -
IMG_4626.jpeg
IMG_4627.jpeg
IMG_4628.jpeg
IMG_4629.jpeg
IMG_4630.jpeg

Since the build was so cheap, my camping air mattresses are too long to fit, and I'm such a sawft desk jockey, I ordered a custom foam mattress to go with it. I ordered a 70" x 28" x 6" mattress (4" of HD36 for the base + 2" of supersoft foam for the topper) plus a custom fit zippered cover for $178 from Foambymail.com.

Screenshot 2025-08-29 at 4.36.15 PM.png
 

PARTS LIST FOR PLATFORM

Qty
$/ea
$ 242.60
Height
Notes
3/4-in x 4-ft x 8-ft Maple Sanded Plywood
1
$ 79.98
$ 79.98
0.703
Actual 96" x 48" x .703". TSCA Title VI certified, CARB compliant, safe to sleep on. Trim length to 69.5" + 8.5" + 8.5" + 9.5".

Loctite PL Premium Max

1
$ 12.48
$ 12.48
Construction adhesive.

3M Coarse 80 Grit Sandpaper (6-Pack)

1
$ 5.88
$ 5.88
80 grit sandpaper

Pipe Decor 3/4" steel floor flanges

2
$ 26.00
$ 52.00
0.188
Five legs * 2 per leg = 10 needed. Two packs of 8 = 16. Fastener holes 1/4" diameter. Actual height 0.64", but only the plate is only 3/16". There is just shy of 1" of clearance on the plate for a washer, so washers can be up to 7/8" OD.

Pipe Decor 3/4" x 8" steel pipes

2
$ 11.00
$ 22.00
8.000
For five legs. Two packs of 4.

Hillman 1/4"-20 2" Zinc carriage bolts

22
$ 0.22
$ 4.84
2.000
Five feet * four bolts each + two reinforcement bolts = 22 bolts needed.

Project Pak 1/4" Flat Washer (25-Count)

1
$ 3.98
$ 3.98
0.063
ID 1/4", OD 3/4", Thickness 1/16". Five feet * 4 bolts = 20 needed.

Project Pak 1/4" Lock Nuts (25-Count)

1
$ 3.68
$ 3.68
0.313
1/4"-20 nyloc nuts. Packs of 25.

Hillman 3/8" x 1.5" Zinc Fender Washers

22
$ 0.29
$ 6.38
0.063
Five feet * four bolts each + two reinforcement bolts = 22 bolts needed. This is for the top of the platform, under the bolt heads. 3/8" ID is enough to allow the square bite under the bolt head to pass through.

Teks #8 x 1.25" Zinc screws

1
$ 13.98
$ 13.98
1.25" #8 wood screws to laminate beams to deck. Head diameter 3/8".

Deckmate 1/4" x 1.5" Fender Washers

2
$ 0.20
$ 0.40
0.032
For underside of the two reinforcement carriage bolts.

Nuanchu Underfelt Carpet

1
$ 37.00
$ 37.00
Cut oversize from the deck dimensions, then staple edges to underside.

Parts List.png
 
Back
Top