Howdy,
Received the adapter from Cabela's in the mail on Friday, but given it's busy season (public accountant), I didn't get time to set it up and play with it until Sunday night. I've summarized my thoughts and added some photos below. Hopefully this helps those of you who are interested in the adapter! Thanks.
View attachment 254144
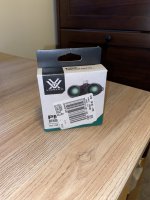
Packaging was small and basic. Nothing fancy here.
View attachment 254145
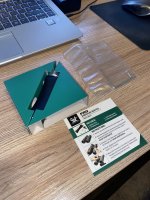
Here's everything that came in the box. Instructions, the adapter + stud, a 2mm Allan wrench for the stud, and a 1.3mm Allan wrench for the set screw on the stud (more on this later).
View attachment 254238
Here is the stud and the adapter. The adapter is milled aluminum, as is the silver screw down knob on top. Right off the bat, I fiddled with the silver knob to determine how the locking mechanism worked. Essentially, there are micro-grooves milled into the barrel of the stud (see next picture). After inserting into the adapter, you screw down the silver knob which lowers a V-shaped piece of aluminum until it seats into one of the grooves of the stud's barrel. One thing I noted was that unlike the Outdoorsman, there is no spring-loaded ball detent in the stud that 'locks' the stud into the adapter when it's inserted. Instead there are two small O-rings on either end of the stud that lock it into place when inserted. into the adapter The O-rings provide a satisfying 'click' when the stud is inserted and from my brief testing (shaking the binos inverted when inserted in the adapter, without the crown screwed down) I am not worried that the stud would come unseated from the adapter when the crown is not fully tightened. I'm sure it could happen, but I don't foresee a realistic situation in which enough force would be created to unseat it.
View attachment 254150
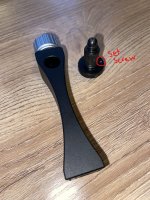
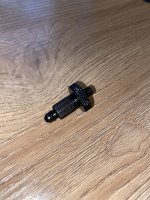
Here is the stud, You can see the milling on the barrel as well as the two O-rings I mentioned above. The stud is made of metal and feels solid.
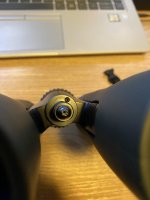
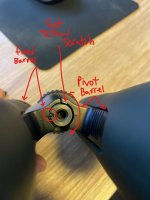
Now here is where I ran into my issue with the stud. I followed the directions, inserting the stud into the threaded adapter on my Vortex Diamondback HD 10x42's and lightly tightening it using the provided 2mm Allan wrench. Next, per the instructions, I lightly tightened the set screw (see circled in the picture above). This could be a case of user error, but from looking at the set screw placement, it seems its only job is to be tightened, which makes it protrude from the back of the stud, making contact with the hinge surface of the binos and thus holding the stud in place, and not allowing it to rotate. The set screw is pointed, so I see no other way of it doing its job than by tapping a micro indentation into the metal of the bino's hinge? This not only creates a small cosmetic issue, but just seems like an entirely inefficient way of 'setting' the stud. Unfortunately I didn't think too much into the mechanics of the set screw and chose to simply follow the provided directions. If you look at a pair of Vortex Diamondback HD 10x42's and adjust the interpupillary distance, you'll notice that the threads where studs are installed actually remain static in their orientation to one of the barrels and the other barrel rotates around the threads. Given the bino's mechanics and the placement of the set screw (which stays fixed), when I adjusted the interpupillary distance, the set screw essentially ground a small semi-circle line into the hinge (see below). Not a huge deal on a $200 pair of binos, but I feel like I followed the directions as they were written, and even after some detailed investigating, I see no other way for that set screw to function in a way that wouldn't dig into the hinge. I ended up just backing out the set screw as the stud was held adequately without it and I wanted to avoid creating any more scratches.
BEFORE:
View attachment 254256
AFTER:
View attachment 254244
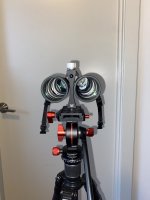
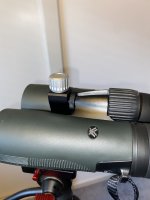
Here are some shots of the binos in the adapter on my pan head (Promaster SPCH20).
View attachment 254251
View attachment 254252
Final Thoughts:
- The set screw debacle was frustrating, and led to a minor gouge on the hinge of my binos. They are cheap, so not the end of the world, but nonetheless would have preferred for that to not happen. I totally understand I could be missing the intended function of the set screw and the scratch could be due to user error, I'm sure someone in the comments can speak to that. If however, it is suppose to function in the manner I assume it is, it's a flawed design. I don't think the set screw is even needed, and I'll personally be running the stud without it.
- Once the stud is inserted into the adapter and the crown is screwed down, there is absolutely
NO wiggle or movement of the binos. Due to the fineness of the grooves milled into the barrel, when tightened, there is no room for the stud to rotate side to side. I've heard some people experiencing a minor amount of movement when using the Outdoorsman stud; however I experience no such movement on this adapter when locked in place.
- A potential point of failure could be the O-rings. Were they to pop off the stud or deteriorate over time, I don't think the stud would "click' into the adapter and would be able to fall out unless the crown was all the way tightened. It's unlikely this would happen, and O-rings are extremely cheap to replace, but still a thought that crossed my mind.
CONCLUSION: Is the adapter worth the $70? Probably. It seems of good quality and despite the set screw issue will serve its intended purpose for me. What stood out most to me was how solid the binos felt once locked into the adapter. Having zero play once locked in was a big factor for me. At the end of the day the adapter does everything it needs to: the stud is universal, it locks in place solidly, no play in the adapter when glassing, built from sturdy materials, and decently affordable. I still might pick up an outdoorsman adapter just to compare them side by side and see if the Outdoorsman is clearly worth the extra $25 over this. Hope this is helpful to someone.

