Does this sound like it would work?

crmiller84

Lil-Rokslider
Joined
Nov 30, 2015
Messages
211
Location
Indiana
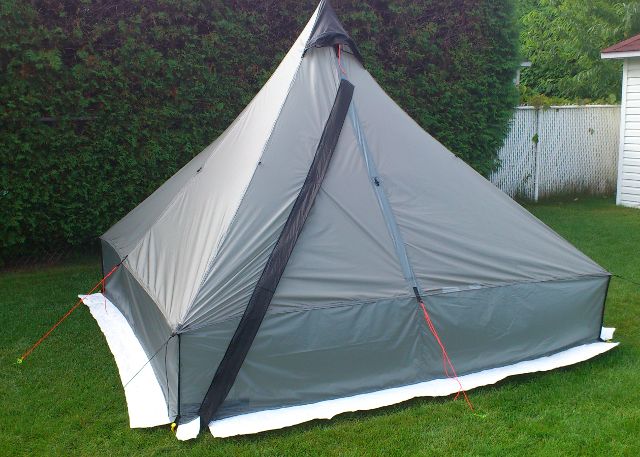
I recently picked up a Mountainsmith Mountain Shelter LT that had a stove jack installed so I could cost effectively dip my toes in the floorless realm. I've set it up a few times now and really like it, but my inner tinkerer just can't let something go.

My thought is, if I sew on 25" of silnylon all the way around the perimeter, and then put new stake loops in the same spots along the new bottom, would that work to effectivly make the shelter taller and wider, or would all the geometry that keeps the pitch taut be fouled up? Everything tells me it would work great, except for the fact that everything would increase except the length between the poles.

Like I said, I really like the shelter for what it is, just thinking out loud.
 
Joined
Feb 29, 2012
Messages
1,796
Location
East Wenatchee, WA
This is essentially what I did with my Nemo Pentalite, but I only added 6 inches around the perimeter, but it made a huge difference in the "usability" of the floor space. Where you previously lost about 1 foot of floor space around the perimeter of the interior, due to the way the walls come down and contact the ground, you can now use every square foot of the floor space.
 

colonel00

WKR
Joined
Jun 19, 2013
Messages
4,776
Location
Lost
25" might be a bit much but you can test it out. The easiest way to test would be to just put 25" lengths of cord on each stake loop. Then pitch the shelter as if there were actually walls there. It should give you a good idea of how it will look and function with minimal time invested. If you want the walls to slope out, you will probably need more longer lengths of material as you approach those corners if that makes sense. However, you could just let the new walls hang down vertically, similar to a sod skirt. This would still give you quite a bit more usable space.

Here is an example of what I mean though it isn't the easiest to see. However, on this shelter, the sod skirts are similar to what you are talking about. Notice how they are pretty uniform in length but when it gets close to the corners, they do not come together because you would need them to extend out in each corner. I'm probably not explaining it very well. Basically, instead of just adding a certain length of material all the way around the perimeter, you actually have to extend each panel down and also out in the corners if you want to maintain the same shape.

628__72297.1458334188.1280.1280.jpg


However, if you want the walls to just hang vertically, they could do that quite easily like this.

luna-mod-front4-640_zps3e0e14aa.jpg
 
Last edited:

colonel00

WKR
Joined
Jun 19, 2013
Messages
4,776
Location
Lost
Heh, me too. Actually I have a link to it that I'll post tomorrow. It's a total DIY job but I always wanted to do that with my SL5. Those vertical walls add a ton of usable space that you normally could use do to the low walls.

Sent from my SM-N900P using Tapatalk
 
OP
C

crmiller84

Lil-Rokslider
Joined
Nov 30, 2015
Messages
211
Location
Indiana
Well, when I got home I went ahead and rigged up 8 17" lines to try this out in the morning the way you said. My original thought was to simply extend the walls along the normal pitch, but those vertical walls have me very intrigued. May mess around with this idea a little more tomorrow before work and this weekend. Thanks for the ideas :D
 
Joined
Mar 16, 2013
Messages
308
Location
Western Washington
I just finished sewing a stove jack into my LT and now you've got ME thinking....dang it.

I like the idea of adding a sod skirt, say 6-8", then pitching the shelter higher and connecting the edges of the skirt (velcro?) to create vertical walls. That'd be pretty slick. Create a lot more usable space.

Sent from my SGH-T999 using Tapatalk
 
Joined
Feb 29, 2012
Messages
1,796
Location
East Wenatchee, WA
My original thought was to simply extend the walls along the normal pitch, but those vertical walls have me very intrigued. :D

I would definitely go vertical with the walls, in the case of my Pentalite, I didn't need a bigger footprint, I just needed to be able to use all of the footprint that I had. By adding a 6 - 12 inch vertical wall, you'll greatly increase the usability of the space inside.
 

WyoElk

WKR
Joined
Mar 11, 2014
Messages
683
It would be great if you can snap some pictures as you go and once your finished. I'm really curious how this turns out.
 

MIKEYB

WKR
Joined
Aug 29, 2012
Messages
312
Couesbitten do you have pics of your pentalite you wouldnt' mind sharing? I have the same shelter un-modified. I am curious on how you put this together. thanks.
 

dble07

Lil-Rokslider
Joined
Jul 19, 2014
Messages
167
Location
NW North Dakota
I've been really thinking about trying this on my BPWD Luna. The idea of having the skirts attached with Velcro where they would be removable is probably the way I would go. It would be nice to have the extra space of the vertical wall extension when needed bit still be removable for those times when weight was an issue and the extra space wasn't needed. I'm curious to see some more pictures and what the pros vs cons are.

Sent from my XT1585 using Tapatalk
 
OP
C

crmiller84

Lil-Rokslider
Joined
Nov 30, 2015
Messages
211
Location
Indiana
Ok, so I got the 17" peices of cordage attached to the stake loops on the shelter and got it pitched this morning. All of them worked out except the rear-most stake out, it was way too short for a taught pitch. I remedied that with a long piece and a Nite Eyez adjuster.
Some pics, even though I forgot to put anything in for scale :rolleyes:

20160415_112830.jpg


I measured all of the cordage from the tarp edge to the stake to get my measurments, and with the exception of the rear tie out, they were all less than 22" (the rear string was 33 1/4"). So I'm thinking that 25" strips of sil along the front 4 sides, and two strips 35" wide for the back will allow me to make my hems and attach it to the body with good strength (folding over and stitching through 4-6 layers). It's going to add a bit of weight, but this starts at about 2.5# anyways, so I'm not too worried. I'm thinking I'll use an angle finder to calculate each of the angles, cut the fabric pieces, and stitch them on individually, then join them all together once they are attached to the main body, finishing them off with new stake loops. I plan on leaving all of the old stake loops for extra tie out points, similar to the MegaTarp.

Oh, and I measured all of the old and new dimensions.

56" between the poles (this obviously doesnt change)

Old pole height : front - 53", rear - 40.5"
New Pole height: front - 63", rear - 50"

Old width : front - 87", rear - 54"
New width: front - 117.5", rear - 75.25"

Old length (beak-to-beak) : 143"
New length : 186"

+- 25" of fabric is going to make a HUGE difference :cool:
 
Last edited:
Top