Benelli Nova Safety Conversion RH to LH Operation?

Joined
Jun 21, 2019
Messages
2,257
Location
Missouri
I realize that this is a very specific question, but I figured there might be another lefty out there with the same problem who has discovered a solution.

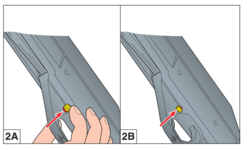
I'd like to convert the safety mechanism on my Benelli Nova pump shotgun from right-handed to left-handed operation. The safety button is located on the forward part of the trigger guard and is designed to be pushed with the trigger finger from right (safe) to left (fire). Since I shoot left-handed, I have to either curl my trigger hand around the bottom of the gun to deactivate the safety or use my support hand, neither of which is ideal. Anyone ever tried to flip the operation of this type of safety (or come up with an alternate solution)?

The illustration below shows the current operation: 2A is the fire position, 2B is safe.
Screenshot_20210505-164456.png
 

fishdart

Lil-Rokslider
Joined
Aug 5, 2019
Messages
167
The safety button can be reversed. Cursory search results indicate 2 things:

1) it can be tricky to get the safety free of the detent and spring in order to remove it.

2) benelli will reverse it for you if you arrange to send them your trigger group.
 

slvrslngr

WKR
Joined
Apr 27, 2012
Messages
900
With just a quick Google search, I found that the best thing to do is remove the trigger assembly and mail to Benelli and they will switch it for free. You might send Benelli an email.
 
OP
Mighty Mouse
Joined
Jun 21, 2019
Messages
2,257
Location
Missouri
I found a parts diagram and some vague instructions online and decided to give it a try. Long story short: it's tricky but doable with a punch set and a vise (or extra set of hands) and some patience. I fully function tested the gun after making the conversion; everything checked out and I now have a left-handed safety. Here's the procedure in case anyone stumbles across this thread in the future:
  1. Ensure chamber and magazine are empty.
  2. Unscrew magazine cap. Remove barrel.
  3. Remove trigger guard pins. The nub on the end of the magazine cap is the right diameter to get started pushing these pins out. A 5/32" punch also works.
  4. Separate trigger assembly from receiver.
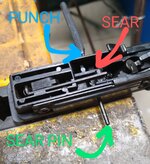
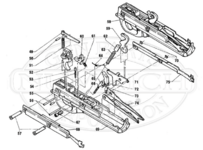
  5. Remove trigger and sear pins (#56 on parts diagram below) with a 3/32" punch.IMG_20210506_171752401~2.jpg
  6. Remove sear (60) and sear spring (61).
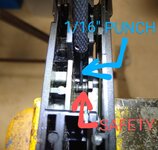
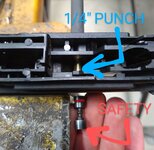
  7. You can now see the top of the safety (67). There's a plunger (53) and spring (54) beneath the safety that limit its lateral movement. The tricky part is depressing the plunger so you can slide the safety out. I put the trigger assembly in a vise, depressed the plunger with a 1/16" punch, and pressed the safety out with a 1/4" punch. Leave the 1/4" punch in place to keep the plunger depressed.IMG_20210506_174007633~3.jpgIMG_20210506_174314947~4.jpg
  8. Flip the safety over and push it back in. Use a 1/16" punch as needed to keep the plunger depressed.
  9. Put the sear and sear spring back in place and secure with sear pin. It took me quite a while to get the sear spring seated back in the right spot.
  10. Put trigger pin back in place.
  11. Slide trigger assembly back into receiver and secure with pins.
  12. Put barrel back on. Screw magazine cap on.
Screenshot_20210506-195907.png
 
Last edited:

Tim_VT

FNG
Joined
Feb 22, 2022
Messages
12
This is the best write up I found on swapping the safety and saved me $100. Thanks!
 
Top