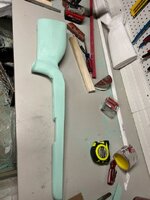
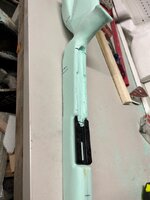
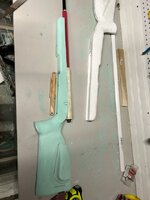
Custom Carbon Fiber Stock

Joined
Aug 13, 2023
Messages
66
I’ve decided to jump into the deep end and make my own carbon fiber stock. This will be going on a M700 7mm Rem mag, which currently wears a wood stock.

I did a ton of research here, read a lot of @Formidilosus posts, and decided I wanted a vertical grip, negative comb stock. I’m taller, so I’ve always added spacers to get a proper LOP and have recently added spacers under a stock pack to be a proper check weld. A custom stock would solve both of these, and cut some weight from a pretty heavy gun as well. My main influences were the first gen Gunwerks Magnus and the Peak44 Bastion.

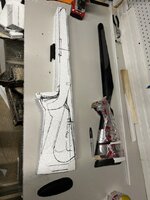
My wish list was a 14 3/8” LOP (1” longer than stock M700), negative comb, trim forend for weight and carrying (I rarely shoot off bags or front rests other than tree branches), relatively straight toe line, and flush mounted Arca rail close to the central balance point.
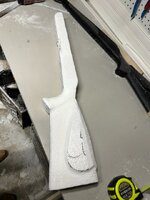
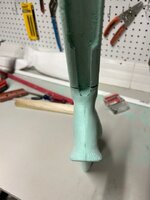
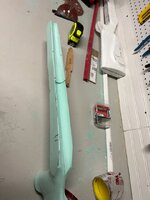
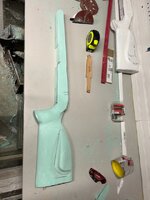
I started out with an $8 takeoff stock from eBay for a good pattern, and laminated polystyrene insulation board for my mold. I cut and carved it most of the way before realizing it was too soft for my vacuum bagging process. So I repeated the process with green insulation board from Lowe’s, which is stiffer and finishes much nicer.

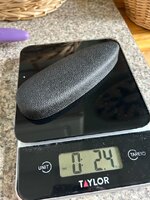
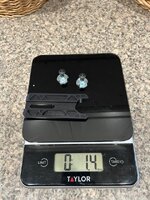
I also bought a bare long action bedding block from Stocky’s, the Arca balance rail from SRS, and a Microcell recoil pad. The skin will be carbon fiber, the aluminum bedding block will be bonded in place with Marine Tex with two carbon fiber rods as cross bolts through the bedding block.
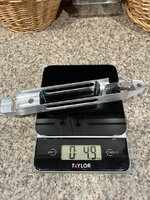
55B2F1D6-7494-4240-B8DF-C4A0DD1AE486.jpeg
FBDCB6CF-7824-4FBC-903B-398E9DC88B9E.jpeg
A4BB816A-70B3-49ED-93C7-7577BA94A3C3.jpeg
0008921E-5A98-46C2-ACC3-8E43972DD59C.jpeg
20D3B35C-F615-4496-B633-61C47496CC58.jpeg
I am going to use a low budget vacuum bagging setup (vacuum storage bag from Harbor freight) with peel ply and a breather layer. The shell will be from a carbon fiber sleeve, like the “sock” in the infamous Sako video.

I was going to wait until I had a successful layup before posting, but I want to ask: any input on stock design or build process?
F89F8585-01BD-404A-B501-AE105D35493D.jpeg
69C3C49F-1607-443E-84A6-2D6F3E7DB544.jpeg
66F8275F-0C4B-402F-AD53-9A3910582564.jpeg
998F4CE6-C7BC-4969-9952-22DF22258B91.jpeg
268BFBD1-6ADC-4EE5-A7D0-61105659389F.jpeg
 

TaperPin

WKR
Joined
Jul 12, 2023
Messages
1,975
Looks great! I’m gathering stuff for a few cf stocks and it sounds like you’re well on your way. I really like the action block.
 

TaperPin

WKR
Joined
Jul 12, 2023
Messages
1,975
Does Sako use one layer or two? I noticed in their video someone was cutting multiple long thin strips - I assumed that is to reinforce the forend, but I wonder what else is reinforced with those?
 
OP
R
Joined
Aug 13, 2023
Messages
66
Looks great! I’m gathering stuff for a few cf stocks and it sounds like you’re well on your way. I really like the action block.

Does Sako use one layer or two? I noticed in their video someone was cutting multiple long thin strips - I assumed that is to reinforce the forend, but I wonder what else is reinforced with those?

The bedding block is making this whole thing way easier. I have a router, but my access to a mill is spotty at best so I figured at least for the inletting on the first stock I make this was like pressing the easy button. Also, ~$25 for a set of pillars plus more strips of CF for the structure at the inletting, and the $50 bedding block is barely more expensive, if at all.

The layer count is the one thing left that I haven’t fully figured out. I bought enough CF sleeve for 3 layers, continuous from forend to butt. I have no idea how many layers Sako uses, but I also noticed the strips in the video. If I have any extra small pieces, I’m planning to reinforce the wrist and potentially the thin spot about the Arca rail cutout. If it comes out of bagging and isn’t as stiff or durable-feeling as desired, then I’ll add more layers.

Someone over on Long Range Hunting posted about a two-part CF stock they made: after 2 layers of twill weave for each of the shell halves, then 3 layers of UD on the inside of each half plus extra for joining the halves, and an expanding foam core, they were at ~22 ounces. I read that wrong the first time, and just noticed the 2-layer skin, so I bought enough for 3 layers. Now I’m thinking that it may not be enough, but am playing it by ear.
 
OP
R
Joined
Aug 13, 2023
Messages
66
Sweet project. Ditch that Monte Carlo cheekpiece though.
Haha, I knew that was going to come up!

If I have a 0 drop at heel, what is the con to a Monte Carlo cheek piece? The way I understood it was that they weren’t great because the recoil pad was actually down an inch or two from the top cheek line, making muzzle flip larger and tracking shots harder. Also, when I shoulder the stock naturally, with moderate cheek pressure, at my scope height my eye is perfectly centered left to right.

I actually carved it in just to see how I’d liked it, anticipating just filing it off. The fatter section feels great under my face so I’ve left it.

But educate me, I’ve only ever shot and hunted with very traditional sporter stocks, so I’m still trying to figure all this out.
 

Gobber

FNG
Joined
Aug 8, 2023
Messages
37
RP-

Fellow FNG here, but I've done a few garage CF stock projects before for a .22lr. Sorry that I haven't had a chance to see the prior posts of folks who have 'rolled their own', but I really like the 'git er done' philosophy this forum has.

Your foam form/plug looks really nice! Having used Lowe's green insulation foam for a 48" UAV wing fabrication before, which was a much simpler layup than you are doing, got more than a few lessons learned to share if you are interested. Depending on your vacuum source, that green foam will compress 5-8%, but shouldn't impact the final dimensions if you do multiple layups. An upgraded option for foam is Smooth-On Foam-It 5 which is also available from Amazon. Used it many times and it holds up very well to full vacuum pull down. Make sure the resin and fillers you use do not eat up the foam plug!

Highly recommend doing a few test layups using fiberglass and your preferred resin system. Something simple, but with some sharp contours to see any crush effect your vacuum bagging system will incur. BTDT. Learning how your resin works during your layup work flow where time is key. This is also how you learn what 'vacuum filler' blocks & shapes will help press the CF into the contours of your plug without deforming the inner plug shape. Plain modelling clay pre-molded into these contour areas that can be placed on top of your peel ply & breather cloth layer are absolute life savers.

Next, what bagging film are you planning to use? Strethlon is really great stuff and it can save your bacon by getting into all the crevasses. The stuff is amazing in what it can compress around and down into. The green 200 weight is great for detail, but doesn’t last for multiple layups. The pink 800 is a bit stiffer but holds up for multiple uses and resists leaks much better.

What resin are you planning to use? Make sure it plays well with your foam core plug. The longer the set time the better! Seriously, if I could get a hardener that would allow 4+ hours of work time, I would use it. I still use West Marine resins because it’s readily available, cures at room temp, has a really good shelf life and has fit all my needs so far. I do need to try some other resin systems at some point though.

How wide is your CF sleeve material and what weight CF - 6K, 12K? BTW - Love using CF 45deg sleeve material as it conforms to all kinds of angles, but it does have it's limits. It stretches over large contours but gets a bit thin when stretched to its limits. The finished weave pattern looks really good as well.

Most Important - go one layer at a time. CF is great in that thin layers add strength. And you can fine tune the shape of areas between layers. Got pointers in this phase of the process. An itital layer over the foam will stiffen the plug up plus you can sand areas down, add filler (highly recommend Epoxy Dough) to get exactly the shape you want before applying final layers.

In areas like the barrel channel, recommend making a vacuum backer/filler form to fill in the void before you apply the bagging. Not sure if that makes sense, but a thin foam layer/edge will deform big time if not internally supported.

Don't be in a hurry to do it all at once!

Sorry if you know most of this, but just want to share a few pointers learned.

Outstanding project!
 
Last edited:
OP
R
Joined
Aug 13, 2023
Messages
66
RP-

Fellow FNG here, but I've done a few garage CF stock projects before for a .22lr. Sorry that I haven't had a chance to see the prior posts of folks who have 'rolled their own', but I really like the 'git er done' philosophy this forum has.

Your foam form/plug looks really nice! Having used Lowe's green insulation foam for a 48" UAV wing fabrication before, which was a much simpler layup than you are doing, got more than a few lessons learned to share if you are interested. Depending on your vacuum source, that green foam will compress 5-8%, but shouldn't impact the final dimensions if you do multiple layups. An upgraded option for foam is Smooth-On Foam-It 5 which is also available from Amazon. Used it many times and it holds up very well to full vacuum pull down. Make sure the resin and fillers you use do not eat up the foam plug!

Highly recommend doing a few test layups using fiberglass and your preferred resin system. Something simple, but with some sharp contours to see any crush effect your vacuum bagging system will incur. BTDT. Learning how your resin works during your layup work flow where time is key. This is also how you learn what 'vacuum filler' blocks & shapes will help press the CF into the contours of your plug without deforming the inner plug shape. Plain modelling clay pre-molded into these contour areas that can be placed on top of your peel ply & breather cloth layer are absolute life savers.

Next, what bagging film are you planning to use? Strethelon is really great stuff and it can save your bacon by getting into all the crevasses. The stuff is amazing in what it can compress around and down into. The green 200 weight is great for detail, but doesn’t last for multiple layups. The pink 800 is a bit stiffer but holds up for multiple uses and resists leaks much better.

What resin are you planning to use? Make sure it plays well with your foam core plug. The longer the set time the better! Seriously, if I could get a hardener that would allow 4+ hours of work time, I would use it. I still use West Marine resins because it’s readily available, has a really good shelf life and has fit all my needs so far. I do need to try some other resin systems at some point though.

How wide is your CF sleeve material and what weight CF - 6K, 12K? BTW - Love using CF 45deg sleeve material as it conforms to all kinds of angles, but it does have it's limits. It stretches over large contours but gets a bit thin when stretched to its limits. The finish pattern looks really good as well.

Most Important - go one layer at a time. CF is great in that thin layers add strength. And you can fine tune the shape of areas between layers. Got pointers in this phase of the process. An itital layer over the foam will stiffen the plug up plus you can sand areas down, add filler (highly recommend Epoxy Dough) to get exactly the shape you want before applying final layers.

In areas like the barrel channel, recommend making a vacuum backer/filler form to fill in the void before you apply the bagging. Not sure if that makes sense, but a thin foam layer/edge will deform big time if not internally supported.

Don't be in a hurry to do it all at once!

Sorry if you know most of this, but just want to share a few pointers learned.

Outstanding project!

Thanks for the response! Your post in the Pounder Kevlar stock thread is what made me reconsider the white polystyrene insulation and switch to the stiffer green board.
This whole project is definitely budget-oriented, so for bagging I was going to use a simple vacuum storage bag from Harbor freight and a shop. I’ve used one before for a simple fiberglass part with decent results. The strethelon sounds much better, but I don’t have a real vacuum bagging setup. It’s more like a medium stage between skinning and a full vacuum bag - the pressures aren’t as high, and don’t conform as well, but will help compared to just laying up the CF over the mold.

For resin I was going to use West System 105-A with the slowest hardener, although I still need to look up the approximate cure time. I chose this because it’s easily available, and relatively cheap.

The CF material I’m using is 3k, which is why I think I may need more.. The sleeve expansion/thinning is why I want to reinforce the wrist/grip area with extra layers as that’s where the sleeve will be stretched the most.

When you say 1 layer at a time - do you mean with separate vacuum bagging iterations in between? i.e. lay one layer down, then vacuum and let dry, and then repeat for every layer? I didn’t realize this. When I’ve done simple fiberglass parts in the past, I’ve done up to 5 layers in one vacuum bagging step.

Also, I am going to use some filler blocks, especially where the foam gets real thin. I have a mock-up “barreled action” that is just 3 different sizes of PVC, PEX, and a steel pipe to keep everything straight and concentric. (I’ll cut and smooth the long edges to not penetrate the vacuum bag) This will fit in the top inletting, and I have another wood plug for the bottom metal. These will be covered in release agent and put into the vacuum bag with the mold so that the critical geometry is held.

DB739E46-4696-4AD0-8DDE-9A6BE4CB7644.jpeg

Since you done this more than a few times, how many layers did you use? That’s the part I’m not sure on, and was just going to layup and see what it felt like after, and add more as needed.
 

TaperPin

WKR
Joined
Jul 12, 2023
Messages
1,975
For my stock the choice of number of layers is somewhat limited - two layers plus a minor amount of reinforcement brings the weight up to a pound rather quickly.

Its not for everyone, but if you are shaving ounces, a recoil pad made from a flip flop is the lightest option and is functional. Sanding it to shape is probably twice the time as a normal rubber pad, but can be done cleanly.

Also, don’t worry about your vacuum pump not being up to snuff - the main difference between yours and a $400 model amounts to very very little additional clamping force - probably in the range of 1/10th of a psi.

Sometimes I spend too much on things that don’t matter, and too little on things that do. The go to bagging material for woodworkers is often regular old clear poly from the hardware store, and I did make a number of things with polyester resin and a few with a true epoxy, without issue. The clear lawn and leaf garbage bags from Costco are a favorite because they are always on the shelf and easy to cut to size.

Beware of leaks. Cheap poly, especially anything with folds and in the lighter weights is more likely to leak. Having said that, careful handling and close inspection has made the last 15 or so bagged items leak free. It’s still important to have a backup plan - keep extra sealing putty for leaks, seals in the bag need to be accessible so if there is a leak you can squish them under vacuum to improve the seal. Worst case, I keep a second bag handy if a bad leak can’t be found. A fancy vacuum attachment to the bag can be used, but you can also simply stuff the hose in at a seam and putty around it well.

It‘s not required, but I’d recommend at least a cheap vacuum gauge so you have some idea of how well the bag is sealed - the difference between a good seal and one only providing half the clamping force isn’t easy to tell. If you can clamp off the hose to the pump and the seal is 100%, then the pump can be turned off, but this can be deceiving without that gauge.

I‘m so comfortable using painters caulking to seal the bag, that’s probably what I’ll keep using until it causes an issue. Moisture is sucked out of the caulking, but it should evacuate out the breather ply and never contact the epoxy.
 
OP
R
Joined
Aug 13, 2023
Messages
66
For my stock the choice of number of layers is somewhat limited - two layers plus a minor amount of reinforcement brings the weight up to a pound rather quickly.

Its not for everyone, but if you are shaving ounces, a recoil pad made from a flip flop is the lightest option and is functional. Sanding it to shape is probably twice the time as a normal rubber pad, but can be done cleanly.

Also, don’t worry about your vacuum pump not being up to snuff - the main difference between yours and a $400 model amounts to very very little additional clamping force - probably in the range of 1/10th of a psi.

Sometimes I spend too much on things that don’t matter, and too little on things that do. The go to bagging material for woodworkers is often regular old clear poly from the hardware store, and I did make a number of things with polyester resin and a few with a true epoxy, without issue. The clear lawn and leaf garbage bags from Costco are a favorite because they are always on the shelf and easy to cut to size.

Beware of leaks. Cheap poly, especially anything with folds and in the lighter weights is more likely to leak. Having said that, careful handling and close inspection has made the last 15 or so bagged items leak free. It’s still important to have a backup plan - keep extra sealing putty for leaks, seals in the bag need to be accessible so if there is a leak you can squish them under vacuum to improve the seal. Worst case, I keep a second bag handy if a bad leak can’t be found. A fancy vacuum attachment to the bag can be used, but you can also simply stuff the hose in at a seam and putty around it well.

It‘s not required, but I’d recommend at least a cheap vacuum gauge so you have some idea of how well the bag is sealed - the difference between a good seal and one only providing half the clamping force isn’t easy to tell. If you can clamp off the hose to the pump and the seal is 100%, then the pump can be turned off, but this can be deceiving without that gauge.

I‘m so comfortable using painters caulking to seal the bag, that’s probably what I’ll keep using until it causes an issue. Moisture is sucked out of the caulking, but it should evacuate out the breather ply and never contact the epoxy.

More great advice - thank you! I thought about the flip flop pad, but for a 7 mag I decided the small weight penalty to go with a microcell pad would probably be worth it.

I think the vacuum bag should be fine for pressure, I keep reading that ideal pressure for surface finish is ~20%, which is what household vacuums produce. I’ll bet that the bagging material that was listed earlier probably conforms better, though. I will definitely have something on-hand to seal leaks and a backup bag just in case!
 

BBob

WKR
Joined
Jun 29, 2020
Messages
3,660
Location
Southern AZ
 
Joined
Jan 26, 2017
Messages
2,712
Location
PA
what Repeat is trying is way more ambitious than what I do. carbon fiber, vacuum bagging and starting from complete scratch. But, they build swimming pools and high performance boats with fiberglass laid in normal conditions, so it is good enough for me.
 
Top