Custom Carbon Fiber Stock

TaperPin

WKR
Joined
Jul 12, 2023
Messages
1,975
More progress.
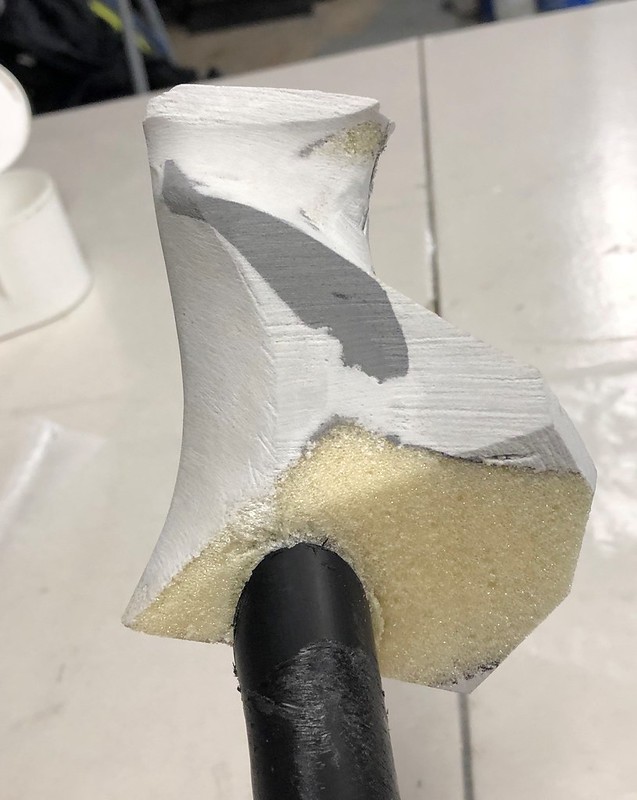
The CF sleeve that I bought is 4” diameter, which shrinks if you pull longitudinally and expands if you open it up. I thought it was an awesome idea. I’m sure it works great for straight projects, but is not as great as I expected for a stock. The height at the butt pad is 5.75”, with the front of the forend at around 2”. These changes, combined with the two curves at the grip and the extra thickness from the cheek piece makes it hard to get the sleeve to conform perfectly.
So I decided to work in halves, overlapping at the grip which needs extra reinforcement anyway. I vacuum bagged the butt side first. 2 layers of CF, then peel ply and breather, and into the large vacuum bag from Harbor Freight. It worked okay, but I ran out of time quickly (I hoped to get 3 layers down), and ended up with quite a few ripples. The stock was at 6.1 oz before, and 10.0 oz after.
View attachment 594130
View attachment 594129View attachment 594131


View attachment 594134
Thankfully, the ripples and imperfections cleaned up pretty easily, and I was down to 9.6 oz. But I had filed all the way through to the foam core in two small spots. I think 2 layers is probably strong enough, but my surface was rough.
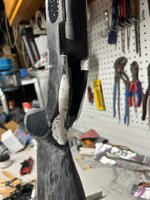
Then I vacuum bagged the forend side, with similar results. It worked okay, but ran out of time way too fast, had trouble conforming as well as I wanted, and the end result seemed a bit thin on resin. We are at 13.3 oz after cleaning it up some.
View attachment 594143
View attachment 594144
View attachment 594145
I decided for the 3rd layer that I was planning on and already had the material for I would do another wet layup, with no vacuum bagging. With my beginner skills and equipment, I can get a better surface finish without vacuum bagging, as well as seemingly better resin distribution and CF placement. Go with what works.
View attachment 594147
I just laid it up tonight, so no results yet. I cut the sleeve lengthwise to essentially make a normal CF sheet. I’m definitely learning a ton, and don’t think I’ll use sleeve material again. This was the first layup (besides the simple rectangle patches early on) that I’m happy with right away.

Edit: wow, this post turned out crazy long, I’ll try to break it up next time
Great job with your progress!
Just like with fiberglass bodywork on a car, the absolute worst thing that can possibly happen is you grind out a spot and redo it until it’s acceptable, so don’t let little snags along the way slow you down.
 
OP
R
Joined
Aug 13, 2023
Messages
66
I wasn’t loving the recoil pad fitment - the stock had rounded edges where the CF layers wrapped around to the butt. I put some tape around the butt, and used resin that self-leveled to make square edges. I also added a final coat of resin only to improve the surface finish. Besides some light sanding on drips and for paint, and potentially a textured grip section, the butt side is done. Currently right at 1 pound.
I’m still debating on putting another layer of CF along the forend. I don’t need it for strength as I can’t flex the stock at all when pushing hard against the corner edge of the workbench. But the 1 more layer would be for the purpose of having a thicker skin to hold my cross bolts that run through the bedding block.
217F97B5-45EC-4733-84B0-27EA323D95D0.jpeg
E15ABCEA-8BF0-4F1C-B7E7-69A7EF3E8DEA.jpeg
C8BD90B8-2662-4B4D-8CA8-0BA7D79D59AC.jpeg
813C4AF4-EA81-4D00-AAF8-E0140635D292.jpeg
900686C6-AB0F-423D-BBC8-D98FEBB0B7FE.jpeg
 

JFK

WKR
Joined
Sep 13, 2016
Messages
706
Nice job. It’s a pretty ambitious project.

Cabosil mixed with epoxy can be used to add material and fair out imperfections, and adds very little weight. It would also work well for ending texture to grip and fore end.
 

Gobber

FNG
Joined
Aug 8, 2023
Messages
37
Man, that is looking really good and I love the self leveling resin contained with the tape.

A trick I like to use for burned / sanded through spots in a carbon shell is a mixture of CF chop (scraps basically) mixed with resin and pushed into a void made in the foam behind the sanded through hole. I just pack the mixture I like to call sticky hair ball up into the pocket making sure it has good clean adhearance to the inner edges of the hole. After packing in a tight glob with a chopstick, I’ll add a glob on top that covers the edges of the hole to allow it to be sanded smooth. To compress it into place, put a bit of peel ply & breather and wrap it with stretchy packing wrap from home depot.

Pro Tip- to make a clean pocket inside the shell, use a wooden q tip with a bit of acetone. It melts the foam, cleans the interior edge of the hole and leaves behind a crust on the foam that holds up well to compacting.
 
Last edited:

Gobber

FNG
Joined
Aug 8, 2023
Messages
37
Guessing we all like projects and pictures here, so as a quick aside, here is the progression of a block of foam to a custom fitted carbon fiber grip.

Started with a form made from a scrap of coroplast plastic. Poured in a measure bit of 2 part mid level rigid Foam-iT! 5. The black plastic tube is a bit of PEC tubing that acts as an anchor point to hold the block in a vise.


Sketched out a general outline of a blank.


Started forming the plug with some strap sanding.


I believe in the general rule of 3's - it takes at least 3 iterations to get close to what you really want.


The lines are the contours of my hand on the grip.
That bit of CF on top is a plate to make a hard point for attaching to the stock frame.


Realized after playing with the foam plug, I wanted a bit of a thumb rest. So added back some Epoxy Dough.
I colored it with just a bit of black epoxy pigment just to see how it looked when darkened.


As I played with the fit and form of the grip I basically sanded it down a bit too thin, so added a layer of the epoxy dough back.
The dough is just about as light as the foam, but has a smoother finish.


After a bit of smoothing down, began ergonomically fitting the contour of the grip to my shooting hand.


A bit more fitting and I realized the back side of the grip had an unnecessary area that I simply sanded away.


The finished surface ready for a few layers of 6K CF.
The contour lines fit nicely to my hand.


One of my few pics of actually wetting out the CF from a different layup.
Just not that keen on getting resin on my phone or camera.
The yellow tape is a big help when cutting out sections of CF as it reduces the fray.
Just have to work it where the tape sections are either in the excess to be cut away or pulled out of the wetted out sections.


Bagged up and vacuumed down.
Note the filler block of modeling clay placed on the outside of the peel ply & breather cloth but inside the bag.
It helped to get the CF to lay down smooth in a recess.
Also planned the joining line to be on the back of the grip so the pattern of the weave was not interrupted on the face of the grip. Lesson learned from the first two versions.


Next morning, get to 'unwrap the present' from last night.
And a pair of pliers does help.


After a bit of trimming and sanding- looks pretty nice..
And yes there are a few burn-throughs, but it's a prototype and structurally works just fine.


The backside.
I just darkened the foam that was visible with a sharpie.


Here's the rough fitting onto the Carbon Coosa stock it was made for.


Mmmm. Nice reach-around...


And the final Glamor Shot.


Sorry for the thread hijack, but there are a few different ways to 'roll your own' stock.

This one has a Coosa Board core and the butt is from a salvaged CF hockey stick shaft. It is not meant to be super light weight - the full stock weighs in at 1 kilo or 2.2 lbs. I was going for an easier build that was all functionality with some built in adjustability. It's a total garage build using really simple tools - dremel, 1" harbor freight belt sander, salvaged fridge compressor, boat resin and CF fabric.

It really comes down to figuring out your set of wants/requirements for a build and working out from that.
 
Last edited:

svivian

WKR
Joined
Mar 16, 2016
Messages
2,859
Location
Colorado
Guessing we all like projects and pictures here, so as a quick aside, here is a the progression of a block of foam to a custom fitted carbon fiber grip.

Started with a form made from a scrap of coroplast plastic. Poured in a measure bit of 2 part mid level rigid Foam-iT! 5. The plastic tube is a bit of PEC tubing that acts as an anchor point to hold the block in a vise.


Sketched out a general outline of a blank.


Started forming the plug with some strap sanding.


I believe in the general rule of 3's - it takes at least 3 iterations to get close to what you really want.


The lines are the contours of my hand on the grip.


Realized after playing with the foam plug, I wanted a bit of a thumb rest. So added back some Epoxy Dough.
I colored it with just a bit of black epoxy pigment just to see how it looked when darkened.


As I played with the fit and form of the grip I basically sanded it down a bit too thin, so added a layer of the epoxy dough back.
The dough is just about as light as the foam, but has a smoother finish.


After a bit of smoothing down, began ergonomically fitting the contour of the grip to my shooting hand.


A bit more fitting and I realized the back side of the grip had an unnecessary area that I simply sanded away.


The finished surface ready for a few layers of 6K CF.
The contour lines fit nicely to my hand.


One of my few pics of actually wetting out the CF from a different layup.
Just not that keen on getting resin on my phone or camera.
The yellow tape is a big help when cutting out sections of CF as it reduces the fray.
Just have to work it where the tape sections are either in the excess to be cut away or pulled out of the wetted out sections.


Bagged up and vacuumed down.
Note the forming block of modeling clay placed on the outside of the peel ply & breather cloth but inside the bag.
It helped to get the CF to lay down smooth in a recess.
Also planned the joining line to be on the back of the grip so the pattern of the weave was not interrupted on the face of the grip.


Next morning, get to 'unwrap the present' from last night.
And a pair of pliers does help.


After a bit of trimming and sanding.
And yes there are a few burn-throughs, but it's a prototype and works just fine.


The backside.
I just darkened the foam that was visible with a sharpie.


Here's the rough fitting onto the Carbon Coosa stock it was made for.


Mmmm. Nice reach-around...


And the final Glamor Shot.


Sorry for the thread hijack, but there are a few different ways to 'roll your own' stock.

This one has a Coosa Board core and the butt is from a salvaged CF hockey stick shaft so it is not super light weight - the full stock weighs in at 1 kilo or 2.2 lbs. I was going for an easier build that was all functionality with some built in adjustment. It's a total garage build using really simple tools - dremel, 1" harbor freight belt sander, salvaged fridge compressor, boat resin and CF fabric.

It really comes down to figuring out your initial set of requirements for a build and working out from that.
Funny to see something done to a rifle that guys have been doing to spearguns for years. the finished product looks great.


Gobber

FNG
Joined
Aug 8, 2023
Messages
37
svivian-

I've seen some write-ups on spear gun mods, but that is a really good one. Guy did some serious research & discovery on how to re-direct the recoil better down the arm. The videos were quite revealing on how much power the larger spear guns have. Some of hose things are beasts!

I am planning to do an epoxy dough custom fit grip on a current project and plan to test out a textured finish. If it doesn’t work well, I’ll just do a CF skin.

His handle molding was a good demonstration of how simple it is to form a custom glove fit. But his CF layup was a bit rough. I would have recommended doing multiple smaller layups - the first vertical reinforcement strip looked good.

The real lesson for this one is when you want to conform the CF weave to complex curves. That is where you want a 45deg weave orientation that will flex & give significantly more than laying the weave parallel to the peaks and valleys of the underlying plug. R-Pete's sleeve was applied using a 45deg orientation and it conformed much better to curves than if he had used a plain sheet of fabric with the weave oriented at 0 & 90 degrees along the length of the stock.

For the purpose of this post, another lesson is that alternating between 0-90deg orientation and 45deg orientation between layers adds significant strength to the shell. When placing reinforcement panels to key areas, alternating the weave pattern gives enhanced strength.

One sequence to use might be -
1. Work up your foam / epoxy dough inner form (plug) to the shape you want. I like to use epoxy dough as a filler for areas that need finer complex detail. Here is where you want to take your time here to get the shapes right!

2. Figure out any internal embedded solid sections of CF, aluminum, steel etc for internal recoil managements, screw fittings, bedding block attachment to the outer shell and such.

3. Lay down your initial reinforcement strips where the lines of the weave run along the horizontal line of the stock. Recessing these into the form if needed. Bag it, let it cure, smooth sand it to shape.

4. Lay down one initial first layer of the stock's shell using a 45deg orientation. This can be either a sleeve or a sheet of CF material. What you want is a stiffened outer skin to work with. This will also show if you have any distortion in your bagging or layup technique that may be crushing or warping your stock. Filler blocks are crucial here as they not only push the wetted fabric into place, but also give solid overall reinforcement to the form.

5. After it hardens, determine if you want to apply more reinforcement panels or strips to areas like grip, inlet area, edges, bottom of grip. If so, lay them on, bag it, let it cure, smooth sand it to shape.

Building the structure of the stock from the center out using individual discrete steps helps a lot when creating a unique one off build. Don't be lulled into thinking you want to do 3-4 layers at once like so many of the videos show. These guys can do this because they have made the exact same layup multiple times and have a refined workflow. What we are doing here is first generation fabrication and it really helps to be able to adjust things between layers / steps. It also really helps when you have enough work time with your resin to get things the way you want them.

6. Once you have your stock built out a few layers, mount up the action, true the barrel channel, do some test firing, etc. Do all this before laying on your final finishing layer if you can. If you’re going for lightest weight that will need all layers in place to hold up to recoil, probably not an option.

7. Finishing layer - depending on how tight you are on weight, the finishing layer can be thinner 6k or even 3K fabric. If you really want a pretty weave pattern, lay the fabric on dry with some spray adhesive and place the fabric exactly how you want it. Then wet it out with a brush. Just be aware - the hard part is applying the peel ply so it doesn't shift the weave (as it will want to do) because the resin dissolves the spray adhesive and allows it to move. The other option is to do a simple wet layup without the vacuum bagging to compress out the excess resin.

8. Final Finish - If you are not using a negative mold, the finish will be an imprint of the peel ply texture. If you want it to be smoother, lightly sand out the residual rough surface and apply a sealer coat. I prefer using automotive clear coat with a bit of UV protection.

PRO TIP - If you don't have an automotive spray gun setup, try PREVAL disposable spray bottles - cheap, available at home depot and small enough to reduce waste.

This is just one approach and there are all kinds of ways to go. The thing that I would noodle the most in the beginning is how you are going to hard mount the barrelled action to the inlet area and how to anchor that inlet to the shell of the stock. R-Pete's AL action block is a great item for this.
 
Last edited:

Gobber

FNG
Joined
Aug 8, 2023
Messages
37
^^ That is looking really good, but…

We are all thinking it.

So I’ll just say it.

Show Us The Money Shot!!

Mount up the barreled action and post a picture. Hurry up man and give us a peek!
 
OP
R
Joined
Aug 13, 2023
Messages
66
^^ That is looking really good, but…

We are all thinking it.

So I’ll just say it.

Show Us The Money Shot!!

Mount up the barreled action and post a picture. Hurry up man and give us a peek!
Haha, unfortunately the gun is at the family farm. That’s another challenge to this project, working off of just a takeoff stock and wooden template for bottom metal.
Hopefully I’ll get up there this weekend to see if it actually fits.
 

Gobber

FNG
Joined
Aug 8, 2023
Messages
37
The pictures look like you have a good close fit that should give a tight anchor gap between the inlet block and the inner walls of the the CF shell.
Are you still planning to use cross pins?
 
OP
R
Joined
Aug 13, 2023
Messages
66
I suppose a bit of an update is in order.

When I bonded the bedding block into the CF skin of the stock, the angle was a little off, with the tang a bit low and the recoil lug area a bit high. I knew I should wait until I had the action in-hand, but was impatient and did it first with a reference line that wasn’t quite parallel with the barrel channel.
So, when bolted up, the barreled action rocked back and forth, with the high point about where the recoil lug is. Not a huge problem, I bedded the action and just left a larger gap at the rear tang for the bedding to fill in. It worked, but wasn’t pretty. Final weight with recoil pad was 28 oz.
35449B36-1D5B-4213-ADF8-84284BCC2E5A.jpeg
8C7DA2FE-E526-4B0B-B760-064625C4D19A.jpeg
Also, even after installing a brand new aftermarket trigger, I still had trigger problems with the Remington 700. In certain repeatable scenarios, the rifle dry fired when the bolt closed. This happened before with the factory trigger with a live misfire, so I was spooked enough to put the “do not use” tag back on and just set it aside.

I decided that I would probably never be happy with the way that the extra bedding material sat at the rear tang, and needed some time to decide what to do about the trigger issues. But I definitely wanted to shoot the stock, to see how my extended LOP combined with the vertical grip and higher, negative comb felt. So I took my other rifle, a Browning A-bolt in .243, and cut the factory stock apart. I used that stock to make the inletting, essentially a new bedding block.
With great effort, I also cut out the excess bedding material and aluminum from bonding the first bedding block in, to form a cavity. Then my new factory spec Tupperware bedding block can be bonded in. Weight is the same as the aluminum bedding block used previously.
10DFC286-F493-4D81-B017-5D5F688716B2.jpeg
788624C5-CBC3-4886-A135-4DAC55983E8D.jpegF0563739-021E-4BB2-9976-D4AC1A687779.jpeg

It’s not going to be super light, but I’ll be able to clean it up nice without any large bedding material spots and try out all my stock geometry before laying up the next prototype.
 
Joined
Jul 26, 2017
Messages
4
Location
Oregon
I’ve decided to jump into the deep end and make my own carbon fiber stock. This will be going on a M700 7mm Rem mag, which currently wears a wood stock.

I did a ton of research here, read a lot of @Formidilosus posts, and decided I wanted a vertical grip, negative comb stock. I’m taller, so I’ve always added spacers to get a proper LOP and have recently added spacers under a stock pack to be a proper check weld. A custom stock would solve both of these, and cut some weight from a pretty heavy gun as well. My main influences were the first gen Gunwerks Magnus and the Peak44 Bastion.

My wish list was a 14 3/8” LOP (1” longer than stock M700), negative comb, trim forend for weight and carrying (I rarely shoot off bags or front rests other than tree branches), relatively straight toe line, and flush mounted Arca rail close to the central balance point.
I started out with an $8 takeoff stock from eBay for a good pattern, and laminated polystyrene insulation board for my mold. I cut and carved it most of the way before realizing it was too soft for my vacuum bagging process. So I repeated the process with green insulation board from Lowe’s, which is stiffer and finishes much nicer.

I also bought a bare long action bedding block from Stocky’s, the Arca balance rail from SRS, and a Microcell recoil pad. The skin will be carbon fiber, the aluminum bedding block will be bonded in place with Marine Tex with two carbon fiber rods as cross bolts through the bedding block.

View attachment 589633
View attachment 589632
View attachment 589634
View attachment 589635
View attachment 589636
I am going to use a low budget vacuum bagging setup (vacuum storage bag from Harbor freight) with peel ply and a breather layer. The shell will be from a carbon fiber sleeve, like the “sock” in the infamous Sako video.

I was going to wait until I had a successful layup before posting, but I want to ask: any input on stock design or build process?

View attachment 589637
View attachment 589638
View attachment 589639
View attachment 589640
View attachment 589641
Follow this
 

Gobber

FNG
Joined
Aug 8, 2023
Messages
37
That's the way a prototype project sometimes runs - three steps forward, one step back. Good thing is you have a solid outer structure with a good form to work with.

TBH - you really are going to need the barrelled action in hand for proper barrel alignment & bedding. The method I use to bed a barreled action is to place two winds of tape around the barrel to act as spacers that orients it exactly down the barrel channel.

Hopefully the new bedding block will bond to an adhesive that can marry it up to the interior surface of the CF stock. If not, you can always mechanically bind it to the shell of the stock. Depending on how that is done, the shell of the stock may need some reinforced layering where the mechanical linkage is located.

This also brings up a conundrum I have been noodling with fabricating a light weight foam core stock - How to make a bedding structure that will hold up to the recoil impulse of a high powered rifle.

One possible approach is to create a receiver mounting box / bedding block:

1. Screw Mounts & Recoil Lug Block - If the receiver has a recoil lug, fabricate a metal block to mate up that will absorb and dissipate the recoil energy into the structure of the stock. Also do the same thing with mounting screws - have metal escutcheons that are embedded into the bedding structure.

2. Mask & Form - Mask up the receiver with tape and releasing agent. Place clay forms where you want the CF to angle away from the receiver and mate up with the stock's shell. Cut out a wood or foam plug for the magazine & trigger group void. Ideally incorporate the bottom metal (masked & waxed) into the plug so the whole structure is a one piece mount.

3. Carbon Wrap - Do a substantial CF layering (4-5 layers of 12K) around the receiver and internal plug to create a bedding structure / box that embeds the recoil lug block & escutcheons into the CF. Also have planned out tabs of the bedding box that can reach out to the shell of the stock body to maximize strength.

4. Marry to Stock - One approach is to make this reinforced bedding box / block prior to laying up the skin of the stock over the foam core. Create your foam rifle stock form / plug to the specs you want. Next cut into the stock plug and insert the bedding box where it needs to be positioned. Here's the novel part - do a wet layup of small CF tabs that connect to the bedding box and run through cuts in the foam of the rifle form that end up laying on the surface of the rifle form. Once these wing tabs cure, they can be the load bearing hard points that connect the bedding box to the inner layer of the rifle shell.


I have used this embedding hard point method making a pair of 48" foam core wing sections with an inner CF tube spar embedded in the foam wing plug. The wing form was 2-3mm wider than the spar tube and the top was sanded down until the tube was exposed. The initial top CF was laid on, vacuum bagged and bonded to the internal spar tube. Once cured, the bottom was sanded down to expose the underside of the spar tube and the process was repeated. It made for a very strong structure that withstood three crashes into trees. Fourteen foot wing span, fun project...


Anyway, you get the idea.
 
Last edited:

longrange13

Lil-Rokslider
Joined
Jun 25, 2023
Messages
227
Solid handy work right there!! My preference would be to ditch the Monte Carlo cheek piece. I also have small hands so prefer the bottom of the grip to be chopped to match the bottom of the stock. When I shoot off the bench all that extra grip has ever done for me is smack my other hand when the gun recoils. I also wonder if a slightly more negative comb that is less rounded would be more effective. Similar to a gunwerks stock. Anyways looks good! Keep it up!
 
OP
R
Joined
Aug 13, 2023
Messages
66
I suppose another update is in order. I’ll try and keep it concise without being too wordy - here’s what has happened:

I bonded the factory stock section in as a bedding block using epoxy resin as the gaps were pretty small and I wasn’t sure Marine Tex would flow with such small gaps. In the larger area at the under the tang I put some chopped up CF bits.

Then, after the first evolution cured, I drilled through the CF stock skin and the polymer bedding block for cross pins. I had bought 5mm CF rods off Amazon for really cheap. I used a 3/16” bit which is 4.8mm. I roughed up the OD of the rod for adhesion and wallowed out the hole a bit which made a perfect fit. These pins took quite a bit of effort to pound in with a standard 16 oz. hammer which really locked everything in place. I did 2 pins at the front of the action, two at the middle between the trigger and the magazine, and two at the rear as that’s what the factory stock had the real estate for. Really happy with how these fit.
E734BA7D-2988-40BE-9EEA-543C99B573CE.jpeg
3F4DF47E-1FBB-4328-9BE6-0A9626B95D66.jpeg
Then I used a JB weld epoxy putty to fill in spots and ease transitions between the stock skin that was built for a R700 and the A-bolt bedding block. This is the white in the pictures.

I drilled a hole in the forend, ovalized it, and poured in resin. This will serve as reinforcement to hold a sling stud. We have a few Harris bipods sitting around and they are available and work, so that’s primarily what the stud is for.

Similarly, the T-nuts for the Arca rail were fit and then bonded in place with resin.

863D2162-1AEC-491D-865E-125047E66A7A.jpeg
F0E64ED7-2D4A-40ED-A45C-8195D707348D.jpeg

Then lots of block sanding to get everything smooth and even was followed by laying textured grip panels with Marine Tex. I’m not super happy with these as the peaks didn’t hold so the texture is pretty smooth and the bumps are small and rounded. Some texture is still better than none I guess. I also used Marine Tex to bond in a flush cup at the butt, as I don’t like the way a rear swivel stud hangs up on a rear bag, and wanted to keep the potential for a sling.
1DE403A9-71D4-4954-AAB7-E765622849C6.jpeg
F79C5698-92BF-429C-88DB-AF9A26B04D78.jpegCC2B1D8E-B22C-4A82-8FC7-B9DE739349D5.jpeg
08A2DAA0-D5E2-4DE9-BA76-65290138956D.jpeg
B684EA7E-8C16-4833-B74A-3759B5640FEB.jpeg
Right at 1 3/4 lbs right now, my goal has been to stay under 2 lbs, which I think is doable.
 

Attachments

  • 19DE5F38-7222-411A-915D-31A24B731AB3.jpeg
    19DE5F38-7222-411A-915D-31A24B731AB3.jpeg
    104.8 KB · Views: 20

amassi

WKR
Joined
May 26, 2018
Messages
3,658
I’ve done similar marine Tex grip attempts and they came out smooth
I just added a thicker layer then stippled it with a Dremel and viola grip


Sent from my iPhone using Tapatalk
 
Top