My knife builds

OP
R

rifletuner

Lil-Rokslider
Joined
Dec 23, 2020
Messages
271
Update to add part 4

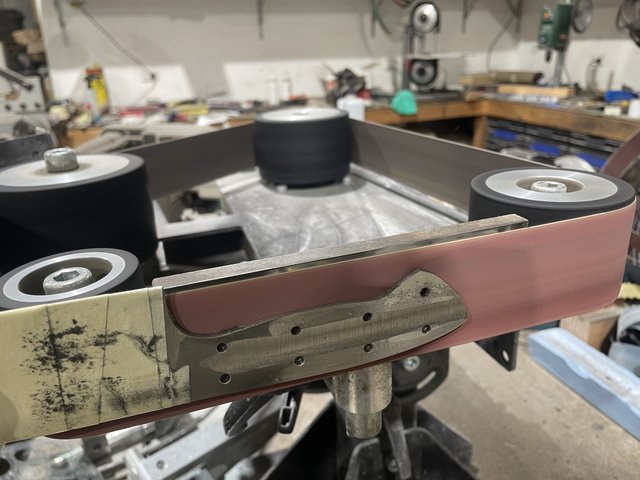
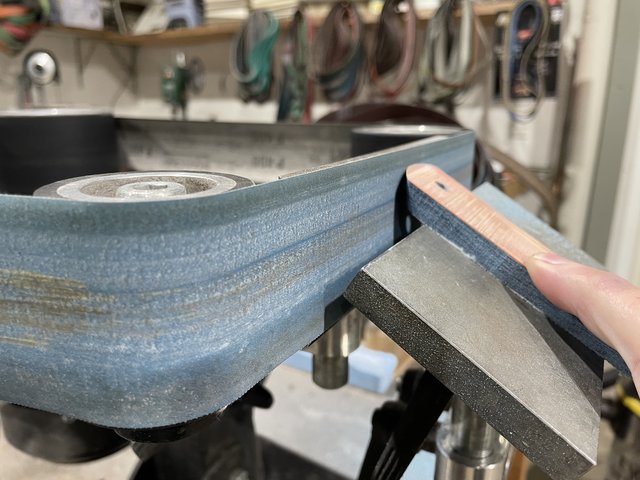
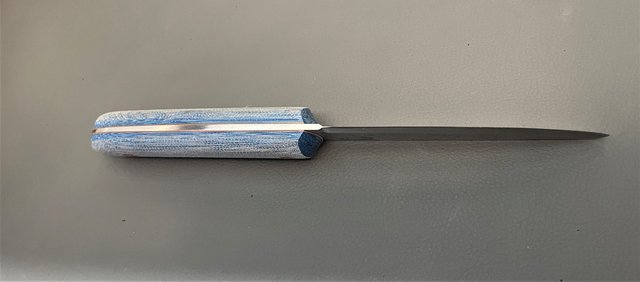
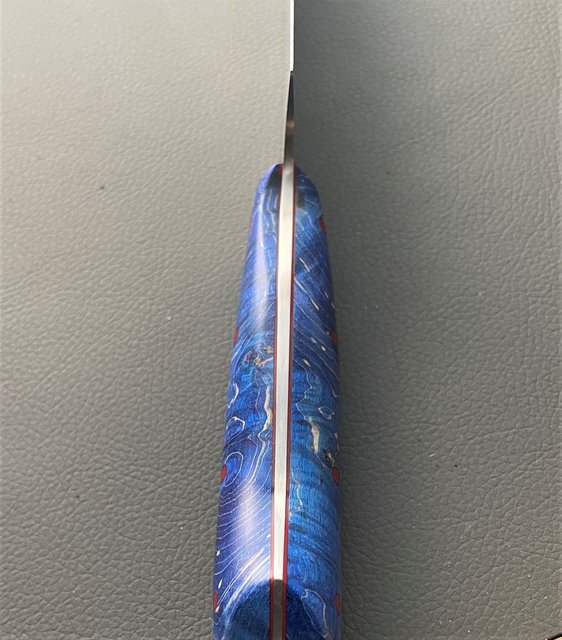
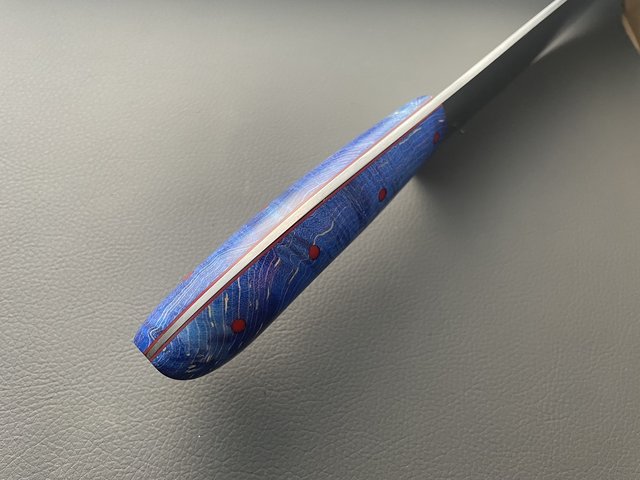
Once I have my handle scales drilled, I can taper the tangs. I grind the end of the tang progressively down to around 1mm (apparently that converts to 0.0393701 of an inch). The trick here is tapering the tang back towards the blade so that the handle sits flush with no gap, but not tapering too far or I will grind into the spine or bevels.

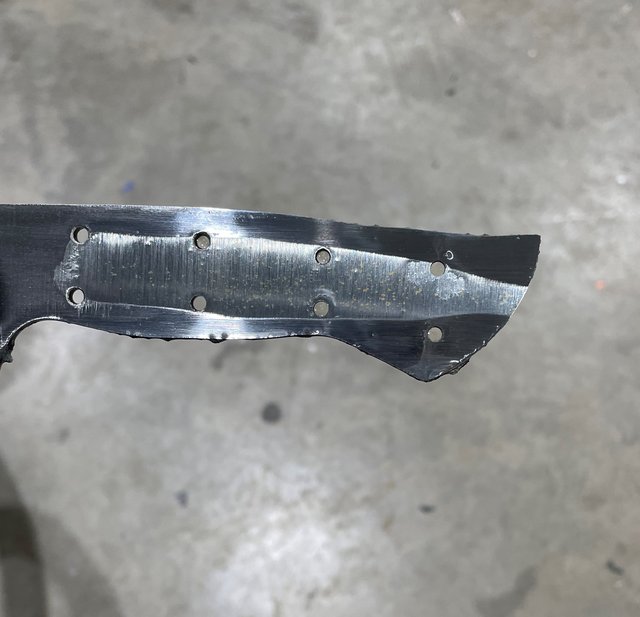
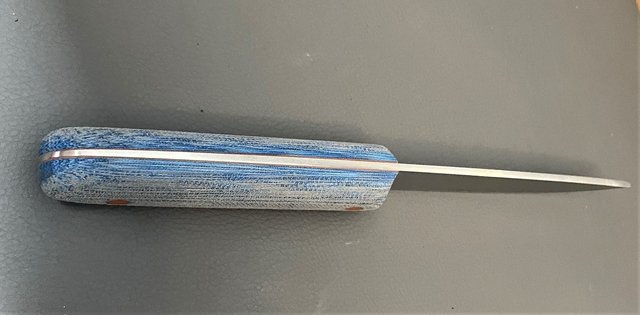
You can see from the below photos that as the grind progresses, the section I hollowed out earlier recedes until there is no hollow visible at the bottom of the tang.

IMG-2447.jpg


IMG-2462.jpg


IMG-2465.jpg


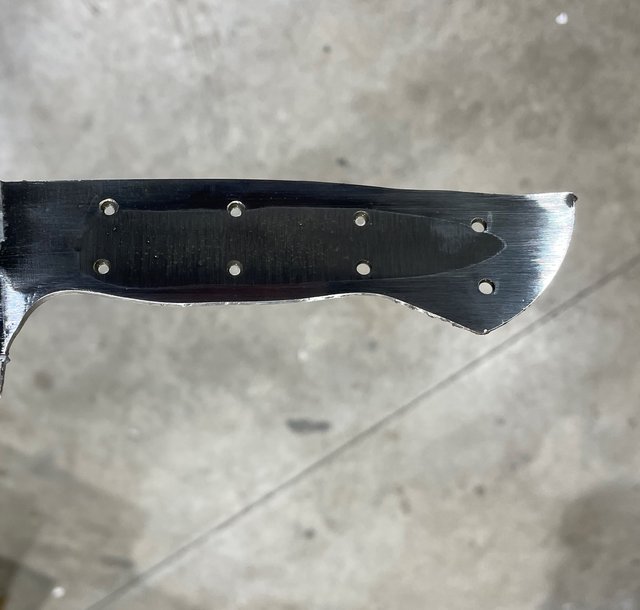
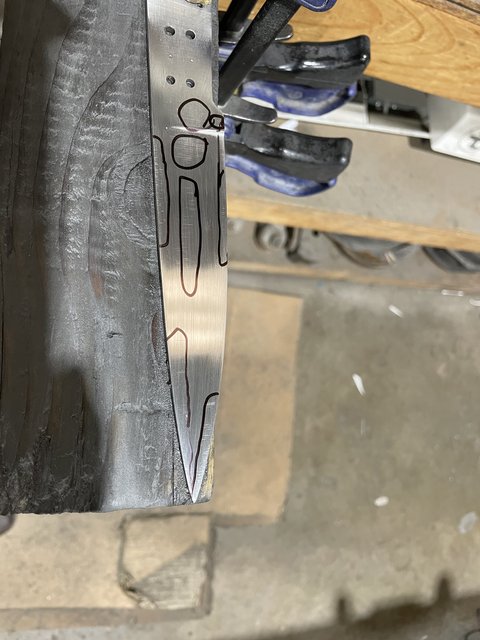
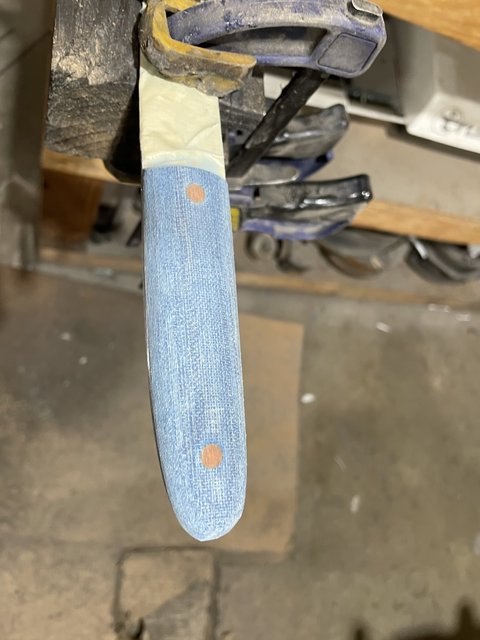
Even though the handle scales haven't been shaped yet, I do a quick check to make sure the tapered section fits flush, before moving on to the next step.

IMG-2427.jpg


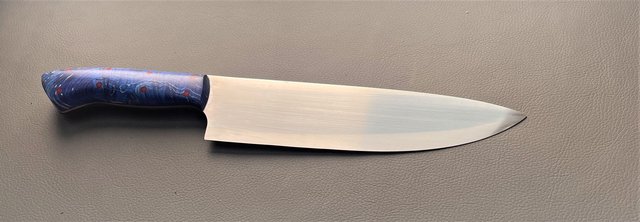
Hand sanding is the single longest step in the whole process. But it really makes the finished product in my opinion. I start off with a 120 grit wet and dry sheet, lubricate the blade with Windex window cleaner, and use a micarta offcut as a sanding stick, and get sanding.

IMG-2478.jpg


After a couple of passes with the sandpaper, I mark any deep scratches and keep working on these problem areas until everything is blended.

IMG-2633.jpg


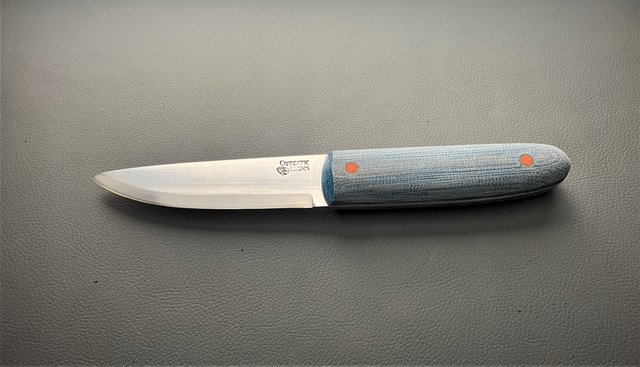
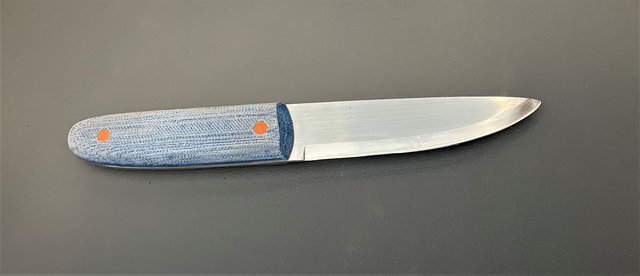
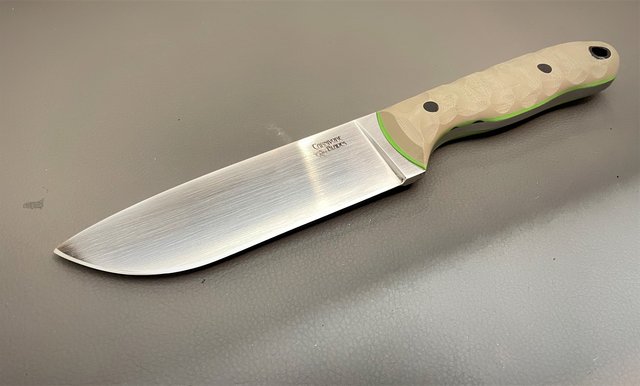
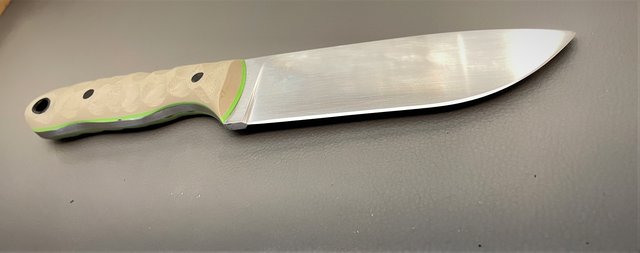
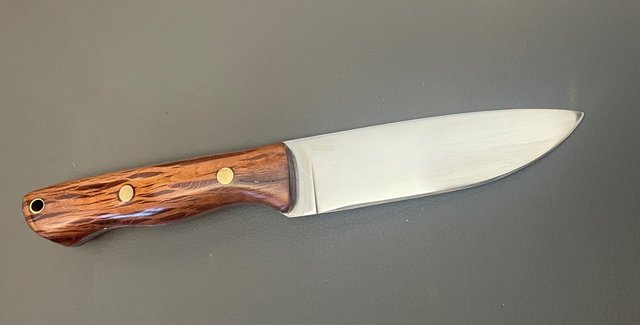
Eventually The bad scratches are gone, and I move through the grits from 180, 240, 400, 600, 800 and usually stop at around 1000 grit, though it depends on the steel. The below photo is once most of the marks are gone, but there are still a few left to get out.

IMG-2637.jpg
 
Last edited:
OP
R

rifletuner

Lil-Rokslider
Joined
Dec 23, 2020
Messages
271
Update with part 5 - the final steps in the process

Once I have the knife sanded to a point that I am happy with the finish on the blade, I etch in my makers mark using a stencil, etching solution and an electric etcher. This runs a current through the blade steel and etches away some of the metal where the solution can get through the stencil. Then I flip a switch on the etcher which changes the current and darkens the etched section.

IMG-2711.jpg


IMG-2712.jpg


Next step is to get the handle material ready for glue up. I leave the material over size on most sides, but the front of the handles facing towards the blade need to be fully finished before glue up because you cant work on them once they are glued on. So I shape the front and sand it to a fine finish.

IMG-2699.jpg


Then I take all the pieces, thoroughly degrease everything with acetone and denatured alcohol, then mix the epoxy and give all the pieces a coating of adhesive. I tape the blade just in case I need to hold it during the glue up process, then put all the pieces together and clamp everything up. The adhesive takes over 10 hours to get hard, so I have plenty of work time at this stage. I wrap the handle in saran wrap befor putting on the clamps so they dont get glued to the handle if anything leaches out while the glue is drying. I set the clamps to hold medium tight, but dont want to have it any tighter in case it pushes too much of the glue out. I use a Q tip soaked with acetone to clean up any adhesive that squeezes out at this stage.

IMG-2716.jpg


Then I leave the knife overnight to cure. Then I cut the excess off the pins with my band saw and start grinding back the handle material until its back to the metal work. I also do a lot of the shaping and contouring of the handle with the grinding belts. I use 50 grit zirconia belt, then a 120 grit zirconia belt to take out the worst of the scratches.

IMG-2752.jpg


Then I move to hand sanding of the handle material. I use 120 to 220 grit sand paper to do the final shaping of the handle and get out any of the scratches. I would normally take wood up to 600 or 800 grit before finishing, and usually take synthetic handles to at least 400 grit. But lately I have been experimenting with the "grippiness" of the handle, so this handle was only sanded to 120 grit.

I used a process recommended by the knife maker William Collins where I heat the handle with a heat gun until its warm, dip the handle into Teak oil for around a minute so it soaks it up, then thoroughly wipe off the excess and let it dry for 24 hours. This has definitely left a better grip on the handle material.

IMG-2798.jpg
 
OP
R

rifletuner

Lil-Rokslider
Joined
Dec 23, 2020
Messages
271
I guess strictly speaking, this is the final step in the build process since its the finished knife. This particular knife is a bushcrafter knife, but I wanted to see how light I could make it, without sacrificing too much of the functionality of a hard use knife.

The blade is 2.5mm SF100 stainless with a scandi grind. I also tapered the tang to reduce a little more weight, but because the steel is pretty thin, the tapper isnt as apparent as is the case with thicker steel. Handles are Tero Tuf scales, with orange G10 pins and .5mm liners. I used Tero Tuf because its a very durable synthetic, but its noticeably lighter than the alternatives like micarta & G10. It also has a reputation for retaining the grip when it gets wet, though I cant verify that from personal use as yet.

As mentioned above, this is an experiment in finishing the handle material. Seems to have worked well in terms of the grip, but it looks like I forgot to finish the handle. I guess that's the trade off between looks and practicality. Then when I made the kydex sheath, I got half way through, then realised I ran out of the eyelets I started with, so its a bit of a mix and match.

Anyhow, I need to put it on an accurate scale, but I think the weight is about as minimal as you can go for this style of knife.

IMG-2841.jpg


IMG-2829.jpg


IMG-2836.jpg


IMG-2838.jpg


IMG-2821.jpg
 
Last edited:

Stoney920

Lil-Rokslider
Joined
Mar 1, 2019
Messages
186
Jealous of all the talent on this thread. Just dipping my toes into knife making myself. Looks like I’ve got a long ways to go but definitely enjoy it.
 

Scottyboy

WKR
Joined
Dec 17, 2016
Messages
1,086
Location
Minnesota
you are a fan of HFB/Andy (as am I…but a dozen or so of his knives). Would you ever do a blade contour similar to his skinners (or anyone’s else’s for that matter) and how to order my good friend?
 
OP
R

rifletuner

Lil-Rokslider
Joined
Dec 23, 2020
Messages
271
Thanks for all the comments guys. I appreciate the feedback from everyone and its always interesting to hear what people like. Its sometimes difficult to visualise how a new design will turn out, and whether it will appeal to people. So I find it really helpful to get reactions from people.
 
OP
R

rifletuner

Lil-Rokslider
Joined
Dec 23, 2020
Messages
271
This knife is another new style for me. Its made from a section of 5.25mm CPM 3V I have had sitting around for a couple of years. Once again, the hand sanding with 3V was a bitch, although for all the effort, the finish is just average. The steel is so abrasion resistant that its just about impossible to get the sanding pattern out. The blade is 5", with a full flat grind, but the edge was only taken down to .5mm (which google tells me is 0.019685 of an inch), so hopefully its very durable. The edge came up very sharp, so happy with that for something thats a bit thicker than normal. Between the steel and the grind, I think it should hold up well to hard use.

The handle is textured G10, with a carbon fibre lanyard tube and G10 liners & pins. I bought this flat dark earth handle material a while back, but thought the colour was a bit underwhelming. I decided to try texturing the material to see how it came up. I think the texture does help, but its still a pretty boring handle colour. Plus I made a "taco" style kydex sheath.

Should work really well for camp tasks, batoning wood, etc. But will still work to field dress a deer if needed.

IMG-2019.jpg


IMG-2018.jpg


IMG-2023.jpg


IMG-2012.jpg
 
OP
R

rifletuner

Lil-Rokslider
Joined
Dec 23, 2020
Messages
271
This one is a slight variation on a design I have made before. The blade is 2.5mm SF100 stainless with a tapered tang and the edge taken down to around 0.3mm. The handle scales are stabilised and died maple, with red G10 liners and pins and a hand rubbed oil finish. Should be nice and slicey and good for food prep.

IMG-2950.jpg


IMG-2959.jpg


IMG-2961.jpg


IMG-2967.jpg
 
OP
R

rifletuner

Lil-Rokslider
Joined
Dec 23, 2020
Messages
271
This is one I made for a friend and wanted it to be a bit special. Its the first knife I have made from Magnacut steel, and really happy with how it turned out.

The blade is a flat grind in 3mm Magnacut. The design is my version of the Bark River Gunny Hunter. The handles are a block of wood that was given to me by the friend I have made the knife for. I have had them for about 18 months and have forgotten what the wood is, but the grain in this piece is excellent. I added red liners, brass Corby bolts and a brass lanyard tube. I gave the handles a hand rubbed oil finish, and it really set to wood off I think.

I wanted something special for the sheath too. I sent the knife to my leather guy, and since my friend is a keen deer hunter, we decided to add the sambar stag image and colour to highlight the stag. Really happy with how that came out too.

IMG-3225.jpg


IMG-3229.jpg


IMG-3233.jpg


IMG-3251.jpg


IMG-3223.jpg


The last step in the process was putting an edge on the blade. As I expected, it took about 3 times the work to get an edge on the knife, but once I got it where I wanted and cleaned it up with the strop, it came up very well. Excuse the crap video - its just self filmed with my phone:

 
OP
R

rifletuner

Lil-Rokslider
Joined
Dec 23, 2020
Messages
271
This is a knife I was asked to make by a member here. He asked for my take on a Half Face Blades skinner. I asked a couple of questions about preferences, but was given a lot of latitude on the build which was actually a bit daunting. I was a bit worried he wouldnt like my choices, so kept it pretty classic. Anyhow, he likes it so thats a relief.

The blade is a high saber grind in 3.8mm NitroV steel. I took the edge down to 0.2mm which google tells me is 0.00787402 of an inch, so should work really well. The handles are Gidgee timber, with red liners & brass pins and lanyard tube. Gidgee is a very dense Australian native wood, so a great material for handle scales. I am getting a sheath made, then it will be on its way to the USA.

IMG-3236.jpg


IMG-3239.jpg


IMG-3242.jpg


IMG-3249.jpg


This video is me testing the edge. It came up very nice once it was sharpened and stropped. Sorry the video is crap. Its just me self filming with my phone.

 
Top