My mountain rifle is getting walnut…

Decker9

WKR
Joined
Apr 10, 2015
Messages
875
Location
BC goat mountains
That would make Jack O’Connor jealous.

Thought I’d share a stock Iv been working on the past few years. My mountain rifle is equipped with a carbon stock (AG privateer), but I’m a long time walnut lover so will be making the switch. Since that rifle is often in use, I only had limited time between seasons to work on its walnut. This time, I should be able to get it finished.

Currently it’s pretty much shaped, im just working on tightening up the flow lines and sanding out file marks and finishing the recoil pad (which I ground the toe off to far yesterday, so today reshaping the stock toe a tad). I’ll add, im still learning!! This started as my second build from a blank, but finished as my fourth. I’ll attach links to my first, and third. Lots of lessons were learnt on this build, that really helped with the 3rd.


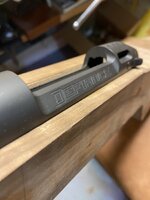
The metal for this build is a defiance anTi XM, with a BDL bottom and a 22” benchmark barrel chambered in 6.5 PRC.

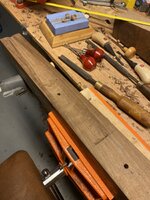
The walnut was ordered from a smith here in Canada (Turkish walnut I was told) Lesson 1, always ask for photos of all 4 sides. This one showed up with an awful crook. For anyone curious, that’s a $1500 (cad) slab.

IMG_1057.jpeg
IMG_1056.jpegIMG_1124.jpeg


I used our local cabinet maker to cut out my piece for me. Luckily the stock im after is small, we barely squeezed a piece big enough from this blank.

IMG_1205.jpegIMG_1207.jpeg

A little hand planing, shows what kind of figure is in there.
IMG_1201.jpeg
(Ignore my work boots)

If you’re interested in seeing a walnut stock unfold, feel free to check back in. I’ll keep adding as time allows. There’s a million ways to build a stock, I prefer hand tools, other than the cabinet maker and a drill press to drill my action holes, it’s all done by hand. There’s no “hand made” in a cnc or milled gunstock 🤪
 
OP
Decker9

Decker9

WKR
Joined
Apr 10, 2015
Messages
875
Location
BC goat mountains
Another lesson learnt. DO NOT start cutting out the layout until the action holes are drilled.

I hand planed the top and one side to make it perfectly square and straight, the proceeds to lay out the metal onto the blank. I got rammy, and started cutting out the inlet, then when I drilled my holes, my rear was off just a touch, which threw my whole layout out a hair. I had to hand plane the top down again and re lay out the metalwork. Quite a hickup that won’t happen again.

IMG_1202.jpeg66190809304__AAA0749A-C6A1-40C5-815D-B12A59DDAAF3.jpegIMG_1264.jpegIMG_1265.jpeg
 
OP
Decker9

Decker9

WKR
Joined
Apr 10, 2015
Messages
875
Location
BC goat mountains
Now, with the holes drilled, and layout drawn onto the black, it’s time to start moving wood.

I’ll back up, the layout…

I run a piece of masking tape down the top on my barrel, and mark in every 1/2” down its length, then take a reading of its diameter, and record.

I then go and split the diameters in half, and measure off of my Center line with a pair of dividers, making the slightest pin mark.

Once it’s laid out, I use a straight edge and see which pin marks line up, then cut them in with a, very sharp knife/cutting tool.

This inlet took a lot of time, as you may see in my third build, I learnt to remove wood a lot quicker, since this inlet was done.

IMG_1278.jpegIMG_1279.jpeg

Hand planed, after I realized my action screw holes were not totally, straight.

IMG_1350.jpeg

In action now

66317903446__74EAC0CB-D2A1-4A4A-B9CF-46A61777C3C5.jpeg
 
OP
Decker9

Decker9

WKR
Joined
Apr 10, 2015
Messages
875
Location
BC goat mountains
There’s a few pieces of a build that I have problems with, one is the tang. It’s so easy to end up with a gap back there, as we all know, gaps ruin the look of any rifle. But not to worry, because I did just that, except at the other end. That mistake to come.

IMG_1385.jpeg
IMG_1389.jpeg
IMG_1390.jpegIMG_1413.jpeg
 

Attachments

  • IMG_1385.jpeg
    IMG_1385.jpeg
    336.7 KB · Views: 68
OP
Decker9

Decker9

WKR
Joined
Apr 10, 2015
Messages
875
Location
BC goat mountains
My last build, I clicked roughly 220 hours into the whole thing. This build, I never kept track due to it being built over a long period of time. This inlet though, itself had close to 200 hours though. With such an expensive piece of wood, there was a lot of time spent just looking and fondling, making sure of my next move.

I’d almost recommend, starting from sn expensive blank for that reason alone. I was terrified of ruining it, which made me step back a lot, and think about what I was doing.

IMG_1416.jpegIMG_1446.jpegIMG_1449.jpeg

Doing good with the gaps, all is fitting snug so far.

IMG_1450.jpegIMG_1454.jpeg
 
OP
Decker9

Decker9

WKR
Joined
Apr 10, 2015
Messages
875
Location
BC goat mountains
I really would like to count one day, how many times the metal goes in and out of the wood, at my level, I bet 1000’s.

I didn’t take any photos it seems of, how it’s actually done, for anyone wondering.

I use a goop called “layout black”, which puts a very very thin coat of black stuff on the underside of the barrelled action. The action has 2 long headless screws in the action screw holes. When I lower the metal into the wood, using the action screw holes as guides, where the metal touches the wood, it leaves a black mark. That’s wood that needs to go away. Reading the black is tricky though, figuring out which are true and / or false readings.

Now, We’r getting close.
IMG_1445.jpegIMG_1461.jpegIMG_1469.jpegIMG_1466.jpegIMG_1470.jpeg
 

Attachments

  • IMG_1467.jpeg
    IMG_1467.jpeg
    199.7 KB · Views: 68

mod7rem

FNG
Joined
Jun 28, 2013
Messages
92
Location
British Columbia
Very impressive work.
Personally, I’ve learned that I can’t have a wood stock on a rifle. Not even a laminate. I can’t handle any blemishes or damage, it drives me crazy. Scratches and damage on even expensive synthetic stocks mean nothing to me.

One time I picked up a 1970’s 444 Marlin that had spent almost its entire life in a safe, virtually unused. It had the typical high gloss finish but the wood had way above average figure and patterns.
I immediately stripped it all down and refinished it in a soft, matte oil finish and changed out the old dried up recoil pad. It was beautiful.
But the problem was, I could hardly take it out of the house. I ended up selling it to end my torture. The guy I sold it to only saw pictures of it but I assured him that the pictures didn’t do the wood justice. Once he got it, he contacted me and was very surprised with the stock.
I’m not sure if he was able to use it without worrying about the stock or not.
But no wood stocks for me ha ha.
 

Steve O

WKR
Classified Approved
Joined
Feb 29, 2012
Messages
2,911
Location
Michigan
That’s some serious skill I do not have! Looks great. I took the high gloss finish off my Blaser and put an oil finish on and that was terrifying. I’d like to trim it down a little and blend in the wood to metal intersections but that’s going to take more courage or a couple more dings and scratches…
 
OP
Decker9

Decker9

WKR
Joined
Apr 10, 2015
Messages
875
Location
BC goat mountains
Very impressive work.
Personally, I’ve learned that I can’t have a wood stock on a rifle. Not even a laminate. I can’t handle any blemishes or damage, it drives me crazy. Scratches and damage on even expensive synthetic stocks mean nothing to me.

One time I picked up a 1970’s 444 Marlin that had spent almost its entire life in a safe, virtually unused. It had the typical high gloss finish but the wood had way above average figure and patterns.
I immediately stripped it all down and refinished it in a soft, matte oil finish and changed out the old dried up recoil pad. It was beautiful.
But the problem was, I could hardly take it out of the house. I ended up selling it to end my torture. The guy I sold it to only saw pictures of it but I assured him that the pictures didn’t do the wood justice. Once he got it, he contacted me and was very surprised with the stock.
I’m not sure if he was able to use it without worrying about the stock or not.
But no wood stocks for me ha ha.

Like a cast iron pan, the seasoning is what makes it! Haha. I treat my walnut like a newborn baby, but I still love a baby with dings 😂.

Iv tried a handful of test piece, this one will be getting a try oil finish, but cut back with boiled linseed so to not get a full gloss finish, and to help absorb into the wood. Being my mountain rifle, I’ll be super diligent about sealing the worked very well, I hope.

A little teaser of what’s inside that wood.

IMG_2840.jpeg
 

TaperPin

WKR
Joined
Jul 12, 2023
Messages
1,975
Holy smokes, that‘s quite impressive on many levels. The wood is amazing. Being hand made will make you smile for years to come. Your willingness to learn as you go on such a nice piece says a lot about what a go getter you are.

Cant wait to see the finished rifle. Well done.
 

bradb

WKR
Joined
Jan 8, 2013
Messages
963
Awesome! I cheated when I did a wood stock for one of my rifles(action is off my first rifle) I ordered a semi inlet and had some one else do the checkering. WAY harder the way your doing it
 

Attachments

  • Copy_of_blood_free_1_133035389753103.JPG
    Copy_of_blood_free_1_133035389753103.JPG
    363.6 KB · Views: 167
Top