Charcoal Grill for a Wood Stove???

Superdoo

WKR
Joined
Feb 21, 2020
Messages
1,007
Location
ND
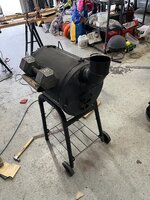
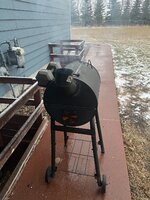
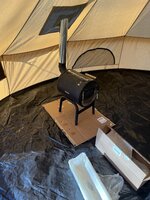
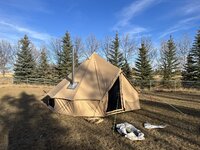
Has any body ever tried to modify a charcoal grill to use as a wood stove? I was looking to see what I could use to DIY a stove and searching for old propane tanks, gas grills showed up in the search too and I got to thinking...
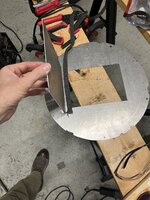
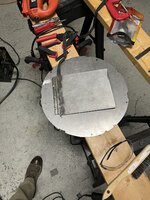
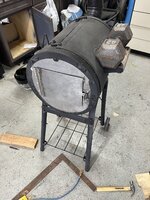
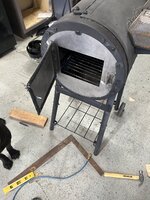
If you can get one of the rectangular charcoal grills and weld the lid shut, you could cut a door in one end and hole in the top for the pipe. The legs would already be be there, so it seems like a fairly simple mod.

Alright internet... unleash your rath and send comments illustrating the naivete of my idea whilst also pointing out my lack of intelligence!


1663602589367.png
 

Marbles

WKR
Classified Approved
Joined
May 16, 2020
Messages
3,707
Location
AK
If used in an enclosed area I would worry about carbon monoxide. The walls will be very thin, not sure they will hold up to the heat of an efficiently burning wood fire.
 
OP
Superdoo

Superdoo

WKR
Joined
Feb 21, 2020
Messages
1,007
Location
ND
If used in an enclosed area I would worry about carbon monoxide. The walls will be very thin, not sure they will hold up to the heat of an efficiently burning wood fire.
The google seems to be unanimous in saying briquettes burn hotter than standard wood. Also, the plan is to use a heavier charcoal grill like the one in the photo, not the cheap round ones.
 

Marbles

WKR
Classified Approved
Joined
May 16, 2020
Messages
3,707
Location
AK
The google seems to be unanimous in saying briquettes burn hotter than standard wood. Also, the plan is to use a heavier charcoal grill like the one in the photo, not the cheap round ones.
Give it a go. A properly stoked woodstove is hotter than an open wood fire, but obviously not hot enough to melt steel.

Have good carbon monoxide detectors. Give good spacing between grill and flammables, such as walls, as you have no distance rating.

There are lots of safety things built into a wood stove, I would personally only use this in an actively occupied space so someone could keep an eye on it.
 
Joined
Feb 12, 2022
Messages
1,725
Comparing one to my (cheap) tent stove they are a lot more real estate and would require more fuel to produce the same heat.

But I see no reason why it wouldn't work.
 

SpringM1A

Lil-Rokslider
Joined
Dec 28, 2018
Messages
129
Location
NV
My current burn pit is a slice out of a 275 gallon tank, so it is oval. i have a buddy weld up a grill grate to fit over it. It is stainless, has angle sides and round stock for the grates. Works pretty darn good. What I have seen for adjustability is if you have a brick structure, you can have some bricks sticking out to hold the grill and do that every other course of brick. The other option is you can use some steel that can protrude from every course of brick for more options. I saw one charcoal pit that used to grills, one lower than the other and it was just 2 bricks more narrow than the other so the bottom grill was a few inches shorter but you could use the bottom or top grill or both and you could slide them out half way to move meat around.
 

Cheaha

FNG
Joined
Oct 20, 2020
Messages
65
I think it would work fine. I built a wood stove out of an old metal file cabinet after watching this video:

I doubled the floor by leaving the three sides long and then folding them together like a box. It has lasted about nine years now. I did put some fire brick on the floor of it too.
 
OP
Superdoo

Superdoo

WKR
Joined
Feb 21, 2020
Messages
1,007
Location
ND
Considering a lack of naysaying on this I think I'll proceed and make this a winter project.
 

WoodBow

WKR
Joined
Jul 21, 2015
Messages
1,759
Only down side i see is how big it is. Just takes up a lot of real estate in the shelter and in the truck. A junk air compressor tank would make a good stove body.
 
OP
Superdoo

Superdoo

WKR
Joined
Feb 21, 2020
Messages
1,007
Location
ND
I was thinking of using this one. Looks pretty compact. Unless that's a costco bottle of Lowry's!

1663947703354.png
 
OP
Superdoo

Superdoo

WKR
Joined
Feb 21, 2020
Messages
1,007
Location
ND
06D92223-7181-4DAA-8F24-813B28D8FD58.jpegC0F23C30-1280-4503-9E57-3C0CD6AB09D3.jpeg


I did a test burn after adding the elbow and sealing both the elbow and lid.
Smoke was pouring out every crevice. I’m guessing it’s because the sealer around the lid didn’t do a good job of sealing as I was hoping to still use the lid to load wood. It also had vents on both ends, so they may have created problems too.
So the plan is to weld the lid shut, pull the shelf off and put a more traditional door on the side the shelf was on.
I got the new end cut and fitted last night. I hope to have the door fab’d this weekend.
 
OP
Superdoo

Superdoo

WKR
Joined
Feb 21, 2020
Messages
1,007
Location
ND
I got the side door finished and applied gasketing to the original door. I’m going to do a test burn utilizing the rear intake on the clean out drawer.
That will tell me if I need to block off the rear intake and cut a front one in.
I’m thinking the rear intake will necessitate adding a baffle. I’ll cross that bridge after the test burn.
 

Attachments

  • AF77F732-6FFB-43D7-ADCA-E2F79D15BA26.jpeg
    AF77F732-6FFB-43D7-ADCA-E2F79D15BA26.jpeg
    339.2 KB · Views: 26
  • B31F7EEC-25EA-4127-B65B-C33B625B54EA.jpeg
    B31F7EEC-25EA-4127-B65B-C33B625B54EA.jpeg
    417.5 KB · Views: 26
  • 537ACACA-CC30-498E-A2C3-2E9289D2143D.jpeg
    537ACACA-CC30-498E-A2C3-2E9289D2143D.jpeg
    413.4 KB · Views: 26
  • 827FDB9A-750C-4114-95E3-A31F4BE64E48.jpeg
    827FDB9A-750C-4114-95E3-A31F4BE64E48.jpeg
    429.1 KB · Views: 25
  • 19DEB64B-C005-435E-8CA1-39E7CEEBB2D5.jpeg
    19DEB64B-C005-435E-8CA1-39E7CEEBB2D5.jpeg
    505.3 KB · Views: 27
OP
Superdoo

Superdoo

WKR
Joined
Feb 21, 2020
Messages
1,007
Location
ND
Test burn went great!
Now that I have legit proof of concept, I ordered the nesting stove pipe. Once that arrives I’ll be able to better ascertain how the intake is performing.
I’m still thinking that a front intake will be needed, but I’m not fixing it if it ain’t broke!
 

Attachments

  • 27F64D43-8FE6-4AFA-AAD8-10BF7CBD928C.jpeg
    27F64D43-8FE6-4AFA-AAD8-10BF7CBD928C.jpeg
    478.6 KB · Views: 23
OP
Superdoo

Superdoo

WKR
Joined
Feb 21, 2020
Messages
1,007
Location
ND
Just an update on all in cost for this so far:
$15 - Grill (off of FB Marketplace)
$20 - 4" elbow (Amazon)
$40 - 3' square sheet steel
$90 - Nesting stove pipe
$15 - Gasketing materials
Total: $180.00

I could probably have shaved some money off of this, but I was trying to get material quickly to finish the build before rifle season starts here.
 
OP
Superdoo

Superdoo

WKR
Joined
Feb 21, 2020
Messages
1,007
Location
ND
Nested pipe arrived and I got everything put together.
I had trouble with the 4” damper I bought. It didn’t have tight enough tolerance to lock into place, so I had to tack weld the rod and clean it up with the grinder.
The first burn resulted in the paint gassing off and filling the tent.
My only guess is that the 8’ of pipe caused the unit to run way hotter than it ever had previously.
Afterwards I looked and didn’t notice any deformation at all. So from a structural standpoint, it’s very safe.
I cleaned off the loose paint and burned it again last night to try and get any residual fumes out. It ran much better.
It burned for over 4 hours.
Photos are before the paint burned off. I also set the stove on a welding blanket before I started the burn.

The thing works great!
 

Attachments

  • 2B270708-4A55-4AFE-912C-70E9DEE75BD7.jpeg
    2B270708-4A55-4AFE-912C-70E9DEE75BD7.jpeg
    365.3 KB · Views: 22
  • 9B649CE3-6C91-43C1-A8A0-C905575B739D.jpeg
    9B649CE3-6C91-43C1-A8A0-C905575B739D.jpeg
    548 KB · Views: 22
Top