Pack Build-Along, Frame and All

5shot

Lil-Rokslider
Joined
Mar 29, 2016
Messages
289
Location
Colbert, WA
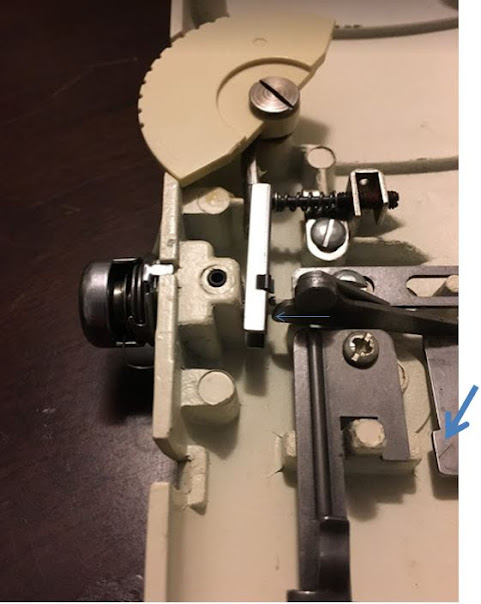
That arm should be attached to the foot lifter, so when you lift the foot all of the tension is removed from the disks. This let's you pull the work out.

There is probably a set screw in that hole that let's you remove the tension assembly.
 

5shot

Lil-Rokslider
Joined
Mar 29, 2016
Messages
289
Location
Colbert, WA
I see know...using my phone...that it doesn't operate the way I suggested. Can you change the relationship between the arm and the dial?

If not, I have some other tricks.
 
OP
Tartan

Tartan

WKR
Joined
Jun 27, 2016
Messages
338
Location
Argyle, Tx
I see know...using my phone...that it doesn't operate the way I suggested. Can you change the relationship between the arm and the dial?

If not, I have some other tricks.

unfortunately, no. When fully extended, the arm is almost contacting the pin that runs up through the discs.

Just to help clarify. When the presser foot is up, a pin comes up and contacts the lever at the thicker blue arrow. Pushing the lever at the thin blue arrow, releasing tension.

Zuk3tPCiOE-cMfi47FtxF8Fx_H4AJIKJ9gyLtuy-FuQTNpCMvQzLjnhrun_cng7iBa9FCk15KCqnr6jU_Pa-A-tgM3rrw_KuudzWvyDagKcfFC4ONh0c14RyEsnPuz4RsYNPNxX-D84ii7ldm9H5ubed0zGU-h82GyVLfCQ7Tk111VcpjKFwDyUq4z5uTWFBV0JcxXwDa1_niBRuO9vHYryzAjwaGv0FcWf0eAlx1PzN_QnDG_1aYXS_Ui1ICbWVejqXKajjuk7rbJtIyJMUk-ufk8_UDeeq4Ldp9ed8L3wDxIwOnFeIH9318xXgYZPHvs6q0DHGntJD_b18i-uPEb9gECYNi2bKvoNr-1lCW_yWqtnTXslGyCqB6f98xJrze28bnwM-gAetb0Taj05jK8zxqe_86yvBsgc0hR88qlidsAnQEFytaZZLAJOQol4f17OCiqbYa-aQZwC9gU0PFy9p2u5RPCkXF8pkGSA2lGdjsycXIvYBAikUATq3SZX83-2rrnvrlzGCFFJJ_oo3vL3GL53vSVsxbaq3uby-rE3bgm5fhj7DH2G7fD79FG0uu6j3qzEefql28iK-mjIDFyaijX28OXQS9RrIf8FVYEZnQg8O=w481-h604-no


I'm not quite sure why I didn't see any change by moving that set screw, but I only went 2 turns full turns in both directions.

I'm getting what I need by wrapping around the tension discs, so I probably won't mess with it any more till I get this completed. I don't know why, but I'm more nervous about tearing apart a sewing machine than I am a motor.

but if you have any other thoughts I'd appreciate it. It is definitely something I'd like to improve for the long term.
 

5shot

Lil-Rokslider
Joined
Mar 29, 2016
Messages
289
Location
Colbert, WA
Industrial machines add a lot of upper thread tension by using a thread post like this one. My industrial has a flat piece with 3 holes in it, which I believe adds even more tension. You can make something like this to go on top of the machine between the spool and the first threading point on the machine. It will make a huge difference...I did something similar on my Kenmore and didn't need to max out the disks any longer.

Singer+331K+Threading+02.jpg
 
OP
Tartan

Tartan

WKR
Joined
Jun 27, 2016
Messages
338
Location
Argyle, Tx
Thanks 5shot! That definitely looks like something I can easily make/modify.

when it comes to the details of the design, I'm just blatantly copying from what I've seen out there. A lot of staring at pictures of kifaru frames and estimating dimensions based on known webbing sizes, etc. The stays are 7.5" center to center at the top of the frame, and the angle follows the the taper of the framesheet. The frame sheet is 11" wide at the top with no taper for the first 6". From there it tapers to 8" at the bottom. If I were to make a 26" frame later, the angle of the stays would change slightly, but the distance from tip to tip and bottom to bottom would stay the same.

OC7da6ShwUCSyFzmVg3scPZutlDZ4KRUPvnUZPzziCYVLcf1q44BSKNV4zG6YLYnJSNmgde7ShJ-tDKh6ikHDL3aTuHMfp2XFeBoCR2QdU34UoKxdUL7VWSb2XzVDdpVucaEniMoPhS76F0uHVgtqKTWaU_hSKM7QqIfbmCo8Gll4z0_WSATb9WtA8gCXSzat3shki9A4sMnHtixTNJfIJB3qfVElqsZr3at8RW3ds-c23jRMBjAdDOVHHsA2zfZQlAwLbWE5Pbu7GNXAIX7PN3zGrv0scNLwKypMb_ZXDjgi7oKQJQoL9zpF2UmQ6mUGKns84hWzp-J6g6tZppLoDbtTk3mFS3vAHvTMPevs-AbMwfj5IWiyZnwhgLcmTrD28GKcjaQZLR_KJwoIDlM0OFqu1TF1Q_H6PSY9gS7RNH4id-uIYnbde-taDtIEoE5a-bP9j5Y4Guo1VEiqnEzQ4Erjmf2M9uIkG6nCXBi5dGDknsDo3u-Kbhf2jyHw5f5ToZKgiFzVHAJJtM2wolQ0Er20FWiFdlhopvXup4ecnEJ-VLJcIC8aXlissvJ6zFe8zelBCgPtSRwUXt4pnFwJu-WF1GDhreMhP_D81KrX690sVGt=w585-h604-no


The shoulder harness again, was designed directly off HPG. It took 3 tries till I got something that seemed to hang correctly.

I mocked everything up with cardboard and masking tape. My wife thought I looked ridiculous walking around the house like that, but I wanted to make sure that everything felt correct.
 

5shot

Lil-Rokslider
Joined
Mar 29, 2016
Messages
289
Location
Colbert, WA
Thanks. I will probably make an HPG style harness too. I know the Hill's, so they're gonna give me crap for doing it!

I have 25" stays, so mine will be set up for those. Have the 2" webbing for the stay pockets in route, so I should get started in a few days. Still need to order the Spandura though.
 
Last edited:
OP
Tartan

Tartan

WKR
Joined
Jun 27, 2016
Messages
338
Location
Argyle, Tx
Making more progress. While not perfect, this is actually going smoother than I thought it would.

Lumbar pad finished. I may end up reshaping a new pad, but I'm going to wait till it's finished and I can test it with some weight it in.

NHZl7mxvzfGVER1S3GUNXIqhOB-ItyaUPndfGYdaOQJOXXV0ua_9URYjp3xyytDKfwemfUzbjmoMSVtIGYQU9zaru7BR80McO6jFmURk7IK7EzHPme1BLy6R3wcIhoPE6qABp0EeX6B2jFpyo-pHLMouhVy4SRfdx2ldj1d1Yy34lSuzHcIXbAeImuj91J_BRrQx1xpphm2JsDnAPpdCnE_fTj8oYcuoF5OvfSi_XoZBw570KRk1ZazST4k2uk9OcZB1jSEfF8dwJ5hOsNygevOkqyPAWOZ9PNahV9Kl49r_rdgKYtCGSAjVabYEHCGhEg9jm32AqPKtASL29DYMcVbxBR_C8HywQ4EGpxDYymYavMa-UKXZIl7z_qYKyT7Hlh72rwP46_27P-5t14pcXsGtrwXAxwk91UKdx7B7MVSr1PvpwYLJAVY12hlbVr0moNdl16NUcG_z8HkRpvik66GRl-ycF2z_57Dr0I98jaajeJ5zdCgBAL2-H_WLPy-7z19SKa-77U-VxVfvuHilMD22Jd4dPF7hivMK2droQOyaLQb3wRm36i53CyKs9d6kd3cRh_H5HAX3I0yAp_MpAdY0GcJ-vcSu2ADhkkUE1HujTcU8=w487-h648-no


DOHBzWKTBERrphLhYX7ZpooXxSGHguQ7z9yPkpfLJXJl3pYOQT7TzY7FTGpO6aScSJfJY2BjjZ_I8X64AWLD8fQTZVv3JbS4tozAIBP3wTcP6LZkLkFj0HExQVS-8JuSDhY9-s7-1xLqi2uoixApXguPAqbmyJPD4VbAybYjPNGafQcdtoZ56AF-4KrVJpTJsXDAsWyyPSf0eORjyEoFCH2bB9VOEKj2YRLhHT29fKXigMnRx3OLuo9XYtILYQHobF-aqZA3PIsWSwt9TdJrp9txMgteT8dh2mAQOsoic1fy1Oir-tvr4X5KbuFgF_pRvQLfgUwYrux5qt1rPtyNd6cuwkWK3e2h9a-ScCdxYU9yVbDMpaimootWxOCSvbwQi1-Yuch4t8ignzrInptCwYrzYHZqn23ookzY0Wcv1ai8BnbqMSG68GOF-ZbN1QdsDAf5r9ailq6TfJ9wIFzxF5ljAc28clNkEk3gZ66K-tjUVdEt_rcSQ_H4L9YcPjXVUv-HznxYBLaevLwtKXadctY45TZZY-N8iRJfMN6WUkKQJJEeg7Vg5uE9fCJACOburq_GbwsHwEOe0AXXeWGbtOyrK9eEEVrswtYt9m1WBwVQvP0Q=w389-h648-no


1SUIkIOanGk3WrHZN2wzhRXdEXp9fnIAAKwqJHPdDdBLllZNAhjyMAJLQjvQBSdoB2CPNYWQdegkNF_weohNQGKg8XZ1hIX8qfYk1qUwaiGB_5-zjCx7n0pyDGstbwIV1jtxLIMVt8nyy1QlGa1SHgSyFgEXz9HxbQuaaxrR9X4BMyqvbbTDVUZ0ja-Xtd8T1cZK4UOepVnOP67lZKHIppRcE_lA9alH6gVh0zRlIEj7bUGB6lM1I6tnCVydQ9IUsJeKg6pbDcq_qunFBnVWkDZLYnOXC7mHq365IsvgvChfHXYXYmKzrzXlBUOU9Ao8vaaA8HKOQ4fuMHzabIgcX0nmHF_9pqfz-UV-xgz4BE0vC0WU9dbxhs0zGBG4nFZCzVS7B4pXocO1kTcvTmi9QDOEwUhokUORxwrZSfoO0_toL4BCpG-SVnTP4BoE5K7YyFNzlVJ4LgduZrC526r4-9G7MpR48kIxKm5FQMtqrQvWCOBVgcWxxPoACuZudkuzuGyDs-73xeVgjiZK0PzNhpY4cvSkp06itOiFtzJusbk1FTKN-hnZainMtc5KAXfQFg0yJVhtrZuQVe-bxhj2NUh5N3TNVQdEVD7Yo9CUPNim3ZJq=w487-h648-no


started working on the belt.
ZAwRhXfA5J2ibZ9WCWA1n-2jlOkF7-CEL4onwLMulyXsS4iqWmzjyLwj1GOoTaFfU1q6ykjhwWx600B14c2iZShovaOF_vg1TnxgN5FjI22PW7h8Lmhc8BLrPgIcqdz2MYUIMX3TcjztZaVEUzey_BbtoDbD8y68J5dXTtvaCeKaQBD1_e1smYzvyM-jm3oEIzMpkID-s_w3HIta1IaNu65cnhqKKPXAQPV7YllVGqUq_7BLR_3D9RtcEK_6RicDnjpF3e6veLhCqvmXtJIGfr8Yzi0H_NndS2HMpgJk8RRnnb88HwQceHRTpy1uj9MT8n8Hw5QhbKRJK7D4wKK79B3YgONHYlaIMaqvOovu78mMwO0X0qD6lSBlCxSqM5zLnGQdPMmXHzFjYvku2f9hq5fk5OLfv-NuOpXBAOYLEUDMK8yEVAP0w-JuOyMLBwoAlDXc4SFpHSsXWHZY-mzM3-SwLHvzHikJWMLUTHX1CW-rpYCVGx81vQdwzHC26Ao7oPVFK8V8YE6Ut3YptkwRLcNMHLgzfr5-YxEqQ72Sa8EX5PQst7v5CWPM8XO_yg7SsSzBd0DF2qnTtHYhpfSVuDy_p6WfpbrnbU0oHkBUgy6IUzzB=w487-h648-no
 

5shot

Lil-Rokslider
Joined
Mar 29, 2016
Messages
289
Location
Colbert, WA
That is really looking fantastic. Smart move stitching the PALS on the belt before you cut it out! Is the square on the pack side velcro on the underside to attach the lumbar pad to?

1SUIkIOanGk3WrHZN2wzhRXdEXp9fnIAAKwqJHPdDdBLllZNAhjyMAJLQjvQBSdoB2CPNYWQdegkNF_weohNQGKg8XZ1hIX8qfYk1qUwaiGB_5-zjCx7n0pyDGstbwIV1jtxLIMVt8nyy1QlGa1SHgSyFgEXz9HxbQuaaxrR9X4BMyqvbbTDVUZ0ja-Xtd8T1cZK4UOepVnOP67lZKHIppRcE_lA9alH6gVh0zRlIEj7bUGB6lM1I6tnCVydQ9IUsJeKg6pbDcq_qunFBnVWkDZLYnOXC7mHq365IsvgvChfHXYXYmKzrzXlBUOU9Ao8vaaA8HKOQ4fuMHzabIgcX0nmHF_9pqfz-UV-xgz4BE0vC0WU9dbxhs0zGBG4nFZCzVS7B4pXocO1kTcvTmi9QDOEwUhokUORxwrZSfoO0_toL4BCpG-SVnTP4BoE5K7YyFNzlVJ4LgduZrC526r4-9G7MpR48kIxKm5FQMtqrQvWCOBVgcWxxPoACuZudkuzuGyDs-73xeVgjiZK0PzNhpY4cvSkp06itOiFtzJusbk1FTKN-hnZainMtc5KAXfQFg0yJVhtrZuQVe-bxhj2NUh5N3TNVQdEVD7Yo9CUPNim3ZJq=w487-h648-no
 

WoodBow

WKR
Joined
Jul 21, 2015
Messages
1,762
Its really looking fantastic. Im impressed. Whats that strap in the middle of the frame for?
 

5shot

Lil-Rokslider
Joined
Mar 29, 2016
Messages
289
Location
Colbert, WA
Its really looking fantastic. Im impressed. Whats that strap in the middle of the frame for?

That's for the shoulder harness. The HPG style harness uses a single center attachment to allow for some articulation of the pack.
 

5shot

Lil-Rokslider
Joined
Mar 29, 2016
Messages
289
Location
Colbert, WA
Finally got the frame sheet cut for mine...work will begin this week. Have my frame and shoulder harness patterns done (using a Kifaru Belt that I had). Your progress has got me itching to get working on mine.
 
OP
Tartan

Tartan

WKR
Joined
Jun 27, 2016
Messages
338
Location
Argyle, Tx
That is really looking fantastic. Smart move stitching the PALS on the belt before you cut it out! Is the square on the pack side velcro on the underside to attach the lumbar pad to?

Yes, There is a 4"x4" square of velcro on the flap and the main section of the frame. Double sided on the lumbar pad. Took the idea from what I could see on some videos of the kifaru frames.

zY2eVE6X_Y76QK2JTTAKx2hCba0I_K2ln0plGO3mqTibvZbbOLuCrzERDqqX6PuQ2RrzbFzFuG7UcnmET8xUVP06d4FbNZ6jP7EWQDa66k170vUbHrhYjZBsd929_WMPTML0UyrKaJM7QIJGgmRx4zeW22hSOszPDD5ncAf0CUDfBbduaZY0fFP7rBsbGPCylAkCRFVcqQjfOfiblqEsWCy_y_BhC4ogGPVABiUe1uiPp56QOmJHSc4mEKEdkOWA894wl60mrLgU5VqwAK5KA9b9aBLRjz6vxIBG9UkFtUvtn-SHGYgP0DpTYynxYQ_0UA_kKEcZbzknljzG8xCub5nsCnFlNMOMuOodARxb91xyFdnBsChI-PzpF--wMYPLR98RsamVBS0VsRD7GNkvps6v1DSCx3ohobeJgsj4gZRnhcra596dU7LldbN2d134iqdmV-WvYPccXNzVBUGG_yksQEonj_6GFL-cJyTS6YVetV7YubG_VFtdham2neJzWUMQyfch__Dg2MCBPFBZLR6k-JY4AXJWdgaZKn0vIsns52u6UddNgsaU7iY0SfFwgk6z2A5HTG3MAdcfsXWa60Z_aNFCMCX_WLJ86kTwN9KaaKod=w487-h648-no
 
OP
Tartan

Tartan

WKR
Joined
Jun 27, 2016
Messages
338
Location
Argyle, Tx
Its really looking fantastic. Im impressed. Whats that strap in the middle of the frame for?

What 5shot said. On the HPG packs that have load lifters, the harness is connected at 3 points. 2 straps going to the load lifters and one going to harness. It is supposed to allow more articulation of the your shoulders. I can see that being a good thing and a bad thing depending on the load and what you're doing at the time. This first pack is a 22" frame, and I only intend to use it on some deep public land whitetail hunts. I don't expect to be loading out a 100 plus pounds with it. I think the extra movement may be useful, especially with the longbow.

probably going to be making two different shoulder harnesses. One with some padding in it. and one without any. The one without padding may be useful for a rifle hunt, so the harness doesn't get in the way of shouldering a rifle.
 
OP
Tartan

Tartan

WKR
Joined
Jun 27, 2016
Messages
338
Location
Argyle, Tx
Finally got the frame sheet cut for mine...work will begin this week. Have my frame and shoulder harness patterns done (using a Kifaru Belt that I had). Your progress has got me itching to get working on mine.

Can't wait to see it. I've got 4 weeks to hopefully finish this up and build a minimalist bag to put on it so I can take it with me on a hunt.
 

5shot

Lil-Rokslider
Joined
Mar 29, 2016
Messages
289
Location
Colbert, WA
This first pack is a 22" frame, and I only intend to use it on some deep public land whitetail hunts. I don't expect to be loading out a 100 plus pounds with it. I think the extra movement may be useful, especially with the longbow.
.

Where will you be hunting with this setup (state)?
 
Top