New Sewing Machine Setup

Hootsma

Lil-Rokslider
Joined
Feb 16, 2014
Messages
263
Location
Memphis, Tennessee
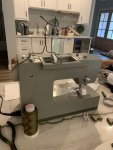
I finally took the plunge and bought a sewing machine so I can finally retire my sewing awl and get after all those mods I've been wanting to tackle. I've never really sewn before, except for some hand stitching and awl stitching, so this is a whole new world for me.

I purchased a refurbished Singer HD 4452 and it should be delivered tomorrow. I have a few 'getting started' questions I was hoping y'all could help me with.

Lets start with stitch type. This machine has 32 stitches that it is capable of with the turn of a dial. Way more than I'll ever use, but it's nice to have the variety and flexibility for what I anticipate being a very deep and wide rabbit hole. Some of the more applicable stitches this machine is capable of are the following:

1) Standard straight stitch with variable length
2) Zig zag stitch with variable length and width
3) Multi-step Zig zag stitch with (3) stitches each direction with variable length and width
4) Straight stretch stitch (I think it's AKA a back stitch) where it stitches 2 forward and one back each time with variable length
5) Multi-step Zig Zag with back stitching which does the (3) stitches in each direction in conjunction with the back stitch and has variable length and width.
6) Automatic button hole bar tack with variable length (this one seems like it'd work well for bar tacking webbing to cordura?)

If your familiar with the 4452, feel free to add other applicable/useful stitches that I may have overlooked.

So, my first question is which stitch for which application?

Specifically, my first task is going to be adding tap loops with 3-bar sliders to a cargo panel. This will be used to attach the cargo panel to the common loops on my frame for heavy meat hauling applications. So, it will be a high stress application. Which stitch is best for this type of high stress application and at what length/width settings? As a side note, I am familiar with the box X stitch for webbing. I've done it several times by hand and with my sewing awl on 1" webbing and each one takes me about 4 hours to complete, hence the plunge into the sewing machine world.

Next is thread. I purchased Bonded Nylon66 thread in both V69 and V92 weights. Which one of these should I be using for the above application or should I be looking for another type of thread?

And lastly, needle size. This machine will come with "heavy duty" needles, but they never tell you what gauge the needles are. What gauge/type of needle should I be using for sewing through multiple layers of webbing and 500d cordura and that fits y'alls recommended thread size for my applications?

If it's easier to talk about over the phone, send me a PM about it and I'll send you my phone number.

Thanks in advanced for any help and guidance.

Cheers,

Robert Merrell
 
OP
H

Hootsma

Lil-Rokslider
Joined
Feb 16, 2014
Messages
263
Location
Memphis, Tennessee
I found a picture on Singer's website of the accessories. It looks like the machine comes with a pack of 16 gauge needles. Are those appropriate for the recommended thread and the layers I need to punch through?
 

WoodBow

WKR
Joined
Jul 21, 2015
Messages
1,754
I will give you my short version.

Straight stitch is all you need.

Needles should be bought to match the size thread you intend to use. There are charts online that you can look at.

69 thread size is pretty universal for gear.

If it starts sewing poorly and you can't find a good reason why, put a new needle in it.


Sent from my SM-G975U using Tapatalk
 
Joined
Sep 26, 2019
Messages
10
Being an heavy duty machine I think the needles will be fine. I am more familiar with E and F thread, do those spools have a letter designator?
I would keep the stitch pattern simple. For Cordura/ nylon webbing etc. 7-11 stitches per inch is where you want to be.
It is hard to beat a good “box x” for strength.consider a “backer” material if you are sewing a high stress box x to just cordura
 

WoodBow

WKR
Joined
Jul 21, 2015
Messages
1,754
Heavy duty is a very relative term as well. That machine will probably sew cordura well but may struggle with a stack of cordura and webbing. A big shortcoming of home use machines is they are not capable of applying adequate top tension when using heavier thread. But you can certainly do it. I know i have.

Sent from my SM-G975U using Tapatalk
 
OP
H

Hootsma

Lil-Rokslider
Joined
Feb 16, 2014
Messages
263
Location
Memphis, Tennessee
Straight stitch only, certainly takes all the confusion out of it.

The V69 is labeled 210D/3
The V92 is labeled 280D/3

Both items I need to sew the 3-bar tab loops are double layer of 500d cordura. If it tears the cordura, then I've done something seriously wrong.
 
OP
H

Hootsma

Lil-Rokslider
Joined
Feb 16, 2014
Messages
263
Location
Memphis, Tennessee
Heavy duty is a very relative term as well. That machine will probably sew cordura well but may struggle with a stack of cordura and webbing. A big shortcoming of home use machines is they are not capable of applying adequate top tension when using heavier thread. But you can certainly do it. I know i have.

Sent from my SM-G975U using Tapatalk
Yeah, I understand the limitations of a $200 machine and it was a consideration. But, with every thing I've seen online, it looks like it should be able to handle the majority of what I have in mind with ease. The only issue is hitting a cross road of seams where the layers pile up. It's my understanding that you can hand crank the machine through those stout areas. I just don't have enough knowledge or experience to be able to look at an older machine and determine if it's worth it or junk. That's why I went newish and this model.
 

WoodBow

WKR
Joined
Jul 21, 2015
Messages
1,754
Yeah, I understand the limitations of a $200 machine and it was a consideration. But, with every thing I've seen online, it looks like it should be able to handle the majority of what I have in mind with ease. The only issue is hitting a cross road of seams where the layers pile up. It's my understanding that you can hand crank the machine through those stout areas. I just don't have enough knowledge or experience to be able to look at an older machine and determine if it's worth it or junk. That's why I went newish and this model.
You are correct on all of that!

Sent from my SM-G975U using Tapatalk
 
OP
H

Hootsma

Lil-Rokslider
Joined
Feb 16, 2014
Messages
263
Location
Memphis, Tennessee
The UPS guy just showed up at the house with my new machine, a day before it was scheduled and the day after I ordered and I did standard free shipping too. That never happens. So, I guess I getting started right now.
 

nodakian

WKR
Rokslide Sponsor
Joined
Aug 24, 2017
Messages
602
Location
Dickinson, ND
I have three old Kenmore machines for building backpacks. Brute tough and heavy. They handle 92 thread ok, mainly for straight stitch though, so I stick with 69 so I can switch between straight and zigzag/bar tack. I’ll be interested to hear how yours handles 92; it should handle 69 well enough.

When you hit stacks of webbing, you may need to adjust top tension momentarily.
 
OP
H

Hootsma

Lil-Rokslider
Joined
Feb 16, 2014
Messages
263
Location
Memphis, Tennessee
That was an interesting and fun night and at times quite frustrating. I forgot to put the presser foot down at least a dozen times which jacked up the stitching. I spent more time ripping seams than I did sewing because of that. I hat a rats nest of ripped threads in a pile next to the machine by the time I was done. I was up till midnight messing with the machine and actually got a good bid of the mods done. Looks kinda crappy because I barely know what I'm doing and I can't stitch a straight and/or parallel line to save my life. But, the stitches are robust and functional.

The machine is definitely not heavy duty, like was forewarned by some of y'all, more like medium duty. But, it's robust enough for my needs. The worst I put it through was punching through 3 layers of 1" Kifaru webbing and 2 layers of 500d cordura. It will punch through all those layers pretty easily, the problem comes from either doing multiple passes to have a nice reinforced stitch line or even just reversing at the beginning and/or end to lock the stitch ends. The extra fabric density from the addition of the threads and the holes created by the needle were just too much for this little machine. I made a mess out of a lot of stitches trying to do this before I figured out an easier way for the machine to deal with it.

I tried using the back stitch where it goes 2 forward and 1 back. The machine didn't have a problem with the back stitch because it went through the same holes when it back stitched. And, I feel like the back stitch automatically locks it self without having to reverse, so there's no need for backing up at the beginning or end to lock the stitch ends. I would just end the stitch line where it backed up one stitch then went forward one stitch to the already previously stitched hole. That seemed to lock the seam in sufficiently. So, instead of doing a Box-X stitch where you typically double the top and bottom stitch lines, I would do 2 - 3 separate stitch lines using the back stitch setting and it settled things down and made it a bit easier.

I'm pretty happy with the purchase so far. It seems to be able to do what I need it to do with a little bit of extra care and babying. Certainly a significant improvement over hand stitching or awl stitching.
 
OP
H

Hootsma

Lil-Rokslider
Joined
Feb 16, 2014
Messages
263
Location
Memphis, Tennessee
I have three old Kenmore machines for building backpacks. Brute tough and heavy. They handle 92 thread ok, mainly for straight stitch though, so I stick with 69 so I can switch between straight and zigzag/bar tack. I’ll be interested to hear how yours handles 92; it should handle 69 well enough.

When you hit stacks of webbing, you may need to adjust top tension momentarily.
I never tried the V92 thread since the general consensus was that the V69 is sufficient. And it was hard enough to get the proper tension with the multiple layers and V69 thread. I had to do some unorthodox extra wraps here and there to get the tension right.

I experimented this morning with doing a single course of the back stitching then spinning the item around and going back over it with a zig zag stitch where the zig zags were on either side of the first stitch line, similar to a bar tack type stitch. There are a couple of little extra steps in there to baby the machine and get it to stitch properly, but once I figured that out, it seemed to go smoothly and work well. I'm sure that's overkill, but it's nice to know the machine can make a bombproof stitch with a single line of stitching.
 

WoodBow

WKR
Joined
Jul 21, 2015
Messages
1,754
In regard to sewing straight, do not look at the needle. Does the throat plate have lines on it at various gaps? That is what you should be looking at a lot of the time. You just keep the edge of the fabric going along the desired line. If it doesnt have markings, put masking tape on it and draw lines with a sharpie. You can also use the edge of the presser foot in the same manner. When you are sewing far from an edge, the presser foot is the best guide. It all just takes practice.....and ripping many more seams.

Sent from my SM-G975U using Tapatalk
 
OP
H

Hootsma

Lil-Rokslider
Joined
Feb 16, 2014
Messages
263
Location
Memphis, Tennessee
The plate does have reference lines on it, but most of the time I was stitching in the middle of the fabric and it was covered up. I have the walking foot and I was using that, which has slots in it for the feet to move forward and back. I didn't notice this at first, but once I saw that, I was able to use that slot to help line things up, especially when doing parallel stitch lines. I'd put the previous stitch line in the slot and keep it there. That helped get the stitch lines more parallel.

Part of the issue is the foot pedal being pretty touchy. I worked it bare foot to help with the feel, but some times, when the machine is struggling, you have to feather it to get it going and it could quickly get away from you and take off.

I did the sharpy thing too when I was doing the box-X stitches. Without the sharpy it wouldn't have looked anything like a box or an X by the time I was done.
 

WoodBow

WKR
Joined
Jul 21, 2015
Messages
1,754
You can also lay out lines with a fabric pencil. Even a white colored pencil will work. The kind kids use in school. We used to call them map colors. Marking is particulary beneficial with something like laying out a molle panel. It will wash off.

Sent from my SM-G975U using Tapatalk
 
OP
H

Hootsma

Lil-Rokslider
Joined
Feb 16, 2014
Messages
263
Location
Memphis, Tennessee
You can also lay out lines with a fabric pencil. Even a white colored pencil will work. The kind kids use in school. We used to call them map colors. Marking is particulary beneficial with something like laying out a molle panel. It will wash off.

Sent from my SM-G975U using Tapatalk

I don't have a fabric pencil yet, but it's on the list of things to acquire. I'm also using a folded up wire hanger hanging off the machine to guide the thread from a large spool sitting next to the machine. I should probably get one of those metal thread guides as well.
 

nodakian

WKR
Rokslide Sponsor
Joined
Aug 24, 2017
Messages
602
Location
Dickinson, ND
I don't have a fabric pencil yet, but it's on the list of things to acquire. I'm also using a folded up wire hanger hanging off the machine to guide the thread from a large spool sitting next to the machine. I should probably get one of those metal thread guides as well.

Sounds like you’re well on your way to addiction. @WoodBow is spot on with all his help.

Being a cheapskate, I made thread guides from scrap wood and a piece of Romex, although any heavy wire would work.

A cutting mat on the table is also handy, and a butane torch is useful for singeing web ends.

0784D99A-706D-4D1D-A7A8-65412D47222B.jpeg
D4452AB4-D483-495A-85F6-08492160EDE0.jpeg
 
OP
H

Hootsma

Lil-Rokslider
Joined
Feb 16, 2014
Messages
263
Location
Memphis, Tennessee
Here's my redneck engineered coat hanger spool guide. Mounts directly to the auxiliary spool shaft on the machine.
 

Attachments

  • IMG_1601.jpg
    IMG_1601.jpg
    186 KB · Views: 62
OP
H

Hootsma

Lil-Rokslider
Joined
Feb 16, 2014
Messages
263
Location
Memphis, Tennessee
I went at it again last night working through my mods and I realized a lot of my issues were user error induced. When I swapped out the standard presser foot for the walking foot, I evidently didn't tighten it enough. I turned the screw until I felt decent resistance and stopped because I have a tendency to torque the crap out of screws and I end up stripping them out, especially the smaller, more delicate screws. The foot would wobble left to right a good bit and not having any sewing machine experience nor paying any attention to how tight the original foot was, I just didn't realize is wasn't right. Once I tightened it, a lot of the random issues I was experiencing that I thought were due to the machine being overtaxed went away. It was like night and day with the stitch quality (especially the back side stitch) and my ability to sew a straight line. I can't believe it took me so long to finally realize it wasn't right.
 
OP
H

Hootsma

Lil-Rokslider
Joined
Feb 16, 2014
Messages
263
Location
Memphis, Tennessee
I read in one of the DIY threads about turning gear inside out and studying the seams and how it was constructed to get a good idea on how the manufacturer went about sewing it. I'm interested in sewing a plain old roll top camp bag, so I turned by other packs inside out and took a good look at the how it was constructed. The first thing I noticed is that I couldn't see much of anything as far as seams and stitching are concerned because every single one of the pack bags I own has every seam wrapped in grosgrain ribbon.

Does the grosgrain serve a functional purpose or is it merely cosmetic?

It looks like some of the seams have multiple rows of stitches holding them together. Is there a rule of thumb for how man stitch lines at a seam based on use or expected seam stresses?

The camp bag that I want to build will be a simple roll top bag in the +/- 5,000 ci range. I intend to make it out of 500d cordura. It will have a circumference of around 48" and be around 44" tall. I intend to make the bottom panel a rectangle that is 15" x 9" with the 9" sides radiused.

Is there an advantage to making the body of the bag out of 4 separate pieces of cordura or will it work just fine if I use a single piece or cordura for the entire body of the bag?
 
Top