


Backcountry Meat Care
By Aron Snyder, Rokslide Staff
Several Roksliders have asked for an in-depth article on how I handle meat care on a backpack hunt. This is very understandable, as everyone’s goal when hunting should be to bring home wild game meat to feed the family. The last thing you want is your meat to go bad because you didn’t take the proper steps after the animal hit the ground.
To make this as simple as possible, I’m going to write this article in a step-by-step format. So I will walk you through what I do from the moment I walk up to the animal to the pack-out. I’m primarily a bow hunter, so warm weather is normally an issue and the steps I take are specific to the August through September. In cold weather I just hang up the game bags and things pretty much take care of themselves (for the most part anyway).
NOTE: this article is about MEAT care and doesn’t include what to do if you intend to mount the animal. If you have intentions of getting your animal mounted, get the hide and head out as quickly as possible (especially in warm weather).
Early Season/warm weather backpack hunt with a buddy (multi-animal)
- Task—Get meat off the animal and to an area that will keep it preserved for 3-4 more days so you can continue hunting
- Conditions—9,500-12,500 feet with temps ranging from 50-80 degrees
- Standard—Perform said task in a timely manner with no meat spoilage
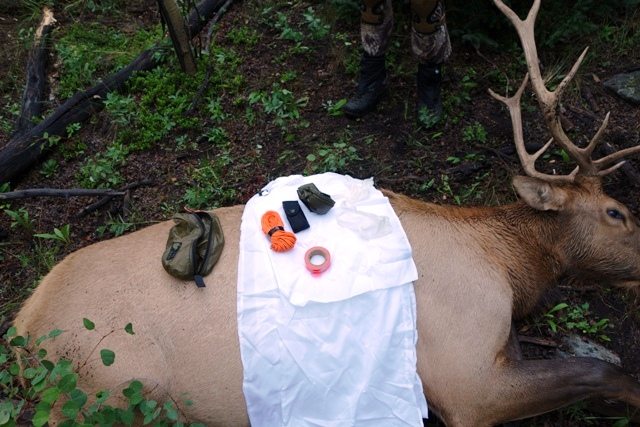
Now that we have the platform down of what the task and conditions are you’ll be facing, here’s what has worked for me. To help make things easier on you, I would first suggest coming up with the lightest and most efficient kill kit possible. It’s taken several years for me to come up with my own perfect kill kit, but what I now bring is as good as it can get in my opinion.
- Havalon knife and extra blades
- Pristine Ventures game bags (B.O.M.B set)
- 50 feet of 1.8mm reflective cord
- 50 feet of orange ribbon
- eVent dry sacks, contractor bags or similar waterproof bags
If you’d rather purchase a preassembled kill kit, link here for a kit I designed. Now let’s get down to business
Trophy photos— this may not seem important, but we do want to remember the hunt and show everyone on Rokslide what you’ve accomplished with some kick-ass photos. The thing that can bite you in the ass with photos is heat, so take your photos as quickly as possible if the temperature is high.
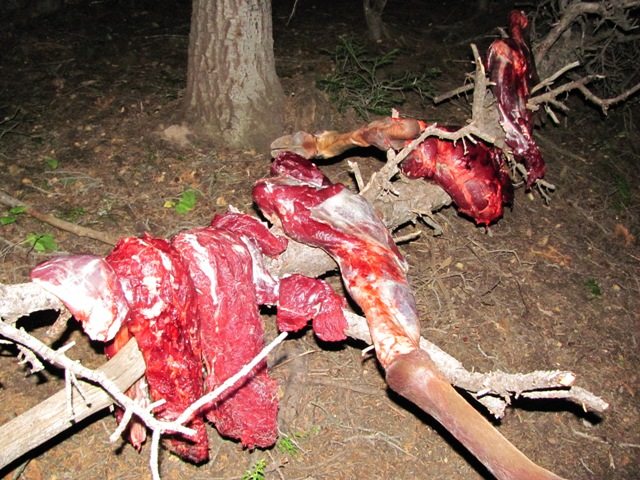
Breaking down the animal— I’m not going to go into too much depth on the steps for deboning, but I always use the gutless method and debone everything. The front quarters will come off the animal and I will de-bone those separately, but I debone the rear quarters while still attached to the animal. Here’s the steps that what I’ve found that works best for keeping the meat clean while deboning.
- Lay out all of your game bags except one, keeping them fully spread out
- Start deboning one side of the animal while leaving all of the hide on the other side attached
- As you debone the meat (if bugs are not an issue), lay the meat on top of the game bags
- Once you have enough meat laid out to completely fill a game bag, transfer that meat into the game bag that you set aside at the beginning and then repeat this process until the one side of the animal is completed
- After one side of the animal has been completed, roll the animal over and start taking the hide off and do the exact same thing you did on the other side
Using this method will help keep your meat clean, your pack weight down, and also help with keeping specific parts of the animal separated.
Meat placement— this means “what do I do with the meat when it’s off the animal”; does it hang on a branch for a while or go right into a game bag? With the conditions I listed above in mind (warm weather), I take the meat straight from the animal and put it in a game bag, I do this because the meat is going to be taken to another area to be cooled off and I don’t want flies and bugs getting into it. If I’m doing this above tree line/high altitude and bugs aren’t an issue, then I will spread out my game bags and lay the meat on top of them as I debone. Doing it this way helps keep the meat clean and free of debris and helps keep my pack weight down as well. Some guys like to bring a small tarp for this, but I pack enough other stuff and the game bag system has worked well for me in several different situations, ultimately saving me pack weight.
Organizing/separating the meat— As far as game bags go, I prefer using the B.O.M.B pack set for deboned meat from Pristine Ventures. These will keep the meat upright in your pack and help simulate the rigidity of the meat as if it’s still on the bone. These also allow me to separate the meat into four different game bags (with larger animals like elk) to help distribute and manage accordingly. With deer I can usually get away with just one, but you’ve got a buddy with you and I’m all about spreading the wealth…so I split the meat into two bags. Whatever you do, just make sure you keep the game bags at a manageable weight as you will potentially be handling these on your own at some point and it can be a problem when too heavy.
Cooling the meat—Now that the animal is broken down and the meat is separated accordingly, you’re next mission is to get the meat cooled off and in a place that will keep it cool for a few days. To help with this, I always look for one of three things:
- Snow
- Creeks/streams
- Echo thermal corridors (ETC)
Keep in mind that the snow or creek will be good for storing the meat for a few days, while the ETC will only be good for initial cooling and not a great option for storing it long term (depending on the situation).
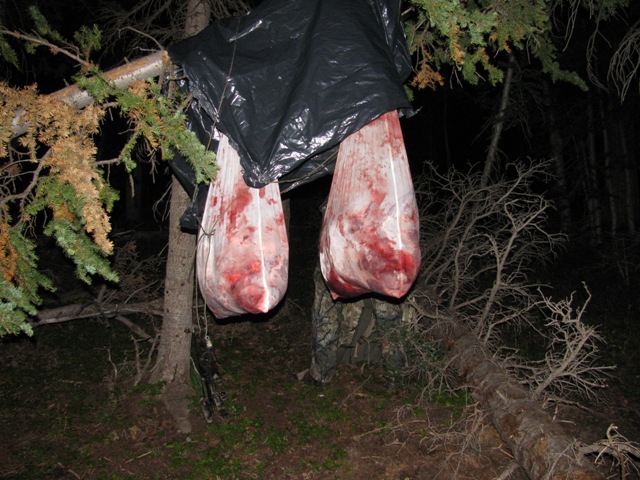
I prefer snow for obvious reasons, but I can almost always count on a creek being nearby and it does the job just as well. Whenever I use snow or creeks for cooling and storage, I will place the breathable game bags inside a waterproof bag. This is to keep water off of the meat, but I know several accomplished hunters who prefer putting breathable bags straight into the creek. I know putting meat straight into a creek goes against what most of us have been taught over the years, but the thought process behind this is that it will help drain the blood out of the meat and cool it at the same time. I’ve asked several butchers about this and they all agreed that the only down side is that the outer layer of meat would need to be cut off, but they usually do that anyway.
Now that you’ve packed the meat to a nearby cooling/storage area, what should you do? If it’s snow, I dig a hole and stick the waterproof bag inside it and then cover it up….don’t forget to mark that area though! When dealing with a stream, I will sometimes submerge the dry sack into the creek and other times, just hang the meat in the breathable sack just above the water. What I do will depend on the temps outside at the time. After I have the meat in an area I’m comfortable with, I will come back to it a few hours later and rotate the inner meat to the outside. This allows for everything to cool equally from inside to out. Whatever method I end up using to cool the meat, I will end up submerging it in the stream/creek until I’m done hunting.
SUMMARY
The system and tools I’ve listed above are just examples of what has worked for me, but it by no means is the only way to get things done. You just need to make sure you keep the meat clean and get it cooled down as fast as possible and into an area that will keep it that way for a few days if you’re going to continue hunting.
Discuss this article here


