


")


Maven RS1.2
Over the past few years, there’s been a lot of discussion on Rokslide regarding a rifle scope’s primary purpose as an aiming device. Paramount to this are retention of zero and accuracy and repeatability of adjustments. Secondary to these are the discussions of weight and a reticle that is easy to use at all magnifications and not overly complicated.
Make no bones about it: While I own a few Maven and SWFA rifle scopes, the go-to for my family and me is a trio of Nightforce SHV f1 rifle scopes. These SHVs weigh a portly 31oz and house the mediocre MIL-R reticle, but they hold zero and, in my mind, are benchmark-aiming devices around the $1k price point. Can the Maven RS1.2 dethrone my trusty SHVs?

In With the RS1.2
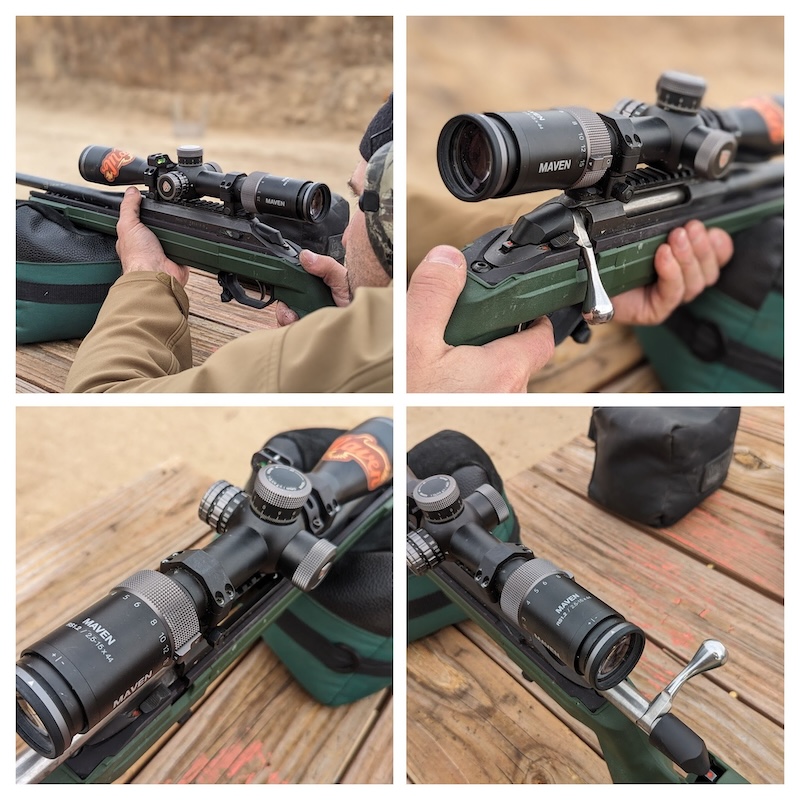
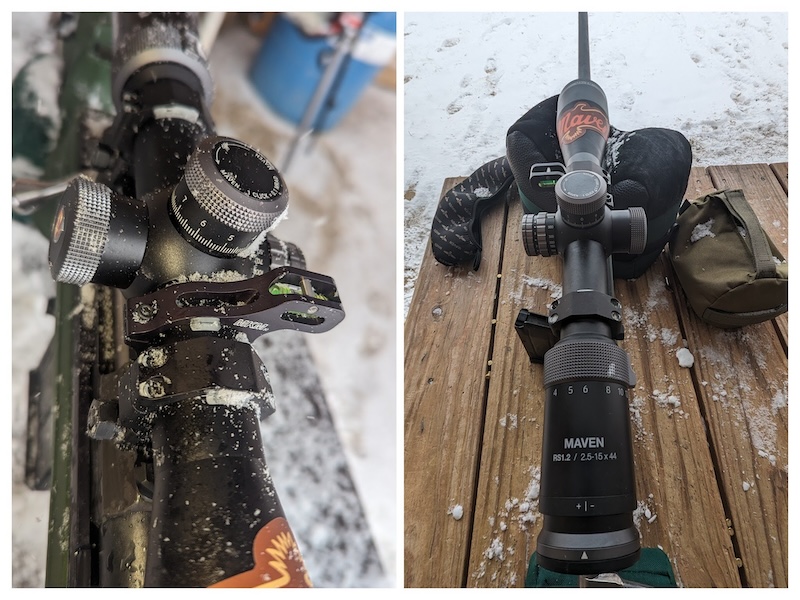
Credit goes to Rokslide member & contributor Dioni A for bringing this scope to my attention in this thread about Maven’s new RS1.2 Riflescope. In short order, I had two in hand in both colorways: all black and black with grey, and both in Maven’s proprietary SHR-MIL reticle. The RS1.2 and most other offerings from Maven are also eligible to be customized with various other colors and color combinations. On paper, the RS1.2 boasts a 26oz weight, 2.5-15x magnification, 44mm objective, side parallax adjustment, and the SHR-MIL reticle has an illuminated center dot, capped windage, and true zero stop. The RS1.2 sells for $1200.
Here are some specs from Maven.
- First Focal Plane
- 2.5x – 15x Magnification Range
- 44mm Objective Lens Diameter
- 30mm Tube Diameter
- 14.05 inch Overall length
- 26.4 oz
Click here to see the full list of specifications.
Maven RS1.2 Design
In talking with Maven’s Cade Maestas about the RS1.2, he told me their design goal was to hit the sweet spot between reliability, weight, and magnification. Maestas said that Maven staff invested a good bit of time and energy on various forums–Rokslide included–reading through the needs and wants of those most selective hunters. At the end of the analysis, Maven concluded that their RS.1 Riflescope was really close to that sweet spot but needed a few functional “feature” changes and additions.
It should be noted that Maestas stated a few different ways that nothing changed structurally inside the RS1.2 from the RS.1 version; the only “changes” were simply a tightening up of specifications to “fine tune” the the unit as a whole and constant quality improvements through QC/QA refinements. The RS1.2 is, for all intents and purposes, an RS1 with exposed elevation, a zero stop, and reticle illumination added.
While Maven is aware of zero retention testing that was taking place on Rokslide, the RS1.2 was not designed specifically for it, nor did they replicate the testing. Maestas told me that Maven made efforts to test the durability/reliability of the RS1 riflescope to ensure they had a good start for a .2 version and did the same in-house testing with RS1.2 pre and post-production units. Maestas told me he had the utmost confidence that the RS1.2 models would hold zero through Rokslide formatted zero retention testing.
Probably what you came for…zero retention
Let’s skip ahead and get right to zero retention testing. After all, priority one is just that, and the visual of dropping a rifle on the scope from chest-high has most people in awe. The process developed by Rokslide Moderator Formidilosus can be found here, as well as an explanation for it.
For this particular evaluation, I used the black/gray RS1.2 that had previously been sighted in with this rifle. There were precisely (9) 6.5 Creedmoor, (18) 30-06, (250) 22LR, and (700) 22BR shots, in that order, with this scope up until this day. The black/gray RS1.2 had been previously sighted in, and been in the bed of my truck for several hundred miles and a pheasant “hike” in eastern Colorado. The rifle consists of a Tikka action, 80gr. ELD-m bullet in a 22br Preferred Barrel Blank, KRG Bravo, Area 419 Picatinny rail, and TPS TSR Picatinny rings.
Only the 89.5 yard range was available (this will matter later for tracking). A zero confirmation/baseline group of (11 shots) was shot and labeled “A.” This group “A” measured 1.314” at the furthest two centers and 1.014” maximum deviation of the point of impact (POI) to the point of aim (POA). After group “A” was marked in order, a group of (7) shots was made and marked “B.” Those shots were taken in the below order after dropping the rifle onto hard ground with a 1.5” foam pad. Group “B” shots were marked in the order they were made.
- Rifle dropped on its right side from thigh-high (I’m 6’ tall)
- Rifle dropped on its top (top of scope) from thigh-high
- Rifle dropped on its left side from thigh-high
- Rifle dropped on its right side from chest-high
- Rifle dropped on its top (top of scope) from chest-high
- Rifle dropped on its left side from chest-high
- RIfle dropped from chest high on its right side, top, right side, right side, top, left side, right side, top right side. (yes, I lost track of what side was what in the moment)
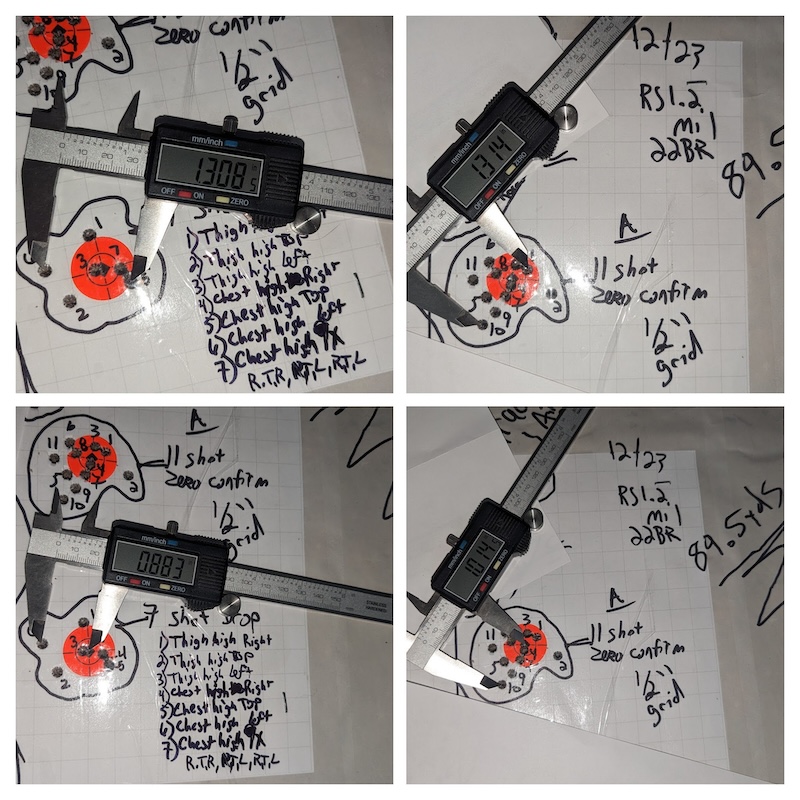
The zero retention group, group “B,” measured 1.308” at the furthest two centers with a max POA/POI deviation of .883.” Dispersion of groups “A” and “B” are similar. My wonderful wife, Cindy, was kind enough to video the zero retention, and it is below in fast speed. There is also a short clip looking through the RS1.2 with ~7X magnification at a buck around 220 yards away, so watch through to the end. I did this same evaluation with the all-black RS1.2 that I have on two separate days with similar results. This was also the eighth time the black/gray RS1.2 was evaluated for zero retention with the (7) shot process, and the results were similar.
Return to Zero
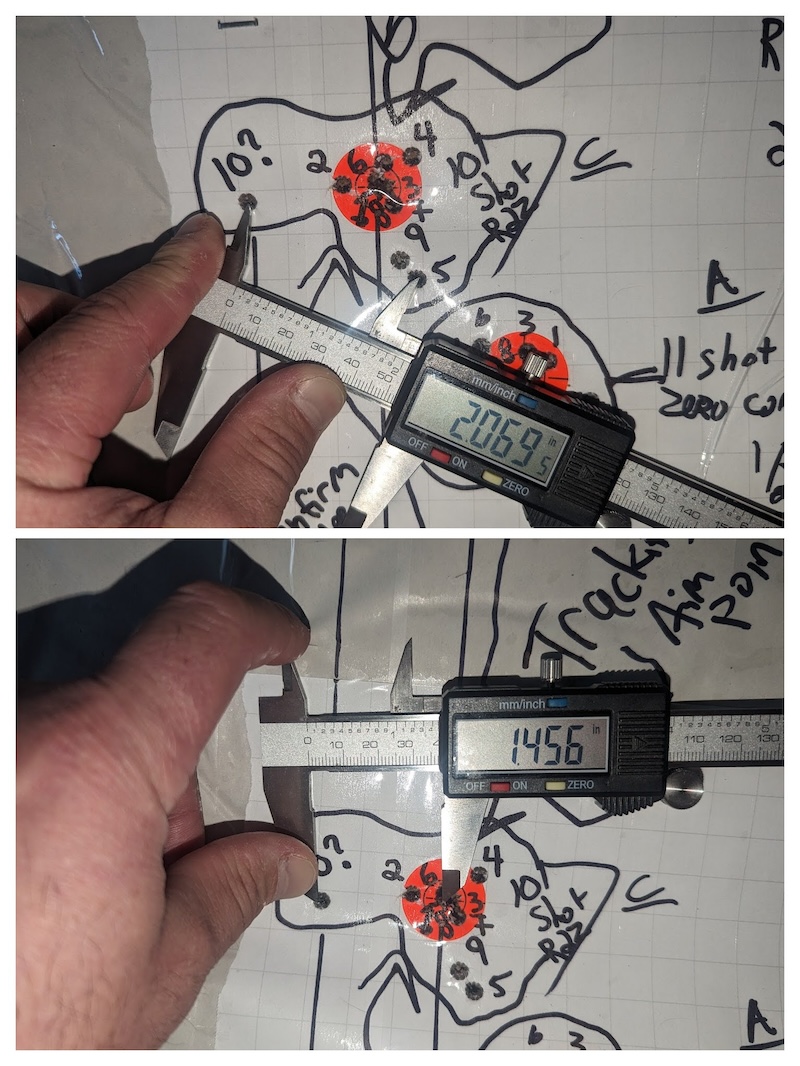
Return to zero was evaluated by twisting the elevation turret to the end of its adjustment up and then returning it to the zero stop position. I had precisely 22.8 mils of travel between the two points, and this was repeated at least twelve times for a total of at least 273.6 (one-way) mils adjusted between each shot for (10) shots. Shots were marked in order, and the group labeled “C.” Group “C” measured 2.069” with a max deviation from POA of 1.456”.
Tracking
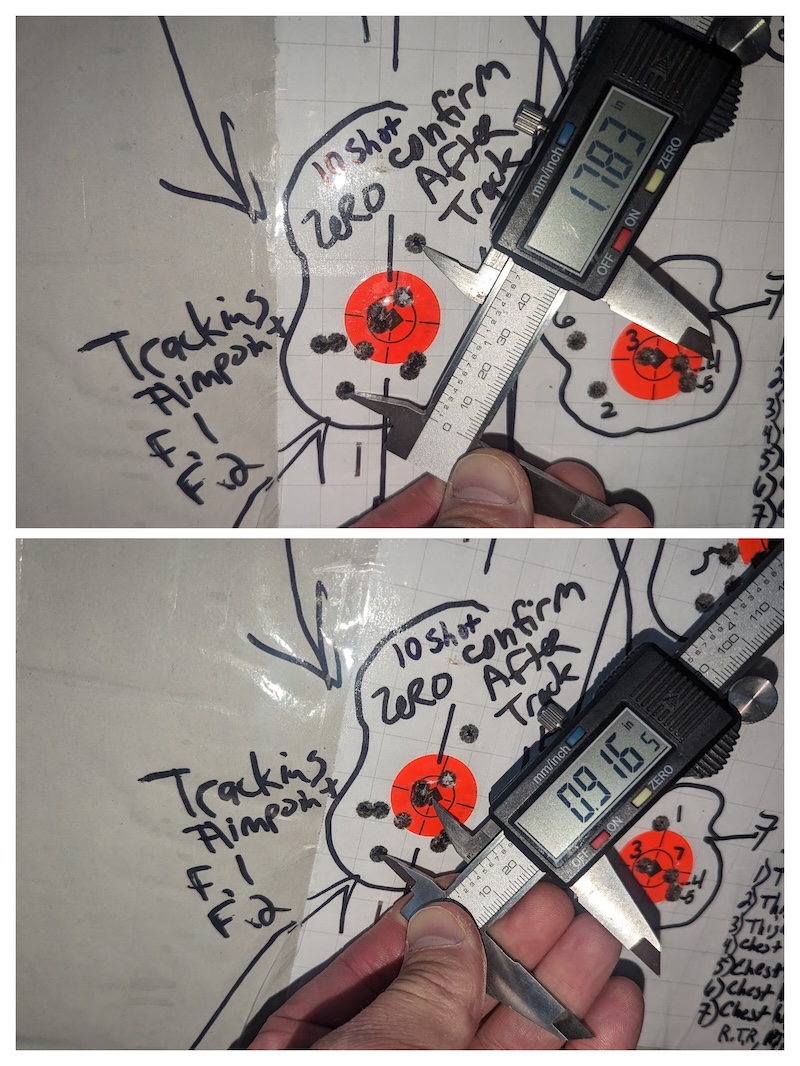
A level was used to draw a plumb line through the aiming point of group “C.” I loosened the zero stop, dialed down 5 mils, and then tightened the zero stop (more on this later). I then set the elevation turret at 5 mils. Fired (20) consecutive shots alternating from 5 mils dialed down (on the “zero stop”) and 5 MILs dialed up (past the turret’s 0). This method helped me keep track of which way I dialed. Since the only range available was 89.5 yards, the bullets should have impacted ~16.11” from the point of aim (green horizontal line). The upper (10) shot group was marked D.1 and measured ~15.625” above the POA. The lower (10) shot group was marked D.2 and measured ~16.375” from the POA.
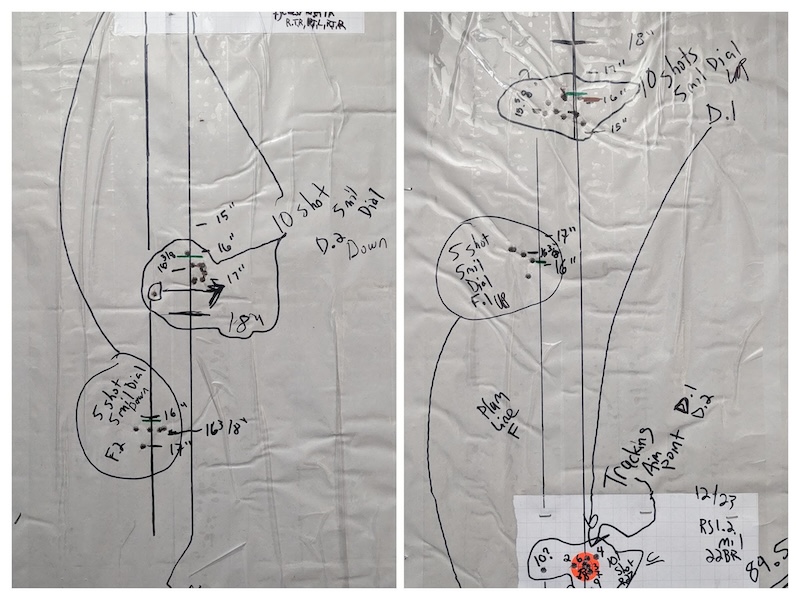
There was a lot of resistance when adjusting the zero stop, and I felt the turret click twice (more on this later). I returned the turret the two clicks I had felt, but with group D.1 measuring ~.485” from where it should have been, I wanted to double-check that I hadn’t missed feeling an accidental click or two. The turret was returned to 0, a (10) shot group was sent, marked as “E,” and measured 1.783” with a max deviation from POA of .916”.
I then shot the last (10) cartridges I had, aiming at the dot used for group “E,” alternating from 5 mils dialed down (on the “zero stop”) and 5 mils dialed up (past the turret’s 0). Shown in the photo above, the upper (5) shot group was marked F.1 and measured ~16.375” above the POA. The lower (5) shot group was marked F.2 and measured ~16.375” from the POA. There are a lot of possible explanations for group D.1’s deviation, and that will be my focus with this scope over the next few months.
These same evaluations were also performed with a different RS1.2 by Formidilosus here.
Group Stats in a Chart
| Marked As | Description | Group Size | Max POI from POA | Hit% on 1″ POA |
| A | 11 shot zero confirmation | 1.314″ | 1.014″ | 54.50% |
| B | 7 shot drop zero retention | 1.308″ | .883″ | 71.40% |
| C | 10 shot return to zero | 2.069″ | 1.456″ | 70.00% |
| D.1 | 10 shot 5 mil dial up | 1.351″ | 1.231″ | 40.00% |
| D.2 | 10 shot 5 mil dial down | 1.948″ | 1.798″ | 50.00% |
| E | 10 shot zero confirmation | 1.783″ | .916″ | 60.00% |
| F.1 | 5 shot 5 mil dial up | 1.069″ | 1.055″ | 60.00% |
| F.2 | 5 shot 5 mil dial down | .959″ | .885″ | 80.00% |
| Marked As | Description | Center from POA | Calculated 5mil value at 89.5yds | Percent of intended adjustment |
| D.1 | 10 shot 5 mil dial up | 15.625″ | 16.11″ | 96.9% |
| D.2 | 10 shot 5 mil dial down | 16.375″ | 16.11″ | 101.6% |
| F.1 | 5 shot 5 mil dial up | 16.375″ | 16.11″ | 101.6% |
| F.2 | 5 shot 5 mil dial down | 16.375″ | 16.11″ | 101.6% |
Additions to the RS1.2 – Turrets
The RS1.2 has capped windage that, when unscrewed, reveals a turret that is able to be reset to 0 by unscrewing the very end and lifting the turret off. It is marked in either direction from 0 as R or L, with the mil version having .1 increments and the moa version having .25 increments. Beneath the turret are hash marks that act as revolution indicators.
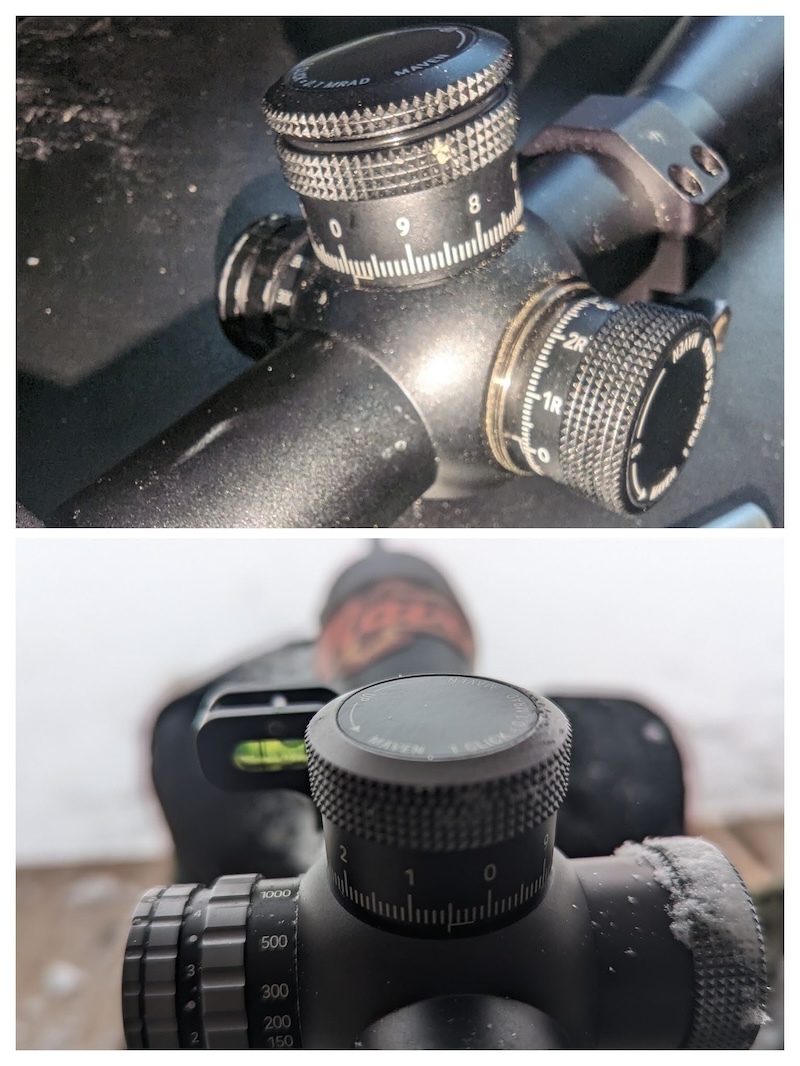
The elevation turret is exposed for adjustment and is able to be reset to 0 by unscrewing the very end and lifting the turret off. The mil version turret is marked 0 through 9.9 in .1 increments. Maven’s specification chart shows 20 moa of adjustment per revolution of the moa version, so I assume it is marked 0 through 19.75 in .25 increments.
Parallax adjustment is on the left side, numbered in yard approximations at 10/20/30/50/70/100/150/200/300/500/1000/ and infinity. The illumination dial is on the outside of the parallax adjustment, and it is marked 1-10. 10 is the brightest, with a dot in between each number as an off position. The illumination dial can rotate either way endlessly, as there is no start/stop position.
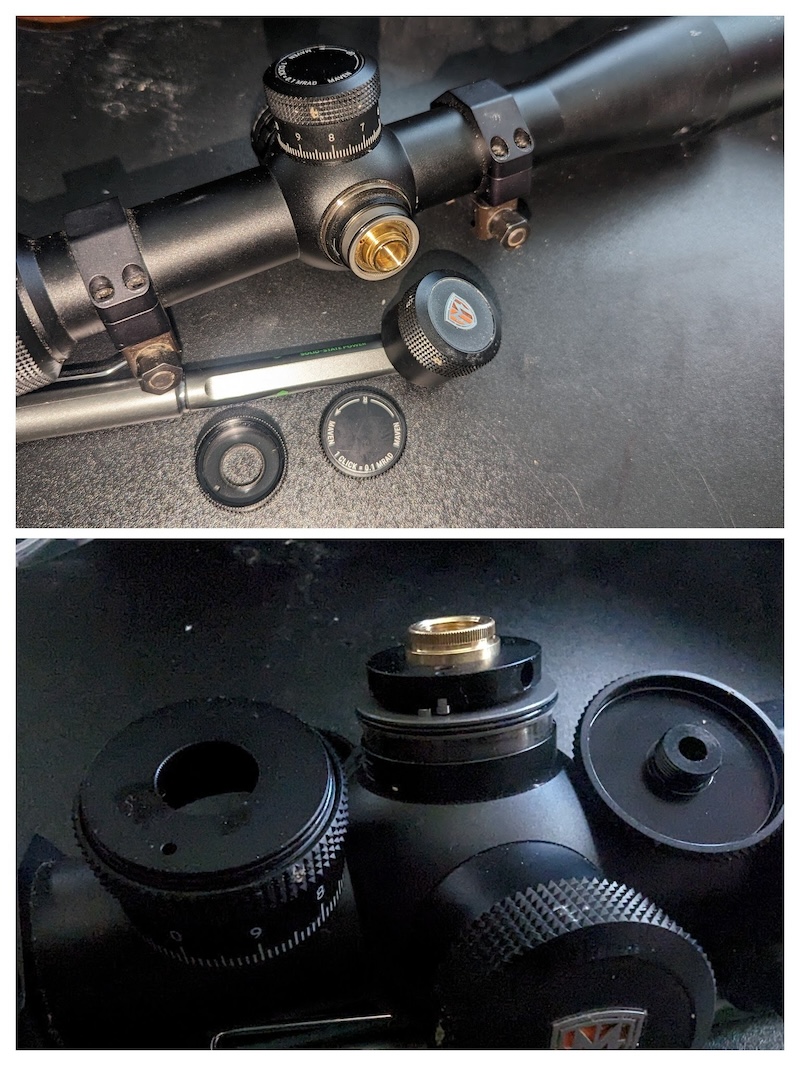
Additions to the RS1.2 – Zero Stop
The RS1.2 has a true zero stop, and it is constructed in a very common way. Once the elevation turret is removed by unscrewing the very end of it, the zero stop is exposed. Loosening the three set screws with the provided 1.5mm hex key allows the zero stop collar to be rotated clockwise so that a vertical silver pin on the collar contacts a vertical silver pin on the scope’s housing. Push the collar all the way down, tighten the three set screws, and the zero stop is set. The process should take a genuine one to two minutes.
Additions to the RS1.2 – SHR-Mil Reticle
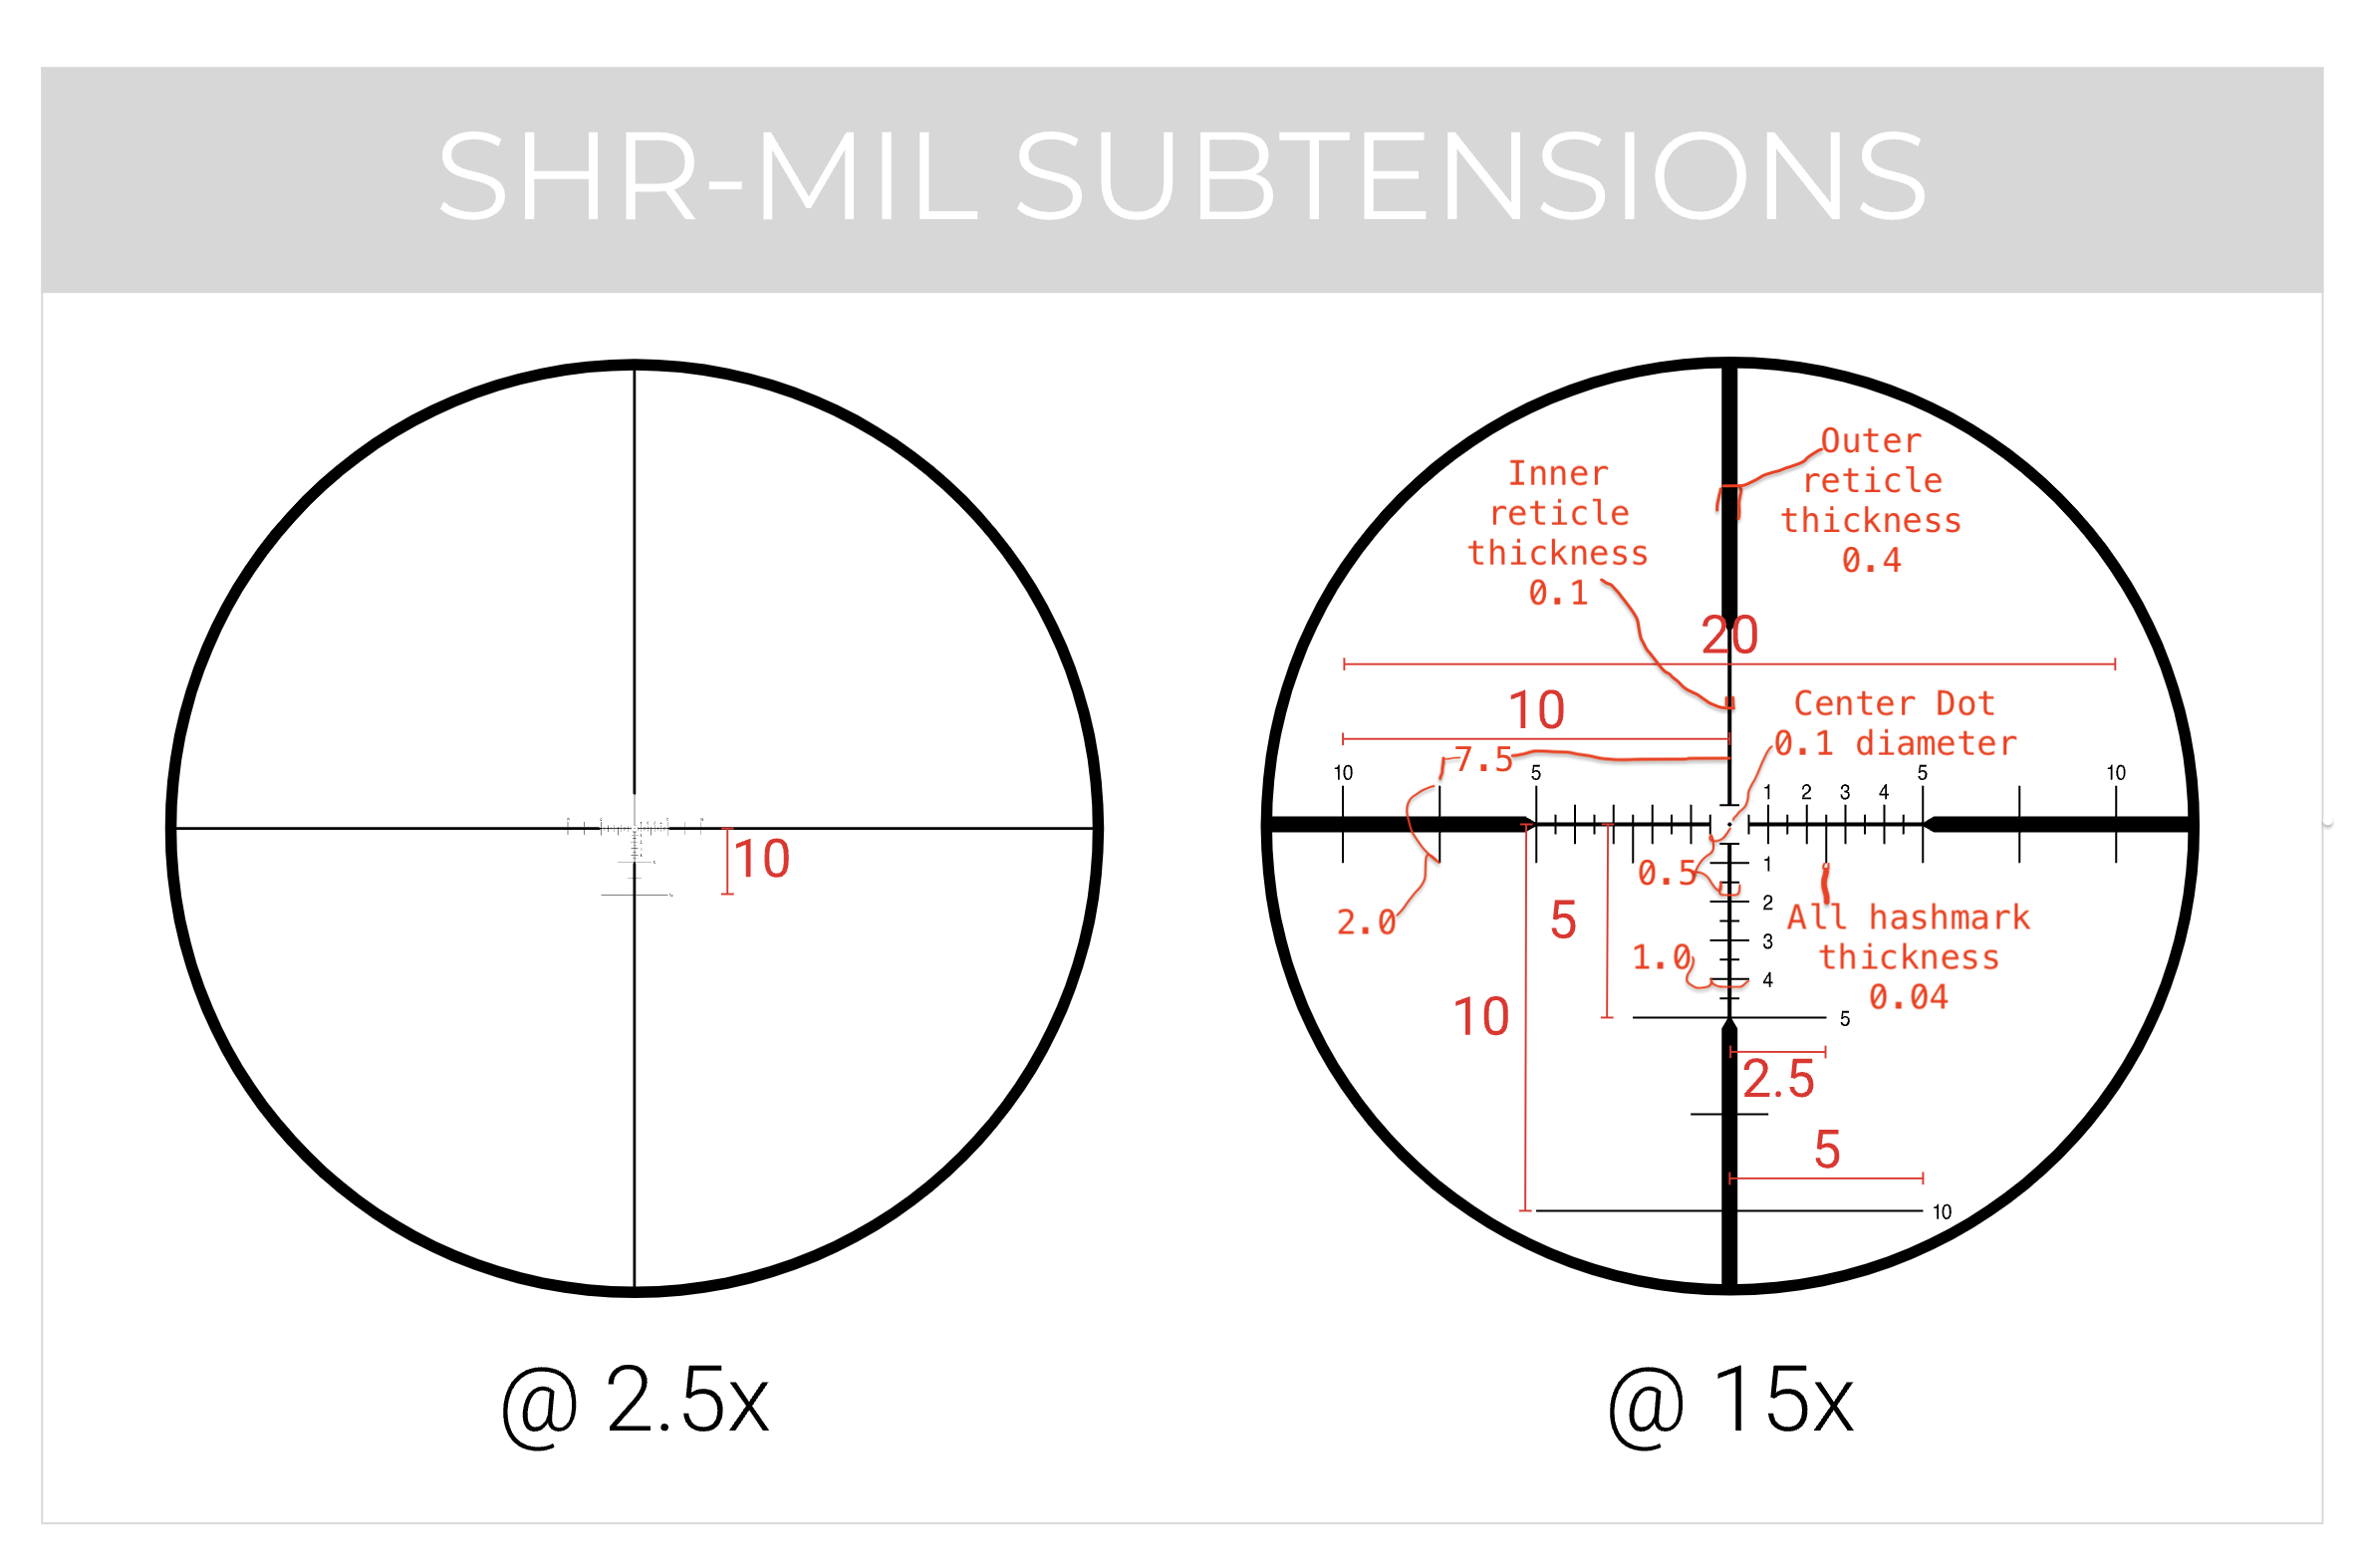
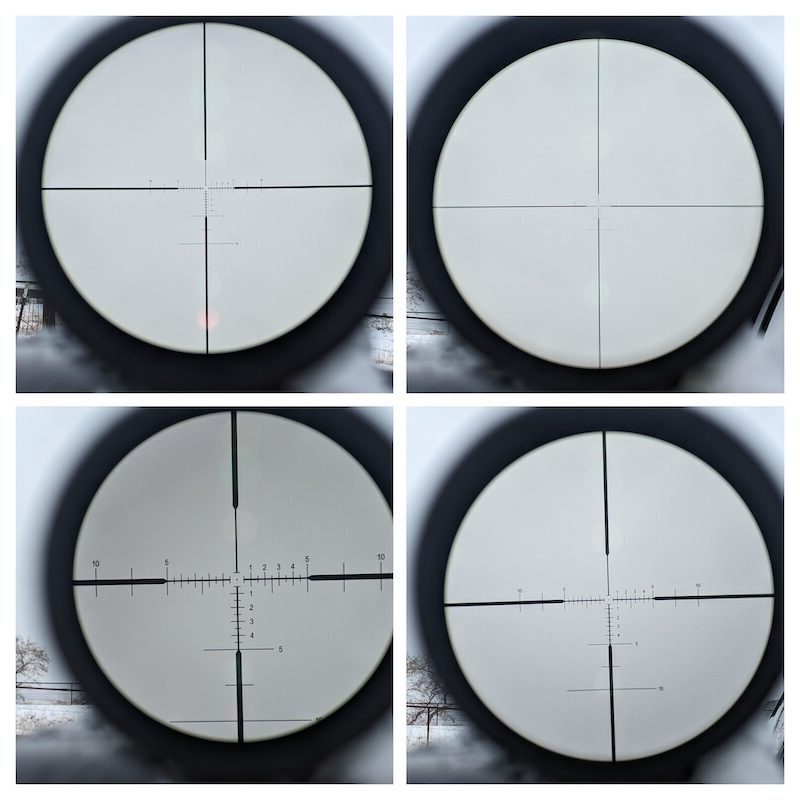
SHR stands for “Simple Hold Reticle,” and the dozen or so people who looked through my RS1.2s seemed to think that it was not overly complicated and funneled their focus to the center. My opinion is that from 2.5x-4x, it is very much like a standard duplex reticle. Around 5x-9x is where this reticle shines for me in that the hash marks are not obvious, but they are still visible if I want to use them. From 10x to 15x, I think the hash marks become apparent, and the center dot is prominent. While Maestas provided me with a very detailed SHR-mil subtension diagram, there was far too much information to it, and I thought it easiest to pull out what I think is relevant and add it to Maven’s more plain diagram.
But Can I See the Reticle in the Field?
Probably! To my eyes, the SHR-mil reticle is bolder and quite a bit easier to see than my beloved SHV’s MIL-R and SWFA mil-quad scopes I have, while being significantly better than the LRTS and Trijicon Tenmile scopes I have used. I think the illumination of the RS1.2 is underwhelming, but I can’t remember ever using it in any scope before. In all of the following pictures with animals and the short clip of the buck at the end of the zero retention video above, the illumination is on power 10.
Mule deer 2.5x and ~10x 221 yards
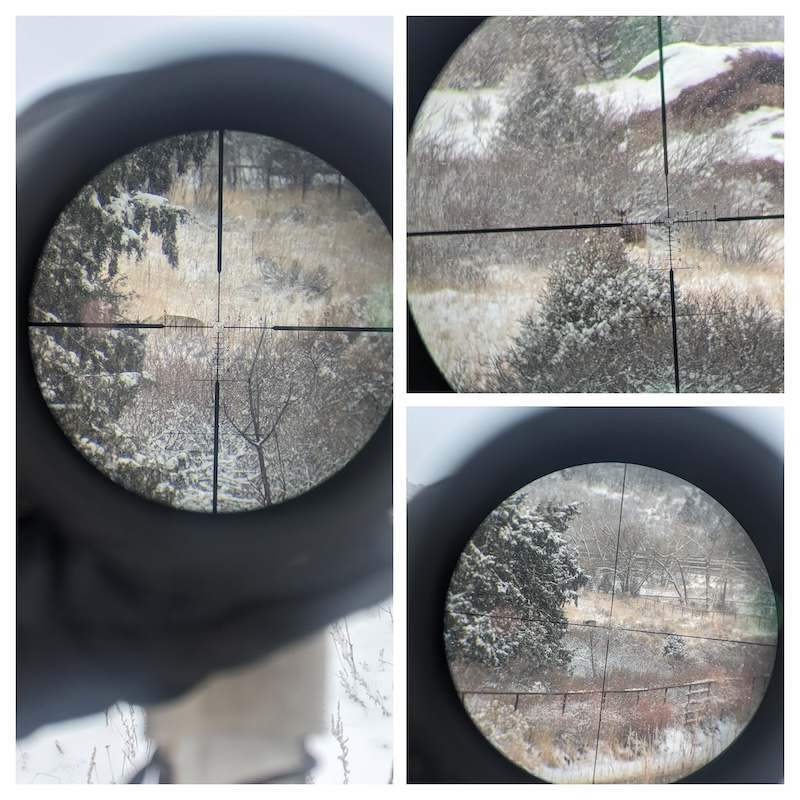
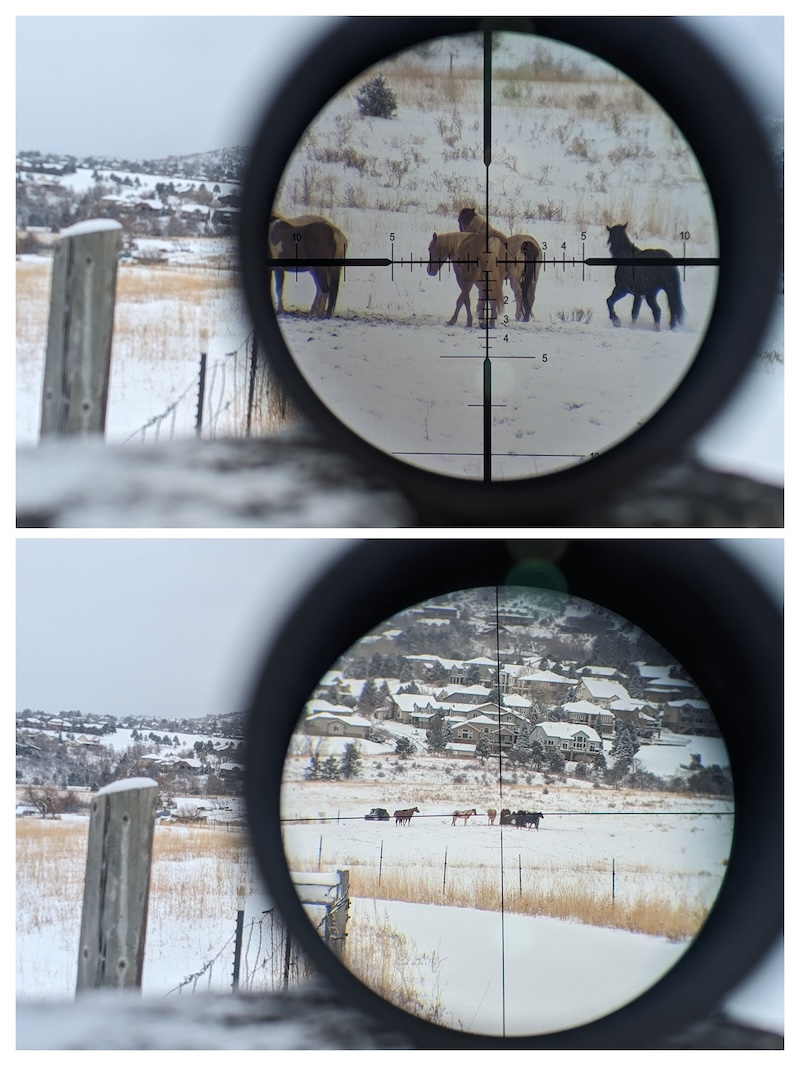
Horses ~5x and 15x 383 yards
Mule deer ~7.5x and 15x 483 yards

~6x, 2.5x, 15x, ~10x
The Qualms
I have mentioned a few times something to explain with the zero stop. I also mentioned that the black/gray RS1.2 had gone through the drops of seven prior zero retention evaluations. When I pulled the zero stop off for shooting groups D.1 and D.2, the collar would not spin freely even with the three set screws fully removed. It felt bound up, and took a lot of fuss to lift it directly up and off of the brass spindle. There was a gouge out of the collar, and the resulting hangnail-ish piece of metal was the cause of the binding. There were no issues with the zero stop spinning freely the last time I adjusted it, so my best explanation is that the numerous drops on the top turret pushed on the zero stop and caused the defect shown below.
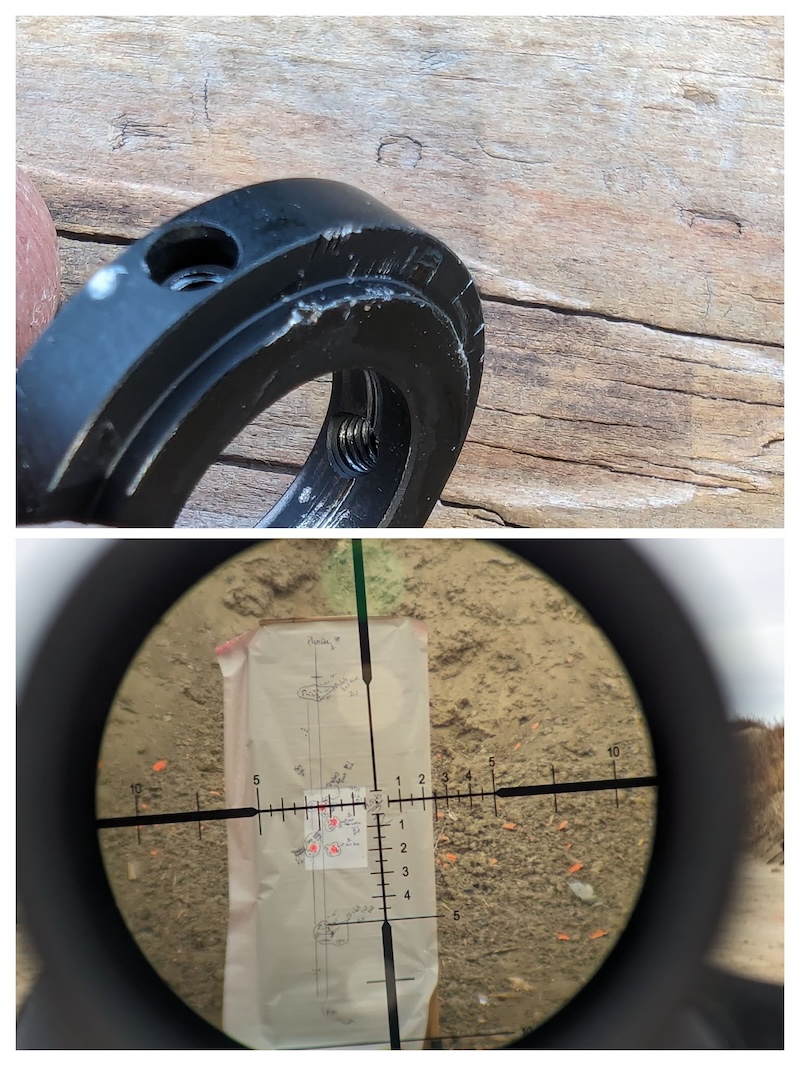
I was also curious if the reticle subtensions lined up with the adjustments that were made in the tracking test. The transition from the thin inner reticle to the thick outer reticle that is stated as being at 5 mils from the center dot did, in fact, line up spot on with 16.11” on the target. As shown above, I did my best to line this up and get a picture.
Outside of the lackluster illumination, I had a few instances with both of my RS1.2s where the elevation turret would move during the drops or while I was brushing snow off of the scope after dropping. I prefer a little more resistance, but I am also used to the longer adjustment “stroke” of my SHV’s 5 mil per rotation turrets vs the RS1.2’s 10 mil per rotation turret.
Yes, the RS1.2 is Definitely in the Mix for Go-To
Overall, I am surprised and impressed with the RS1.2. Compared to my go-to SHV, it is lighter and shorter, the reticle is easier to pick up, it has a true zero stop, and the eye box is much more forgiving. Optically and functionally, there is nothing that I can pick apart yet as being an issue. It does exactly what a rifle scope should do and is priced competitively. The two RS1.2s I have will get used for another 1500 rounds or more over the next few months with the goal of causing an issue or giving up on doing so. If a new scope is on your wants and needs list, Maven’s RS1.2 should be seriously considered.
Comment or ask Kyle questions here.
Click here to read all our optics reviews.
Click here to see all the riflescopes that have been evaluated by Formidilosus.


