


")


Iron Will K1 Ultralight Hunting Knife. Click here
Hunting knives and rabbit holes definitely go hand in hand. Back in the day, it was the typical heavy, stout, moderately sharp, Buck style knives that carried the masses. Over the years, the lightweight backcountry movement created a niche for the light, scalpel sharp, replaceable blade knife. I jumped into the second category of knife owner because I like lightweight, sharp knives, and I absolutely hate sharpening knives.
Over the years I have collected far too many of each while trying to find the perfect balance of what I want and need. So, when friend and Rokslide sponsor Bill Vanderheyden told me he was sending a prototype knife for me to test out last fall, you can bet I was excited! If you haven’t been living under a rock the last few years you know about the amazing broadheads that his company has designed and produced. Knowing how sharp and durable the heads are that Bill produces, I couldn’t wait to see and try this knife.

I received the K1 Ultralight Knife just in time for archery elk season. After a little inspection, it was put into the kill kit and awaiting use! Early September found me headed to Wyoming. With fires all around, it took a little time to find a playful elk, but it wasn’t too long before I was able to put the prototype K1 into use. You can read about that adventure here and follow along with this year’s adventures and product testing here.
My Intended Use
After snapping a few photos, it was time to get to work. My goal, with the K1 Ultralight Knife, was to do the entire elk from start to finish. Could I do it reasonably well? Was it possible? With traditional fixed blade knives, I have always used two-three for a complete breakdown. When I switched to replaceable blade knives I generally carried three, with a couple of blade options, and usually used multiple blades because they were quick and easy to keep sharp.
I’m a hacker, definitely not known for nice, precise blade work. I’m after time and efficiency. The only bone I pack is antler, so my meat is 100% boneless, which means my knife edge will be in a lot of contact with bone. I think one of the hardest things on a knife is the neck to tailbone hide opening slice. In the past, I have used a shingle blade, in a pulling motion from ears to tail, along the backbone.

A True Field Test
This bull died in an awkward position, on a pretty steep hillside. I used paracord in three directions to stabilize and help me get where I needed with the knife. The ears-to-tail slit was pretty easy, but given a choice, I would still prefer a pull cut with a shingle style blade. From there I took the onside quarters, rib meat, neck meat, and backstraps off. I laid those to cool, then did my best to flip the bull and repeat the process. At this point, the bull was pretty much done, other than severing the head and antlers. I decided to debone the meat, so it could start cooling, and then all I would have left would be lower jaw removal and removing the head from the spine.
Holding An Edge
As I deboned, I could definitely tell the knife had lost its original edge. It was still very doable, but getting to the point where if it was a replaceable blade I would be switching blades. When the deboning was finished, it was time to start the face caping, head, and jaw removal.
Editor’s Note: The K1 prototype used for this review had a much shorter back blade than the final production K1 (see photos #1 & #2 above). The increased cutting area will increase time between sharpening. Also, Les didn’t have access to the instructional video below. This video demonstrates proper use of the back blade. Had Les used this method and a final production K1, the knife should have remained sharp well beyond the elk butchering job. If you buy the K1, be sure and watch this video!
Blade Design
One thing I noticed immediately while removing the head from the spine, is the back blade. Wow, is that super handy! Prior to using the knife, I was a little skeptical about it, from a safety standpoint. I find my thumb along the top of the knife blade a lot. I figured with a knife this sharp, it could be a recipe for disaster. Through the uses though it was fine, and I had zero issues. There’s also 2” of safety grip notches along the back for your thumb to rest on. These are very nice. However, that first half inch of angled back blade could be the most useful thing I have ever found! I can’t believe how much I used it. It worked well for getting in between vertebrae and spine segments and then “prying” or leveraging with that edge. I would carry this knife, for that reason alone if need be.
Upon my return to Wisconsin, I did use the knife for some rough cuts and skinning on a couple of whitetail does. At that point, though it was pretty dull and time for a good sharpening, or another knife.
In Summary
Using the K1 Ultralight Knife on the elk, it was outstanding. I was able to do an entire mature bull elk completely, with this stand-alone knife. The only thing I would prefer, as stated above, is to use the shingle style blade for my opening cut. I’d also use it for ringing the legs, and making those opening style leg cuts. The neck-to-tail cut would be for simplicity sake, and the ringing and long leg cuts would be to save the blade on this knife.
Specs:
- Knife weight: .97oz
- Knife and Kydex sheath: 1.28 oz
- Knife, sheath, and paracord wrap: 1.5 oz
- OAL: 7.5”
- OAL blade length: 2.85”
- Knife, sheath, paracord, and box: $125
- Knife engraving + $25
- Knife and box engraving + $50
With the extremely tough A2 tool steel and heat treatment process used for their broadheads, Iron Will has been able to create this ultralight hunting knife by reducing more material than other knife companies do, while achieving superior sharpness and edge retention. There were countless design changes and over two years of testing and developing, before releasing it to sale.
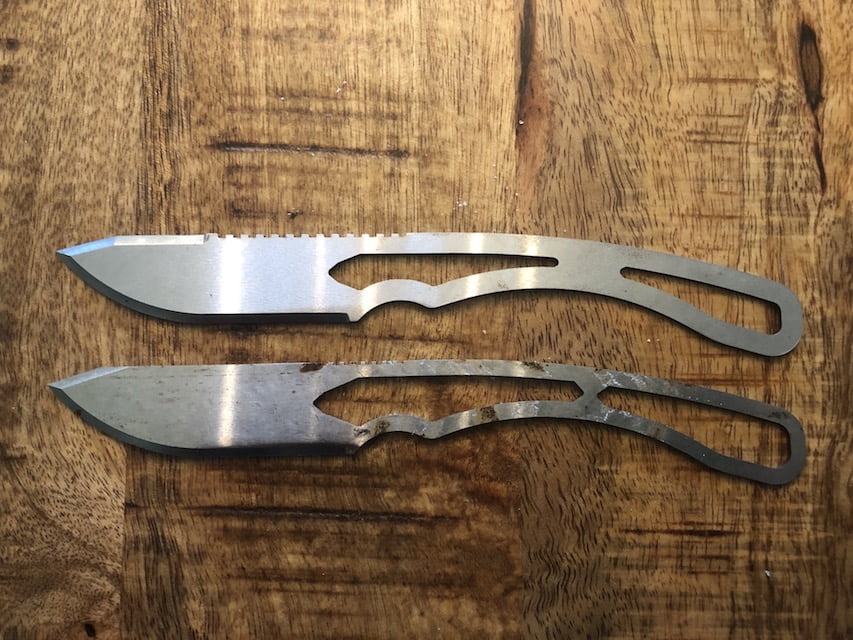
Pictured above is the prototype on the bottom, and the final K1 Ultralight Knife on the top. In the final version, you can see a little less material removed, which in turn made the knife about 50% stiffer. This is a great improvement. The prototype worked great but did have a little flex. Can’t wait until September to try this out on a bunch of NM and WY elk!

Bullet Points:
- Designed for skinning and deboning large game animals with minimal weight and superior edge retention and toughness.
- Includes Paracord that can be added for extra grip, removed for easy cleaning, or used for secondary purposes such as hanging quarters.
- Extended finger grips for blade edge control.
- ½ ounce carbide sharpener for backcountry knife and broadhead touchups, available on the website here
- Home or camp sharpenable with Iron Will double sided stone, or Lansky, Gatco, KME style sharpeners.

The short and sweet
This will fill a hole in my kill kit. For me, it’s not a do-all. Can it be? Absolutely. However, I’m particular. I’ll still carry one replaceable blade knife, and another with a shingle blade. I want to have the K1 Ulralight Knife sharp and ready when it’s time for the heavy lifting. If I’m really nitpicking, the Kydex sheath is a little loose. I’ll wind up losing it somewhere, that’s just how I roll. I’ll have this along on all my backcountry hunts and I really think you should too. There isn’t really a negative about this knife. Order Here
You can comment or ask Les questions here.


