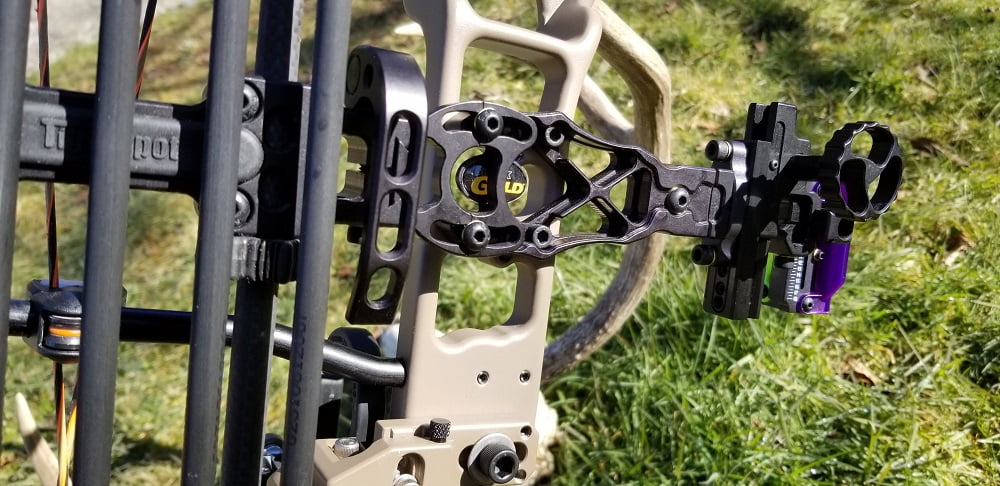
Third Axis Adjustment. Over the past 10-12 years, I have seen these words come up more and more. It has become a staple among the target and western hunters alike. But what is it? What does it do? Why is it important to me as an archer and hunter?
What is 3rd Axis?
Some may know that it is an adjustment that is on my new top end sight. But may not know what it does or how it affects your shooting accuracy. It really comes into play when you’re standing off camber 45 degree up or downhill shot. Or sitting high up in a treestand shooting a critter tight to the tree below you.
In this article, I will break down what every archer should know about 3rd Axis and sight leveling in general. Everything from basic setup to how to properly set the 3rd Axis on that new fancy sight with all the bells and whistles. What tools you will need and more importantly what you don’t need! And if you take your bow to a shop you will know if it was set correctly.
What are the Axes of a bow sight?

First Axis
First Axis has very little effect on sight level or accuracy. It is as if the sight head tilted to you or away from you top to bottom of the head. All current sights have this locked down and there is no need to adjust it.

Second Axis
Second Axis is what so many work so hard to perfect. It is the level (plumb) of the pins and or the slide bar if it is a moveable sight. This is where you make sure that all the pins are in a perfect plumb line so you don’t have arrows going left or right at farther ranges. We will say you’re perfectly centered at 20 yards but as you shoot farther and farther out your left and right impacts become farther and farther away from the center.

Third Axis
Third Axis is like the door hinge of the sight. As if the sight head was on a saloon door hinge. Swinging in and out. If this incorrectly set when you shoot up or downhill your bubble level in your sight will read incorrectly and indicate you to tilt or cant your bow causing you to miss left or right.
This is where we get into the meat and potatoes of setting up a sight. There are all kinds of benchtop sight levelers out there (there are some very expensive ones that say they can be used to set up 3rd Axis but can’t and we will get into that later.)
Here are the tools you will need to set up your sight correctly.
- Bow Vice, very important tool to hold a bow in a precise position while making adjustments to the sight.
- Levels, 4’ and one torpedo (small 6”-8”)
- Hamskea 3rd Axis level
That’s it. If you’re already working on your bows you should have a vice and most people have levels around the house. The only thing that I would tell you to buy is a Hamskea 3rd Axis level. You can order them online from Black Ovis.
Leveling your sight
First thing is to get your bow in the vice and make it level/plumb with the 4’ level by going limb-to-limb and lock down the vice.

Some sights have a level that is adjustable like on the Black Gold Sights. We will not pay attention to these until further steps.
You will use the torpedo (horizontal) level to make sure that the sight bar is plumb. This is the most crucial step in leveling a sight. Check and double check that the bow and sight bar are both plumb. And lock it down.

Next step is setting the bubble level on the sight. Make adjustments to level the bubble and tighten. Check everything to make sure they are all level.
If your sight doesn’t have a moveable level, it should show level. If it isn’t, make sure everything is level and check again.
Now that you are sure that the elevation (slide) bar and the bow are both plumb, you can set the level in the sight housing if it is moveable.
Now the good stuff
3rd Axis leveling is done with the Hamskea level mounted to the bow’s sight window or sight bar in a manner that the pin is parallel /running the same direction as the pins or elevation bar. Make sure both levels are the same.

Now mark a plumb level line on a wall or check one of your doorframes and make sure it is level. Grab your bow and draw it back and look through the peep looking at the line or doorframe. Step forward creating a steep angle down.

While holding that angle, line up the two points on the Hamskea 3rd axis level pin with the line or doorframe and look at the level bubble in your sight housing. If it is level you are good to go. If not, you will make adjustments to your 3rd axis adjustment and repeat this until it is level.
I repeat, 3rd Axis leveling must be done at full draw! The reason for this is that when you draw the bow you and the cables are imputing torque and load into the riser of the bow which in turn moves the sight. While on flat level ground, it doesn’t affect the level in the sight housing. On uneven ground, it does and you fight it back to being level which cants the bow making you miss left or right.
You can comment or ask Michael questions here.

Bio
Michael May is the owner and operator of May’s Custom Archery in a suburb of Seattle WA called Puyallup. He has been a passionate hunter for 30 years. Being an opportunity hunter, Mike has used all 3 modern methods with archery being his biggest passion. He opened his archery shop in 2009 after working in other shops in his younger days. Mike found a need for a shop that helped customers on a one on one basis that wasn’t biased to brand and delivered great technical support to hunters and sportsmen alike.
- [email protected]
- (360)316-9710
- IM me wabowman


